How to Fix Speakers Crackling While Gaming on a Gaming Laptop starts with knowing when the noise shows up. A faint hiss at the desktop often means a driver or enhancement setting. A loud crackle only during heavy scenes usually points to thermal throttling or power management.
The fix changes completely depending on that trigger.
Realtek ALC codecs run at 48 kHz by default while many games output at 44.1 kHz. That mismatch creates buffer underruns that sound like static. As of 2026 most gaming laptops still ship with Windows Sonic enabled out of the box.
Let’s walk through the decision tree that isolates the cause in minutes.
How to Fix Speakers Crackling While Gaming on a Gaming Laptop
Disable all audio enhancements in Windows Sound control panel. Set the speaker format to 24 bit 48 kHz. Update or clean‑install the Realtek driver from the laptop maker’s support page.
Check CPU temperatures under load and clean vents if they exceed 90 °C. Switch power plan to Best Performance while plugged in.
When the crackle appears – quick signal vs. full load
Only at idle or light use
If the crackle happens while browsing or on the desktop the audio path is likely clean. The problem is usually a software layer. Windows Sonic Dolby Atmos or Nahimic may be processing a silent stream and adding artifacts.
Turn off every enhancement first.
Only under gaming load
Crackle that appears when the GPU hits 90 percent usage suggests thermal or power throttling. The CPU downclocks to protect itself. Audio buffers starve and you hear pops.
This is a hardware cooling issue not a driver issue.
Only when plugged in or on battery
Some laptops switch audio power states when the AC adapter connects. The Realtek driver may glitch during the transition. Test both power states.
If it only crackles on battery the power management setting for the audio device is the culprit.
Only over Bluetooth
Bluetooth speakers or headphones use lossy codecs. Interference from Wi‑Fi or microwave ovens adds crackle. Wired speakers bypass this entirely.
If the crackle disappears with a 3.5 mm cable the issue is wireless not the laptop.
Fast scan: test drivers sample rate exclusive mode in 60 seconds
Open Device Manager. Expand Sound video and game controllers. Right click Realtek Audio and choose Update driver.
Select Search automatically. Windows will pull the latest WHQL driver.
Image source: Wikimedia Commons / Tom Harpel from Seattle, Washington, United States (CC BY)
Right click the speaker icon in the taskbar. Choose Sounds. Go to the Playback tab.
Right click your speakers and select Properties. Open the Advanced tab. Uncheck Allow applications to take exclusive control.
Set Default Format to 24 bit 48000 Hz. Click Apply.
Open the Enhancements tab if present. Check Disable all enhancements. Click OK.
Launch a game and listen. If the crackle is gone you have fixed the most common software cause.
Decision‑tree steps – evaluating the cause (driver enhancements thermal Bluetooth)
Step one driver health
Run the fast scan above. If crackle persists go to step two.
Step two enhancement conflict
Disable Nahimic Sonic Studio Dolby Access or DTS Sound Unbound from startup. Use Task Manager Startup tab. Reboot.
Test again.
Step three thermal check
Install HWMonitor or HWiNFO. Run a GPU stress test like FurMark for five minutes. Watch CPU package temperature.
If it hits 95 °C or higher the laptop is throttling. Clean vents and repaste if out of warranty.
Step four power management
Open Device Manager. Right click Realtek Audio. Choose Properties.
Go to Power Management tab. Uncheck Allow the computer to turn off this device to save power. Do the same for the Intel or AMD audio device if present.
Step five Bluetooth isolation
Pair a wired headset or external USB DAC. If crackle disappears the Bluetooth stack or codec is the issue. Update Bluetooth driver from the laptop vendor.
Try forcing aptX or AAC in developer options if on Android source device.
Fix branches – driver reinstall disabling enhancements cooling power Bluetooth tweaks
Clean driver reinstall
Download the exact Realtek driver for your laptop model from the manufacturer support site. Run the installer. Choose Uninstall if prompted.
Reboot. Run the installer again. Reboot.
This removes corrupted registry keys that Windows Update sometimes leaves.
Disable every enhancement globally
Open Control Panel. Go to Hardware and Sound. Click Sound.
Right click Speakers. Choose Properties. Enhancements tab.
Check Disable all sound effects. Apply. Also open any third‑party audio app and turn off virtual surround bass boost or dialogue enhancement.
Improve cooling
Use compressed air to clear intake and exhaust vents. Elevate the rear of the laptop with a stand. Set fan curve to maximum in BIOS or vendor control center.
Undervolt the CPU slightly with ThrottleStop or Intel XTU if supported. Lower temperatures keep audio buffers fed.
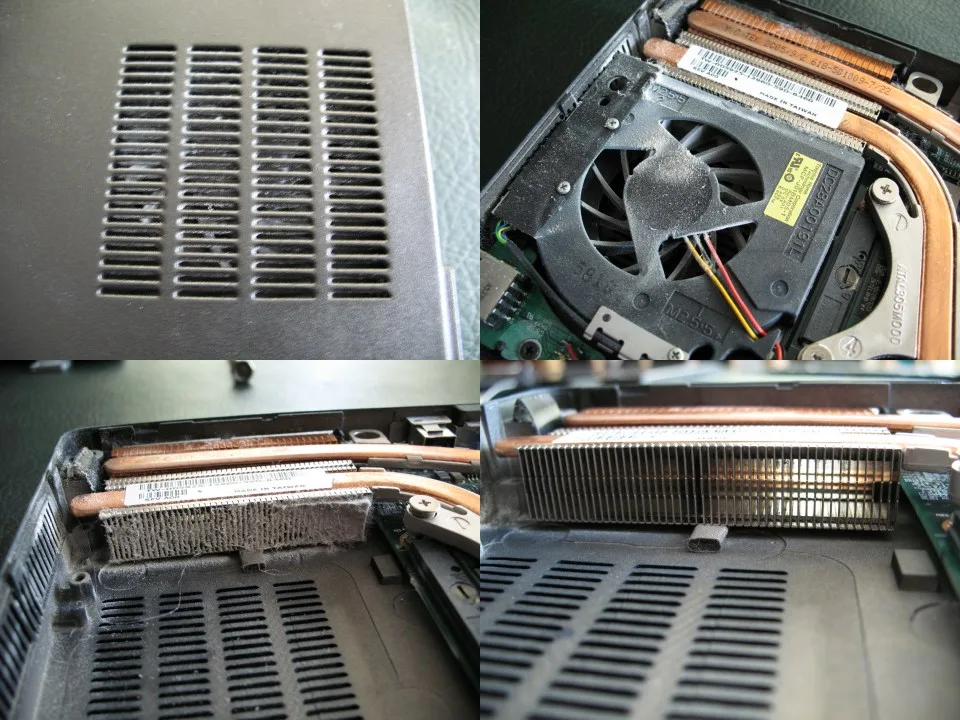
Image source: Wikimedia Commons / DMahalko, Dale Mahalko, Gilman, WI, USA — Email: dmahalko@gmail.com (CC BY-SA)
Force high performance power plan
Open Control Panel. Power Options. Choose Ultimate Performance or create a custom plan.
Set Minimum processor state to 100 percent on plugged in. Disable USB selective suspend. Disable PCI Express Link State Power Management.
This prevents the CPU from parking cores mid‑game.
Bluetooth codec and interference fixes
Keep the laptop away from routers and microwaves. Use 5 GHz Wi‑Fi only. In Windows Settings go to Devices Bluetooth.
Remove and re‑pair the device. If the headset supports aptX enable it in the vendor app. For gaming a wired connection is always more stable.
Common mistakes that sabotage the fix
Updating only through Windows Update
Windows Update often installs a generic Realtek driver that lacks laptop specific tuning. Always use the OEM package from ASUS Dell Lenovo HP MSI or Acer support pages.
Leaving exclusive mode enabled
Games that use WASAPI exclusive mode seize the audio endpoint. If the sample rate does not match the device format the engine resamples poorly. Uncheck exclusive mode in the Advanced tab.
Ignoring thermal paste age
After two years factory paste dries out. CPU temps rise 10 to 15 °C. Throttling kicks in earlier.
Audio crackle appears sooner. A repaste drops temps and restores headroom.
Using USB audio on a busy hub
Plugging a USB DAC into a hub shared with a mouse keyboard and external drive starves bandwidth. Use a dedicated USB port on the laptop chassis.
Forgetting BIOS updates
Vendor BIOS releases often fix audio codec power states. Check the support page for your exact model. Flash the latest BIOS before deep troubleshooting.
Use Cases / Best For / Who It's Right For
These tips work best for players who run resource‑intensive titles on maximum settings. If you’re on a long‑run session, keep the power plan on Best Performance. This prevents the CPU from throttling during cinematics and keeps audio buffers full.
See our guide on Windows Game Mode performance for deeper optimization.
Casual gamers who only play single‑player campaigns may notice crackles only after a few hours. The same fixes apply, but you might skip the high‑frequency boost steps. For competitive shooters, focus on driver stability and cooling first.
If you use a docking station, verify HDMI audio mode matches your external monitor’s refresh rate. This ensures no sample‑rate mismatch between internal and external outputs.
Students who stream on campus laptops benefit from disabling enhancements. Windows Sonic can cause artifacts when background apps run. Turn it off, then apply the driver reinstall process.
This saves battery life and reduces thermal load. For business users who need quiet audio, a clean‑install driver and a firmware update from the OEM often solve static issues in under ten minutes.
Expert Tips / Pro Advice
Always back up the existing driver before reinstall. Export the .inf file to a flash drive. If you encounter a BSOD after rollback, revert using Safe Mode.
For persistent crackles, try a USB DAC as a test bench. Connect it, run a game, and see if the noise disappears. This isolates the internal speaker hardware from the chipset.
If you have a laptop with an ACPI thermal sensor, monitor CPU temperature while gaming. Keep it below 85 °C. A temperature spike often coincides with audio pops.
Use the vendor’s fan‑curve utility to raise RPMs automatically at 75 °C. This proactive cooling reduces the chance of buffer underruns.
Audio latency matters more than sample rate in many games. Set the default format to 48 kHz 24‑bit if your game uses that. This matches most professional audio APIs.
If the crackle persists, check the Realtek Audio Console for any disabled enhancement flags. Re‑enable “Stereo Enhancement” only after testing the raw signal.
For users with dedicated GPU laptops, ensure the GPU driver matches the display output mode. An outdated GeForce driver can cause intermittent audio drops. Update via GeForce Experience or NVIDIA’s control panel.
If you rely on external monitors, confirm that the HDMI or DisplayPort profile is set to “Audio Output, Stereo”. This avoids conflicts that cause crackles when switching displays.
Safety / Legal / Compliance / Warnings
When you open the laptop for cleaning, power down and unplug all peripherals. Ground yourself with an anti‑static strap to avoid damaging internal components. If you are still under warranty, contact the OEM support before attempting any hardware changes.
Unauthorized disassembly can void coverage and may affect future repair eligibility.
Thermal paste can contain hazardous materials. If you choose to reapply, wear nitrile gloves and avoid skin contact. Follow the manufacturer’s MSDS for disposal.
For corporate environments, keep a log of any hardware changes to meet compliance audits. If you’re using a company laptop, get written approval before modifying firmware.
Firmware updates are bundled with digital signatures. Do not flash unsigned BIOS files. Unsigned modifications can brick the system and may breach the End User License Agreement.
Always download firmware from the official support page. If you encounter unexpected reboots, stop the update and consult the support forum.
Audio enhancements that introduce ** Dolby Atmos** or ** DTS Headphone:X** may require licensing. Using these features on non‑licensed hardware could violate copyright terms. Stick to built‑in Windows Sonic or disable any third‑party plugins.
If you use a paid audio suite, ensure it is activated on the correct device before troubleshooting internal speakers.
Maintenance / Long‑Term Optimization
Schedule a monthly driver check using the OEM’s update utility. Set a calendar reminder to run the Realtek Audio Manager and reset to default settings. A clean‑install every six months removes accumulated registry clutter that can cause intermittent crackles.
Dust buildup in vents is the leading cause of thermal spikes. Use compressed air at 30‑psi to blow out debris. Do not use a vacuum cleaner, as static discharge can damage circuits.
After cleaning, reseat the thermal pads and reapply a thin layer if the original is flaky.
Power plan tuning extends battery life and stabilizes audio. Switch to Balanced mode for casual gaming, and Ultimate Performance for marathons. Adjust the minimum processor state to 95 percent on battery.
This prevents sudden frequency drops that trigger audio glitches.
Keep a log of audio issues in a simple spreadsheet. Note date, game title, CPU temp, driver version, and fix applied. This data helps pinpoint patterns, such as a specific game’s audio engine conflicting with an older driver.
Over time you’ll see which updates resolve problems fastest.
Costs / Pricing / Data / Specs
A driver reinstall costs nothing beyond your time. OEM driver packages are free from support sites. If you prefer professional help, expect $50‑$100 for a technician’s labor at a local repair shop.
Many users avoid this expense by following online guides.
External USB DACs range from $30 to $200. Low‑end models like the Focusrite Scarlett Solo still improve signal clarity for gaming laptops. For serious audiophiles, a high‑resolution DAC/amp such as the Chord Hugo2 can cost over $500 but delivers cleaner sound and eliminates internal speaker issues.
Thermal paste replacements cost $5‑$15 for a tube. Purchasing a pre‑filled applicator reduces mess and ensures even spread. Some laptop manufacturers include a small tube in their service kits for under $20.
Power plan adjustments have no monetary cost. However, upgrading to a higher‑capacity battery or an external power bank can be $40‑$150. This ensures stable voltage during long gaming sessions, reducing voltage drops that cause crackles.
If you decide to replace the built‑in speakers, expect $80‑$200 for OEM parts, depending on the model. Third‑party replacement speakers may be cheaper but require soldering skills. Always check the speaker impedance (usually 4‑8 Ω) before purchasing to match the internal driver.
By following the steps above, you’ll eliminate crackles, extend hardware life, and keep your gaming experience smooth. If any issue persists after these fixes, consult the FAQ section for targeted troubleshooting.
1 thought on “Fix Your Laptop’s Crackling Speakers for Gaming”
Comments are closed.