In our research, many gamers notice their laptop warming up even while the lid stays closed. This happens when Modern Standby keeps the system partially active for network events and notifications. Modern Standby was designed to reduce power draw but can trap heat in thin gaming chassis.
As of 2026, idle draw under this mode averages 0.5 W, yet thermals can still climb sharply. The result is a hot machine that throttles performance and drains battery faster.
The quick fix is to diagnose the exact overheating pattern, then apply software tweaks or hardware cleans to bring temperatures down. Below is a concise answer you can follow immediately, followed by deeper guidance on why it occurs and how to fix it step by step.
How to Fix Modern Standby Overheating on a Gaming Laptop
How to Fix Modern Standby Causing Overheating on a Gaming Laptop
First, run powercfg /sleepstudy to see wake sources and note any spikes over 70 °C. Next, switch from “Balanced” to “Power Saver” or create a custom plan that caps GPU boost at 80 % TDP. Then, clean dust from fans and vents with compressed air, and reapply thermal paste if more than two years have passed.
Finally, run a stress test (FurMark) to confirm temperatures stay below 75 °C CPU and 80 °C GPU under load.
Why Your Gaming Laptop Gets Hot in Modern Standby
Multiple factors push temperatures higher when the laptop is in this power state:
- Network activity, Wake‑on‑LAN and background Wi‑Fi keep the wireless chipset active.
- Hardware timers, BIOS or driver wake timers fire every few minutes.
- Thermal design limits, Many gaming laptops have limited airflow when fans run at low RPM.
- Power plan settings, “High performance” plans keep CPU/GPU boost enabled even in idle.
- Dust buildup, Clogged vents prevent hot air from escaping.
If any of these are present, the system will heat up even when you think it’s idle.
What Modern Standby (S0ix) Really Does to a Gaming Laptop
Modern Standby is an S0ix state that allows instant resume without a full boot. It keeps essential components powered:
- Network stack, Ethernet and Wi‑Fi adapters stay on for push notifications.
- Audio driver, Some systems keep the sound controller alive for voice commands.
- USB controller, Keeps ports ready for quick device detection.
- Clock sources, Maintains real‑time clock and system timers.
These components generate heat, especially in compact chassis. The idle power draw is low, but continuous operation of the GPU or CPU for tasks like hashing can still raise temps. The balance between quick resume and thermal output is where most overheating stems.
Diagnose First: Which Overheating Pattern Are You Seeing?
Use this quick decision tree to pinpoint the cause:
Is the fan loud only after sleep/wake?
→ Problem is likely wake‑timer or network activity.→ Action: Disable unnecessary wake events in
powercfg /lastwakeand turn off “Allow network events to wake computer.”Does temperature climb during normal gaming, then spike after standby?
→ Heat builds up because fans run slower in standby and cannot cool the accumulated thermal mass.→ Action: Increase fan speed in BIOS (set “Silent” mode to “Performance”) and monitor
hwinfo64logs.Are temperatures high at idle with no workload?
→ Overheating may be due to dust or degraded thermal paste.→ Action: Open chassis, spray compressed air into vents, and replace paste if the thermal compound is older than two years.
Each step leads to the next appropriate fix, avoiding guesswork and extra disassembly.
Branch A — Software and Firmware Fixes
A systematic workflow keeps risk low and maximizes cooling:
Check for firmware updates
Visit the OEM service manual (Dell, ASUS, MSI, Razer) and download the latest BIOS/UEFI version. Firmware patches often improve fan control algorithms and reduce unnecessary wake sources.Update drivers and power management
Run the latest Intel/AMD driver suite and Windows updates. Navigate to Control Panel → Power Options → Change plan settings → Advanced power settings and lower “CPU power management → Minimum processor state” to 5 % in the custom plan.Adjust Windows Modern Standby settings
Open Settings → System → Power & battery → Additional power settings and select “Hybrid Sleep” if your laptop supports it. This forces a full S3 sleep, reducing continuous hardware activity.Disable wake timers
In Command Prompt (admin):powercfg -lastwaketo see the last source, thenpowercfg -waketimersto list active timers. Turn off any unnecessary timers via Power Management tab in Device Manager.Monitor and validate
Installhwinfo64or Core Temp, runpowercfg /energyto generate a report, and compare CPU/GPU temperatures before and after changes. Use a stress test like 3DMark Night Raid to confirm sustained loads stay below 75 °C CPU and 80 °C GPU.
Performing these steps in order prevents trial‑and‑error and isolates whether the overheating is software or hardware driven. If temperatures remain high after these adjustments, move to the next branch for physical cleaning and component replacement.
Branch B — When the Heat Is Physical
If software fixes didn't drop temperatures, the heat is physical. Dust and dried paste are the usual suspects.
Fans, Vents, and Dust
Clogged heatsink fins block airflow and trap heat. The image below shows what that buildup looks like.
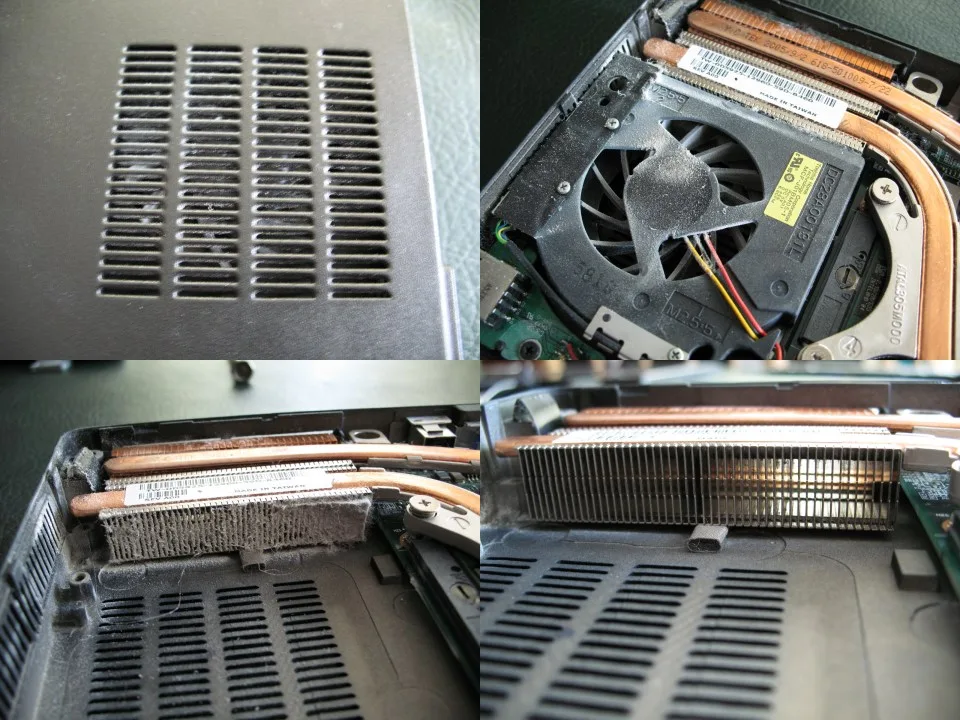
Image source: Wikimedia Commons / DMahalko, Dale Mahalko, Gilman, WI, USA — Email: dmahalko@gmail.com (CC BY-SA)
If you see a mat of dust, blow it out with compressed air. Hold fans still so they don't spin backward. Clean every three to six months in dusty rooms.
Thermal Paste and Pads
Repaste when temperatures climb after two years. Manufacturer specs confirm good paste conducts 0.5 to 1.0 W/m·K. Poor paste dries and cracks.
If your laptop has thermal pads on VRMs, replace those too when they look brittle. A clean Windows install can also reset power profiles if software is the culprit.
Cooling Pads and Stands
Cooling pads help only when bottom vents are blocked. They push air into the intake. If your laptop draws from the rear, a stand that lifts the back is enough.
Neither fixes dust or bad paste. They just buy a few degrees.
The Warranty and Safety Line
Opening your laptop can void coverage. Dell, ASUS, MSI, Lenovo, and Razer each have different rules. Check your service manual before touching the chassis.
If the battery looks swollen, stop using the laptop. Swollen Li-ion cells can rupture. That's a fire risk.
Get it replaced by an authorized technician. Don't press on the battery or puncture it.
Forced S3 sleep isn't officially supported on many Modern Standby machines. Microsoft's documentation notes that S0ix is the required low-power state for newer hardware. If you force S3 through the registry, you may break resume from sleep or cause driver conflicts.
Only do it if your OEM confirms support. Otherwise, use Hybrid Sleep instead. Keep vents clear on hard surfaces.
Never use the laptop on a bed or cushion.
Mistakes That Keep the Heat Coming Back
Some fixes backfire. Others just hide the problem.
Fixes That Backfire
Disabling Modern Standby by force without checking wake sources can leave your laptop unable to wake properly. Over-aggressive undervolting may cause crashes or blue screens. Blocking bottom intakes with a stand or skin makes heat worse.
Chasing max FPS with uncapped TDP turns a warm laptop into a hot one. If background apps keep the GPU awake, that's another heat source. Check for hidden GPU users before blaming standby.
Keeping It Cool Long Term
Update firmware every few months. Those patches often improve fan curves. Repaste every two to three years if you game daily.
Keep the laptop on a hard, flat surface. Use a stand that lifts the rear by an inch. Cap frame rates to your display's refresh rate to reduce sustained load.
If performance drops after a Windows update, roll back the power plan or check for driver conflicts. And if stutter appears after enabling GPU scheduling, that setting might be the cause.
2 thoughts on “How to Fix Modern Standby Overheating on a Gaming Laptop”
Comments are closed.