If you've ever pressed Del or F2 during boot and landed in a blue or grey menu full of acronyms, you've already met UEFI firmware. So what is uefi firmware in a gaming pc, exactly? It's the software baked into your motherboard that wakes up the hardware, hands control to Windows, and decides which settings your CPU, RAM, and GPU actually run at.
Per the UEFI Forum specification, modern boards ship with UEFI version 2.x, which replaces the old BIOS with a 32-bit or 64-bit pre-boot environment and support for drives well past the 2 TB MBR limit. That matters because features like Secure Boot, TPM 2.0, and XMP memory profiles all live in this menu. Let's walk through what you're looking at and where the gaming-relevant settings hide.
what is uefi firmware in a gaming pc
UEFI firmware is your motherboard's pre-boot software. It initializes hardware before Windows loads. It also stores settings like Secure Boot and TPM.
On gaming PCs, it controls memory profiles and boot order. Most boards made after 2011 use UEFI.
UEFI stands for Unified Extensible Firmware Interface. It replaced the older BIOS firmware that shipped on PCs for decades. The UEFI Forum publishes the spec, currently at version 2.10 as of 2026.
Think of it as a tiny operating system that runs before your real one.
On a gaming PC, UEFI does three jobs. First, it wakes the CPU, RAM, and GPU. Second, it reads the boot order and loads the Windows bootloader.
Third, it exposes tunable settings like memory speed and fan curves. All of this happens in a few seconds during POST.
The firmware lives in a flash chip on the motherboard. That's why you can update it without opening the case. It also stores your settings in NVRAM, so they survive power loss.
If you're planning a build, the firmware version matters as much as the parts. Our guide on firmware version and component support explains why. A newer CPU often needs a newer UEFI before it will boot at all.
Why the UEFI Screen Looks the Way It Does (and Where Things Hide)
Each manufacturer skins UEFI differently. ASUS calls it AI Tweaker. MSI uses Click BIOS.
Gigabyte and ASRock have their own layouts. The underlying settings are the same, but the menus move around.
A typical UEFI screen has five tabs. Main shows CPU and RAM info. Tweaker or OC holds memory and voltage settings.
Advanced covers CPU features and storage. Boot sets priority and mode. Security holds Secure Boot and TPM.
The visual clutter comes from legacy options. CSM, or Compatibility Support Module, adds old BIOS-style boot entries. Keeping CSM on clutters the boot menu and slows POST.
Most gaming PCs should run pure UEFI mode.
Settings also hide behind sub-menus. Resizable BAR often sits under PCI or Advanced, not Boot. TPM may be labeled PTT on Intel boards or fTPM on AMD boards.
Knowing the alias saves a lot of hunting.
When you verify RAM support before buying, check whether XMP profiles are listed too. That saves a trip back into firmware later.
The UEFI Features That Actually Matter for Gaming
Not every toggle affects your frame rate. These four do.
- Secure Boot: verifies the bootloader signature. Required for some anti-cheat like Vanguard. Also required for Windows 11.
- TPM 2.0: a hardware security chip. Windows 11 demands it. Often labeled PTT or fTPM.
- XMP / EXPO: loads rated memory speed. Without it, DDR5 may run at a slow JEDEC default.
- Resizable BAR: lets the CPU access all GPU VRAM at once. Can improve 1% lows in some titles.
Two more settings matter for builders. Above 4G Decoding enables ReBAR on many boards. Virtualization (VT-x or AMD-V) helps if you run VMs or emulators.
One caution. XMP can fail to train on some kits. If the system won't POST after enabling it, clear CMOS and try a lower profile.
Aggregate user reviews often flag specific board and kit pairings.
Before you tune, check compatibility checks before buying parts. A fast kit that isn't on the QVL may need manual tuning.
Reading Your UEFI Menu: Key Screens and Identifiers
Manufacturers label things inconsistently. Here's a decoder.
- Main / System Info: CPU model, RAM amount, BIOS version, system time.
- Tweaker / OC: XMP toggle, CPU ratio, voltage, fan curves.
- Advanced: CPU features, storage mode (AHCI/RAID), USB config, network stack.
- Boot: boot priority, UEFI/Legacy mode, Fast Boot, CSM.
- Security: Secure Boot, TPM, supervisor password.
Watch the identifiers. "UEFI" in a boot entry means native mode. "Legacy" or "CSM" means old mode.
A drive showing twice, once each way, means both modes are active.
The firmware version sits on the Main or System Info screen. Note it before updating. If you're installing a fast NVMe drive, confirm the M.2 slot is enabled in Advanced first.
Boot entries matter too. Windows Boot Manager should top the list for a clean Windows install. If a USB installer won't appear, check that USB boot is enabled and Secure Boot isn't blocking it.
UEFI vs. Legacy BIOS: Side-by-Side Comparison
Legacy BIOS is the older firmware standard. It boots in 16-bit real mode and uses MBR partitioning. UEFI is the modern replacement with a graphical interface and GPT support.
| Feature | UEFI | Legacy BIOS |
|---|---|---|
| Partition scheme | GPT (2 TB+) | MBR (2 TB max) |
| Boot mode | Native 64-bit | 16-bit real mode |
| Secure Boot | Yes | No |
| TPM support | Yes | Limited |
| Drive size limit | Very large | 2 TB |
| Interface | Mouse + keyboard | Keyboard only |
| Boot speed | Faster POST | Slower POST |
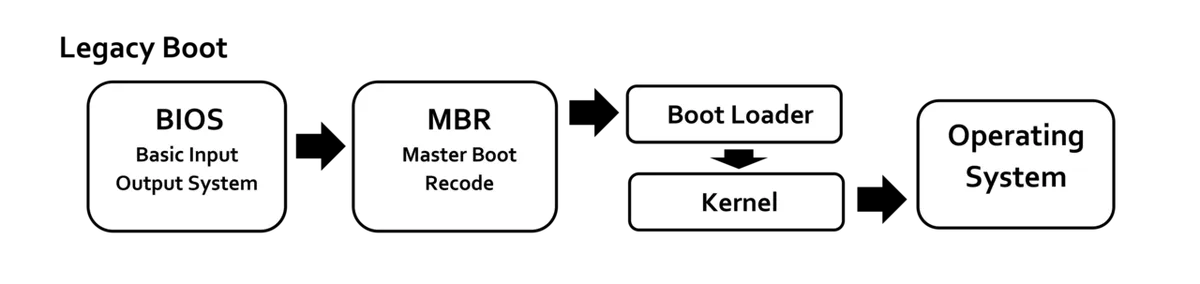
Image source: Wikimedia Commons / Amila Ruwan 20 (CC BY-SA)
For a gaming PC built after 2011, UEFI is the right choice. Legacy mode only helps with very old OS installs or ancient hardware. If you're dropping in a new GPU, ReBAR needs UEFI and Above 4G Decoding enabled.
One more note. Converting an existing MBR install to GPT is possible with Microsoft's mbr2gpt tool. Do it before switching boot mode, or Windows won't boot.
How to Enable the Big Four Gaming Settings in UEFI
Enter firmware by restarting and tapping Del, F2, F10, or F12. The exact key shows on the splash screen. Before changing anything, photograph the default screens so you can revert.
Save changes with "Save & Exit" or the equivalent option. Closing the window without saving discards everything.
| Setting | Common labels | Usually found under |
|---|---|---|
| Secure Boot | Secure Boot Control | Boot or Security |
| TPM | PTT, fTPM, TPM Device | Security or Advanced |
| Memory speed | XMP, EXPO, DOCP | Tweaker or OC |
| ReBAR | Above 4G Decoding, Re-Size BAR | Advanced or PCI |
Enable them in this order. First, turn on TPM if you plan to run Windows 11. Second, enable Secure Boot once your OS and drivers are stable.
Third, enable XMP or EXPO, then reboot and test memory stability. Fourth, enable Above 4G Decoding and ReBAR, then verify in Windows or a tool like GPU-Z.
If XMP fails to train, clear CMOS and try the next slower profile. If Secure Boot blocks an installer or mod, disable it temporarily, then turn it back on.
Common Visual Mistakes When Tweaking UEFI
The biggest mistake is changing several settings before rebooting. If the PC fails to POST, you won't know which change caused it. Change one thing at a time and test.
Color coding also misleads. Red text may mean "enabled" on one board and "warning" on another. Read the value, not the color.
The same applies to icons that look like locks or shields.
Another common error is leaving CSM enabled while troubleshooting UEFI boot. That creates duplicate boot entries and slows POST. Disable CSM for a clean native UEFI setup, unless you need legacy hardware.
Boot priority is visual too. The top entry wins. If Windows Boot Manager sits below a USB device, the PC may boot from the wrong drive.
Drag or reorder entries before saving.
Memory speed labels cause confusion as well. A kit rated for 6000 MT/s may show 3000 MHz in the main screen because DDR is double data rate. Check the XMP profile, not the base value.
Before major changes, compare your current firmware version with the manufacturer's support page. A newer CPU may need a newer firmware before it will boot.
Troubleshooting UEFI Boot and Settings Issues
If the screen stays black, watch the motherboard debug LEDs or listen for beep codes. CPU, DRAM, VGA, and BOOT lights point to the failing stage. That narrows the fix quickly.
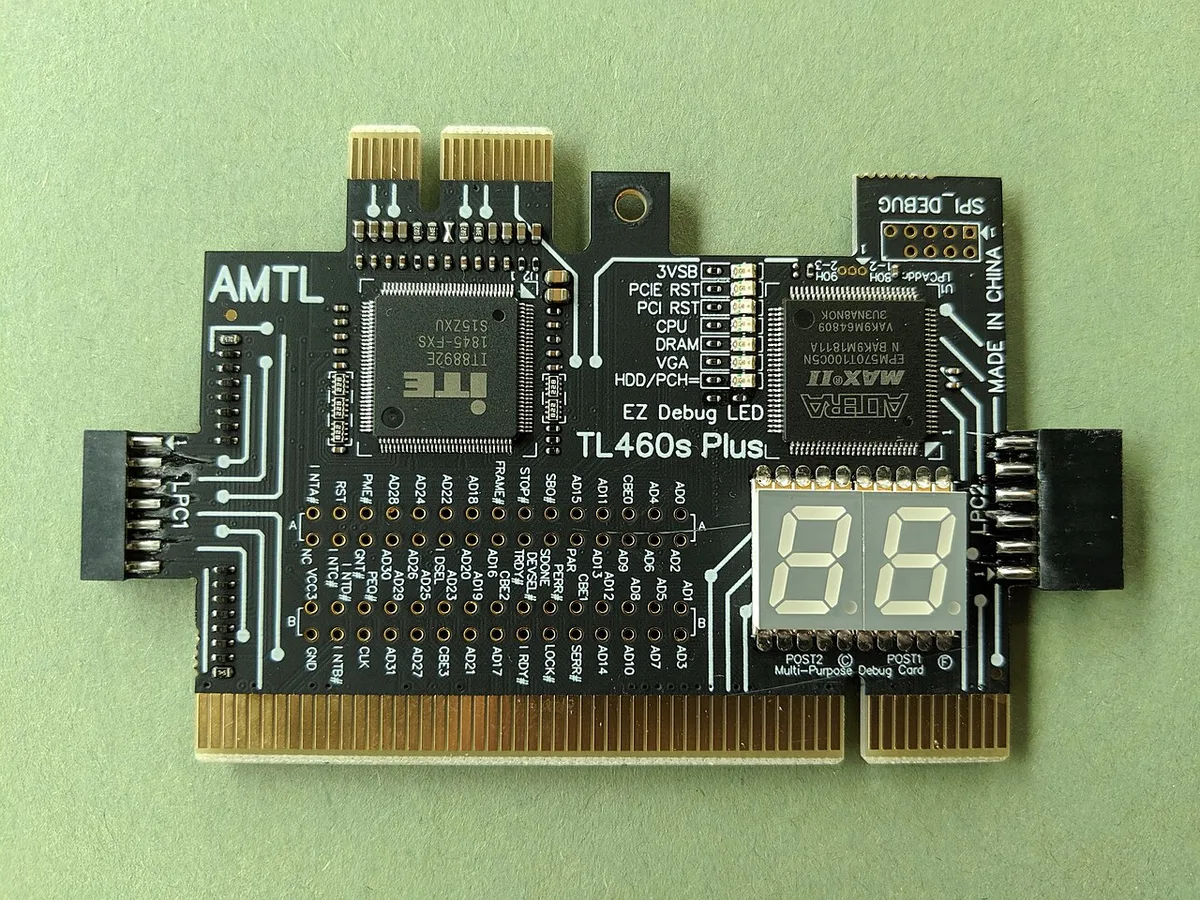
Image source: Wikimedia Commons / Markus Kuhn
Start with the simplest resets. Power off, unplug, and clear CMOS using the jumper or button. Then boot with minimal hardware: one RAM stick, no extra drives, and the GPU if your CPU has no integrated graphics.
If settings keep resetting, the CMOS battery may be weak. Replace the coin cell and re-enter your settings. If the firmware flash fails, use BIOS Flashback if your board supports it.
Never power off or reboot during a flash.
Boot loops after enabling XMP usually mean memory training failed. Disable XMP, boot into Windows, then try a lower profile. Check whether your kit appears on the board's QVL memory list.
If Windows won't boot after switching UEFI and Legacy modes, revert the change. Converting MBR to GPT with Microsoft's mbr2gpt tool can fix a mode mismatch, but back up first.
Secure Boot can block unsigned USB tools. Disable it temporarily, complete the task, then re-enable it. Keep TPM enabled for Windows 11 and anti-cheat compatibility.
FAQs
Does UEFI improve gaming performance?
UEFI itself does not raise frame rates. It enables features that can help, such as XMP, ReBAR, and faster boot. The performance gain comes from those settings, not from the firmware standard.
Should Secure Boot be on or off for gaming?
Keep Secure Boot on for most gaming PCs. It supports Windows 11 and some anti-cheat systems. Turn it off only when a specific tool or mod requires it, then turn it back on.
How do I enter UEFI on a gaming PC?
Restart and tap Del, F2, F10, or F12 during POST. The splash screen usually shows the key. Some boards also offer a restart-to-firmware option inside Windows.
Can I update UEFI without Windows?
Yes. Use the board's built-in flash tool or BIOS Flashback with a USB drive. Follow the manufacturer's file naming and formatting rules exactly.
Do not interrupt the process.
Why does my PC show two boot entries for one drive?
CSM is likely enabled, creating both UEFI and Legacy entries. Disable CSM, set boot mode to UEFI only, and remove the stale entry if needed. Then set Windows Boot Manager first.
Final Recommendation: How to Treat UEFI in Your Gaming PC
Treat UEFI as a configuration layer, not a performance hack. Keep the firmware current, CSM off, Secure Boot on, and TPM enabled. Use XMP or EXPO only when it trains reliably.
Document your settings with screenshots before updates. If a new CPU or GPU needs a newer firmware, update first, then install the hardware.
Keep these habits in mind:
- Change one setting at a time.
- Test stability before moving on.
- Re-enable security features after troubleshooting.
- Clear CMOS only when simpler resets fail.
That approach keeps your gaming PC stable, secure, and easy to recover.