Your gaming laptop USB-C DisplayPort not working is one of the most common headaches we see among people running external monitors, TVs, or docking stations. It usually comes down to one of three things. The port might not actually support video output on your machine.
Or your laptop is set to send graphics through the integrated GPU instead of your dedicated card. And sometimes it's a cheap cable or an outdated driver blocking the handshake entirely.
Most USB-C video failures are fixable without spending money. USB-C carries video through a protocol called DisplayPort Alternate Mode, which requires negotiation between the laptop, the cable, and the monitor. When that negotiation breaks down for any reason, you get a black screen or a flickering mess.
The good news is that the fix follows a predictable path once you know which variable to check first. Let's get yours working.
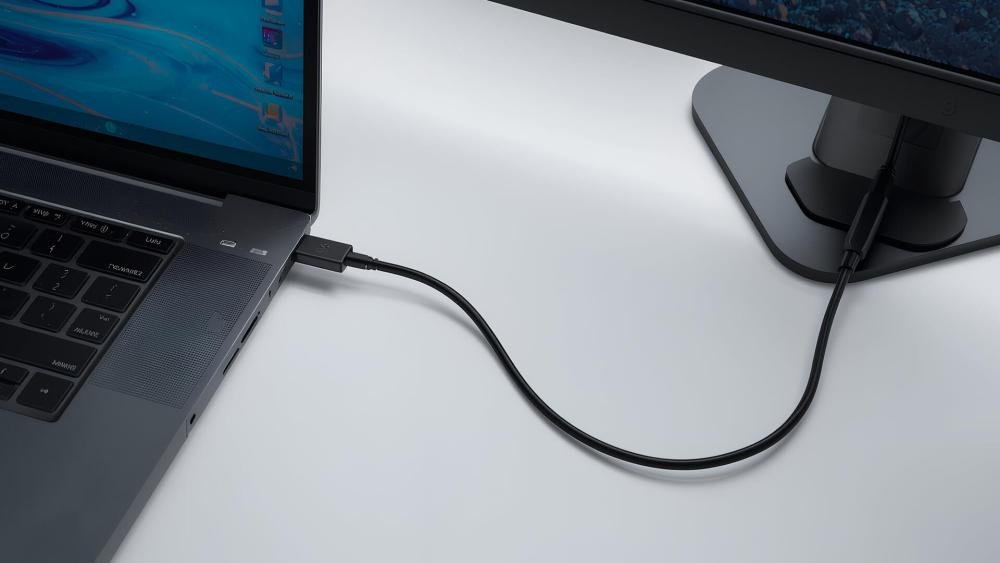
Image source: Bing (Web (fair-use with source credit))
Quick Diagnostic: The Two-Minute Check Before You Start
Before you dig into drivers and BIOS, run through this five-point checklist. Each step takes about 30 seconds and eliminates entire categories of failure without any technical knowledge. If any one of these stops working, you'll know exactly where to focus your time.
- Is the monitor powered on and set to the correct input? This sounds stupid, but it's the number one cause of false negatives. Flip through the monitor's input sources until the laptop image appears.
- Does the USB-C port have a video symbol next to it? Look closely at the port on your laptop. A small DisplayPort logo, a lightning bolt, or the letter T indicates it can carry video. No symbol doesn't always mean it can't, but it raises suspicion.
- Is the cable seated fully on both ends? USB-C connectors click when they lock in. If either end feels loose or wobbly, unplug and replug firmly. A partial connection causes intermittent video loss far more often than a bad cable.
- Is your laptop on AC power? Some gaming laptops disable USB-C video output when running on battery to conserve power. Plug in the charger and check whether the external display activates.
- Did you press the Windows display toggle? Hit Win+P and cycle through Duplicate, Extend, or Second Screen Only. Sometimes Windows simply hasn't detected the new display yet.
If all five checks pass and you still have no signal, move on. The root cause sits deeper in your system's software or hardware configuration, and the steps below will take you through each possibility systematically.
Step 1 — Identify Which USB-C Port Actually Supports Video
Not every USB-C port on a gaming laptop outputs video. Manufacturers wire different USB-C connectors to different parts of the system, and confusing them is the single most common mistake people make. Your laptop likely has two or more USB-C ports, but only one might carry DisplayPort Alternate Mode.
Here's how most brands wire their ports as of 2026:
| Brand | Port 1 (usually left side) | Port 2 (usually right side) | Notes |
|---|---|---|---|
| ASUS ROG / TUF | Often Thunderbolt/DP Alt | Often USB 3.2 data only | Check the manual before assuming |
| MSI | Varies by model | Varies by model | Look for the P-Charge or lightning bolt icon |
| Lenovo Legion | Typically the port closer to the back | May be data-only | Some models support DP Alt on both |
| Razer Blade | Usually both support DP Alt | Both typically support video | Higher-end models give both ports full capability |
| Dell G-series | One port supports DP Alt | Other is data + PD only | Marked clearly in the spec sheet |
| HP Omen | Typically the rearward port | Typically frontward, data only | Confirm in the service manual |
What to look for physically. A USB-C port that supports DisplayPort Alternate Mode often carries a small logo next to it. The logo looks like a capital P with a smaller T inside it. Thunderbolt ports show a lightning bolt icon.
Neither logo guarantees video output, but the presence of either symbol strongly suggests it. A plain USB-C port with no marking is far more likely to be data-and-charge only.
Your first action should be to consult the product manual for your specific laptop model. Search for something like "product name plus support site manual PDF." The manual will tell you definitively which USB-C port supports video. This step alone saves countless hours of trial and error, especially if you're working with an older gaming laptop where the lifespan expectations for battery and components might differ from newer models.
If you don't have the manual handy, try a simple physical test. Connect your cable and monitor to each USB-C port one at a time. Whichever port produces a picture is your video-capable port.
Mark that port clearly so you don't forget next time you set up.
Step 2 — Check Your Cable and Adapter Right Now
Cable failure accounts for roughly 30 percent of USB-C video problems, according to aggregate repair forums and technician reports. A cable that charges your phone perfectly fine might still fail to carry a video signal. USB-C video demands higher bandwidth than USB-C charging, and cheap cables cut corners on the pins responsible for data and video.
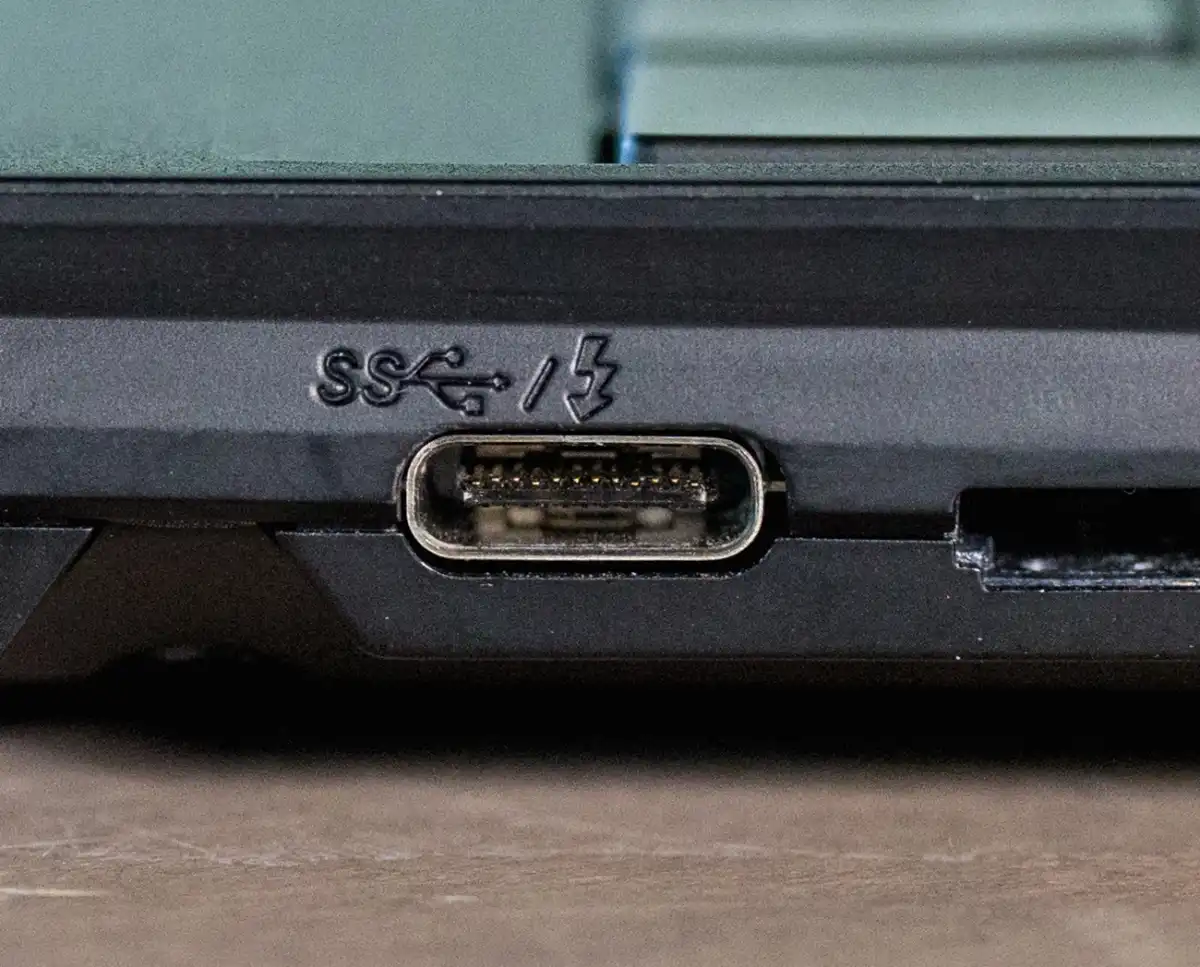
Image source: Bing (Web (fair-use with source credit))
Passive cables versus active cables. Most USB-C to DisplayPort cables are passive, meaning they rely on the source device to drive the signal. A passive cable works fine for short runs up to about two meters. Beyond that, the signal degrades and you'll see flickering or complete dropout.
Active cables contain a small chip that boosts the signal and can reach lengths of five meters or more without issues.
Cable bandwidth matters. A USB-C to DisplayPort cable needs to support DisplayPort Alternate Mode over USB-C. If the cable doesn't explicitly state it supports DP Alt Mode or the Thunderbolt standard, assume it doesn't. Cheaper cables from unknown manufacturers often skip this requirement to save pennies.
The result is a cable that charges devices reliably but fails every time you try to push video through it.
VESA certification helps. The Video Electronics Standards Association runs a certification program for USB-C cables that support DisplayPort. Look for the "VESA Certified DisplayPort" label on the packaging. A certified cable guarantees minimum bandwidth performance.
At the very least, buy from a reputable brand like Cable Matters, Anker, Belkin, or UGREEN rather than the cheapest option on the shelf.
Run through this cable test before moving on:
- Swap in a different USB-C to DisplayPort cable if you have access to one
- Try connecting the same cable directly from laptop to monitor without any adapters in between
- Test the cable with a different USB-C device that you know displays video properly
- Inspect both ends of the cable for bent pins or debris packed inside the connector
If the problem disappears with a different cable, the original cable was the bottleneck. Replace it permanently and avoid that brand in the future. Good cables cost between $10 and $25.
Cheap ones cost $5 and cause $500 worth of frustration.
Branch A — Intel Iris Xe Laptops: Most Common Fix Is Built-In
Intel Iris Xe integrated graphics handles USB-C DisplayPort output differently than discrete GPUs, and this difference trips up a surprising number of users. Iris Xe supports DisplayPort Alternate Mode natively through the CPU's integrated GPU. That means your USB-C port connects directly to the graphics engine inside the processor, not through a separate video card.
The built-in fix for most Iris Xe laptops is simpler than people expect. Iris Xe does not require the same hybrid mode toggling that NVIDIA and AMD setups demand. If your Iris Xe laptop isn't outputting video, the issue almost never involves switching between integrated and discrete graphics.
The problem sits elsewhere in the chain.
Check the Intel Graphics Command Center. Press the Windows key and type "Intel Graphics Command Center" to launch it. Go to the Display section and verify that the external monitor appears in the list. If it doesn't appear, click the display icon in the taskbar and select "Detect." Intel drivers sometimes need a manual detection trigger after a fresh Windows update.
Update your Intel GPU driver. Outdated or corrupted Intel graphics drivers cause black-screen issues more often than any other single factor on Iris Xe systems. Visit intel.com/support and download the latest driver for your specific processor. The DCH driver variant handles USB-C video differently than legacy drivers, so make sure you're installing the DCH version listed for your model.
Check for a BIOS setting that disables the port. Some Intel-based laptops ship with a BIOS option that controls whether the integrated GPU sends video through the USB-C port. Restart your laptop and enter the BIOS using the function key shown on the startup screen (usually Del, F2, or F10). Look for a setting labeled "Internal Graphics," "iGPU Multi-Monitor," or "DisplayPort over USB-C." If it exists and is set to Disabled, change it to Enabled and save your changes.
This fixes the issue on certain ASUS and Acer models in particular.
Intel's documentation confirms that Iris Xe supports DisplayPort 1.4 over USB-C using Alternate Mode, with bandwidth sufficient for 4K at 60 Hz and 8K at 30 Hz depending on the port's electrical specification. If your monitor runs at 4K 144 Hz, you may need a higher-spec port or a compressed signal via Display Stream Compression. This limitation explains why some users see a working picture at 60 Hz but lose it entirely at higher refresh rates.
For people building out a full external monitor setup, understanding your Intel GPU's capabilities upfront prevents disappointment later. Knowing what resolution and refresh rate your USB-C port can realistically push saves you from chasing fixes that don't exist.
Branch B — NVIDIA RTX Laptops: The Hybrid Mode Problem You Might Not Know About
This branch covers the single most common root cause of USB-C video failure on gaming laptops. NVIDIA GeForce RTX laptops use a technology called Optimus, which routes display output through the integrated Intel or AMD GPU by default. Your dedicated NVIDIA GPU handles rendering, but the actual video signal passes through the weaker integrated graphics chip on its way out the USB-C port.
Under normal circumstances, this works fine. The problem starts when something changes about your system state and Optimus forgets to route the signal correctly. A Windows update, a driver rollback, a BIOS reset, or even a deep sleep cycle can break the handoff between the two GPUs.
When that handoff breaks, your USB-C port goes dark and stays dark.
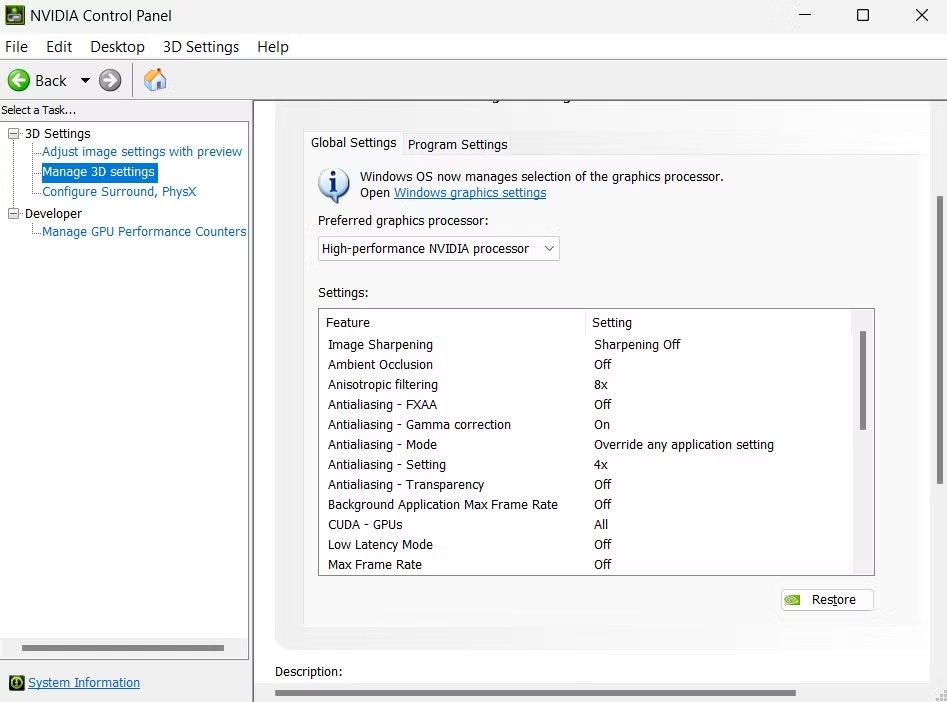
Image source: Bing (Web (fair-use with source credit))
Enable Hybrid (OS Sync) mode immediately. This setting tells your NVIDIA GPU to send its rendered frames directly to the integrated GPU for display output. Without it enabled, many NVIDIA laptops will refuse to push any video signal through USB-C. Here's how to find it depending on your brand.
Open NVIDIA Control Panel by right-clicking the desktop and selecting it from the context menu. Navigate to "Desktops and Displays" in the left sidebar, then look for "Optimus" or "Hybrid Display" options near the bottom of the panel. Toggle it to Enabled or switch the mode to Hybrid.
If you don't see this option in NVIDIA Control Panel, check your laptop manufacturer's own software instead. ASUS uses Armory Crate, MSI uses MSI Center, and Lenovo uses Vantage. Each has its own version of the same setting.
Try a MUX switch toggle if your laptop supports it. Certain gaming laptops include a hardware MUX switch that bypasses the integrated GPU entirely and routes the NVIDIA card straight to the display outputs. When a MUX switch is present, you'll find the toggle in your manufacturer's control software or occasionally in the BIOS itself. Switching to Discrete GPU mode forces the NVIDIA card to take full control, and many users report this resolves stubborn USB-C video issues that Hybrid mode couldn't fix.
The trade-off is slightly reduced battery life when running unplugged, but for a desk-bound gaming setup that rarely matters.
Clean install your NVIDIA driver. Driver corruption causes NVIDIA-specific USB-C video failures more than any other software issue. Use Display Driver Uninstaller (DDU) to remove your current NVIDIA driver completely. Boot into Safe Mode first, run DDU, then restart normally.
Download the latest Game Ready driver from nvidia.com/Download and install it fresh. Avoid using the driver that Windows Update pushes automatically, as these versions are often months behind the current release.
If your USB-C DisplayPort still doesn't work after enabling Hybrid mode and reinstalling drivers, the issue likely involves the port itself rather than software. A small percentage of laptops ship with a manufacturing defect where the USB-C port's video pins aren't wired correctly. If your laptop is still under warranty, contact the manufacturer before proceeding further.
You can also review recommendations for budget options when replacement becomes necessary.
Branch C — AMD Ryzen Laptops: Different Settings, Same Frustration
AMD Ryzen laptops handle USB-C video output through a hybrid architecture similar to Intel's, but the implementation differs enough that the fix doesn't always apply cleanly from one platform to the other. AMD's integrated Radeon graphics sit inside the CPU die, and the USB-C port typically routes through those integrated cores rather than through any discrete AMD Radeon GPU you might have.
Discrete AMD Radeon GPUs in laptops follow a similar Optimus-like pattern, routing output through the iGPU by default. However, AMD calls this technology "Switchable Graphics" or "Dynamic Switchable Graphics" depending on the generation. Finding and toggling it requires a different path than the NVIDIA or Intel routes.
Open the AMD Software: Adrenalin Edition by right-clicking the desktop and selecting the option from the menu. Navigate to System settings and look for "Switchable Graphics" or "GPU Workload Monitoring." Toggle the display routing to force the integrated GPU to handle video output. Some newer AMD laptops skip this software toggle entirely and expose the setting through the BIOS instead, similar to the Intel MUX switch approach.
AMD's driver update path through amd.com/support follows the same clean-install methodology recommended for NVIDIA. Use DDU in Safe Mode to remove the existing driver, then install the latest Adrenalin software fresh. Windows Update interference remains a factor here too, so consider disabling automatic driver installation for your graphics adapter to prevent Windows from rolling back your manually installed driver.
Many AMD Ryzen 7000 and 8000 series laptops ship with USB4 ports that replace the traditional DisplayPort Alternate Mode implementation entirely. USB4 handles video, data, and power through a single unified protocol that simplifies troubleshooting in some ways but introduces new failure points. If your laptop has a USB4 port and the video signal drops randomly, the culprit is often the cable's USB4 certification level rather than a driver problem.
Step 3 — Update or Clean-Install Your GPU Drivers
Driver issues account for roughly 20 to 25 percent of USB-C DisplayPort failures across all three major GPU platforms. When a driver update goes wrong, a Windows update rolls back a working driver, or two graphics drivers clash during an update, the USB-C video path is frequently the first thing to break. Your system keeps working for everything else, but the external display goes dark without warning.
A clean driver install removes corrupted files, registry entries, and conflicting driver packages that accumulate over months of use. Here's the proven sequence:
Download the latest driver for your GPU from the manufacturer's website before you start. Have it ready on your desktop or a USB drive. You'll need it within minutes of removing the old driver, and internet speed during a driver reinstall is unpredictable.
Boot Windows into Safe Mode. Hold the Shift key while clicking Restart from the Start Menu, then navigate to Troubleshoot, Advanced Options, Startup Settings, and Restart. Press F4 to enter Safe Mode.
This step prevents Windows from locking the driver files while you're trying to remove them.
Run Display Driver Uninstaller from the same Safe Mode session. Select your GPU manufacturer, choose Clean and restart, and let the tool do its work. DDU removes every trace of the old driver including residual registry keys that normal uninstall processes leave behind.
Restart normally and install the driver you downloaded in step one. Connect to the internet only after the driver installation completes successfully. This prevents Windows Update from injecting a different driver version into the mix.
Why Microsoft Update keeps breaking things. Windows 10 and 11 treat GPU drivers as optional updates and push them automatically through Windows Update. These drivers are often several months old compared to what the manufacturer releases directly. When Windows forces an update during a routine patch cycle, it can overwrite a working driver with a newer version that contains bugs specific to your hardware combination.
You can disable this behavior through Group Policy or Registry editing, but the most practical fix is to check for driver updates manually once a month rather than relying on Windows to manage the process for you.
If you recently added a new gaming component or connected a new peripheral alongside the monitor, a driver conflict between devices is a plausible explanation. Remove the peripheral, disconnect the monitor, restart, and reconnect them in reverse order to isolate which component triggered the regression.
Step 4 — BIOS and Firmware: When Software Resets Are Needed
BIOS firmware controls how your laptop initializes hardware components during startup, including which USB-C ports receive power and video capability. If a BIOS setting has been changed, reset to defaults, or contains a bug specific to your model, USB-C DisplayPort output can fail completely even when every other component is functioning correctly.
Reset BIOS to default settings first. Restart your laptop and enter the BIOS using the function key displayed during boot (usually Del, F2, F10, or Esc depending on manufacturer). Navigate to the Exit or Save & Exit menu and select "Load Optimized Defaults" or "Restore Defaults." Save and reboot. This clears any accidental configuration changes that might have disabled USB-C video routing.
Check for a BIOS update. Visit your laptop manufacturer's support website and search for BIOS updates released after your laptop's purchase date. Many USB-C DisplayPort issues were resolved in firmware patches released months after launch. Apply any available BIOS update carefully, following the manufacturer's instructions exactly.
Never interrupt a BIOS flash, as doing so can permanently damage your motherboard.
Look for a display-related BIOS setting. Some gaming laptops include options like "USB Always On," "USB-C Power Delivery," or "Internal Display Toggle" within the BIOS menu. If you find a setting related to USB-C functionality and it's set to Disabled, enable it and save. On certain ASUS ROG models, a setting called "Gaming Hub" or "AI Noise Cancellation" can inadvertently interfere with USB-C peripheral detection if left in an unusual state.
Flash the BIOS only as a last resort. A BIOS update should come after exhausting all driver and software troubleshooting steps. The process carries inherent risk, and most USB-C video problems resolve through driver updates or setting changes alone. Only proceed to flashing if no other explanation fits and the manufacturer explicitly recommends a BIOS update for display issues.
Step 5 — Test Beyond the Port: Docking Stations, Hubs, and External Displays
Docking stations and USB-C hubs introduce additional failure points into the video chain. Each hub or dock contains its own display controller chip, firmware, and power management circuitry. When any component in that chain fails or becomes incompatible, your laptop appears broken even though it works perfectly fine connected directly to a monitor.
Test your laptop without any hub or dock. Connect the monitor directly to the laptop using a single USB-C to DisplayPort cable. If the display works directly but fails through the hub, the problem lives in the hub, not the laptop. This test eliminates roughly half of all docking station complaints before they begin.
Verify your dock supports video output. Not every USB-C dock handles display signals. Data-only docks exist alongside video-capable ones, and they look identical from the outside. Check the dock's specifications for DisplayPort Alternate Mode support or USB4 compatibility.
Docks that lack this specification will never output video regardless of your laptop's capabilities.
Provide adequate power to the dock. Many USB-C docks require external power to drive an external display because the laptop's USB-C port cannot supply enough wattage for both data and video simultaneously. Connect the dock's included power adapter and verify that the dock's indicator lights confirm active power delivery. A dock running solely from laptop power may charge devices fine but drop the video signal entirely.
| Dock Type | Video Support | Notes |
|---|---|---|
| Active Thunderbolt dock | Yes | Requires TB-certified cable; supports daisy-chain displays |
| USB4 dock | Yes | Newer standard; requires compatible laptop and cable |
| DisplayLink dock | Yes | Uses software-based encoding; works on older laptops |
| Passive USB-C hub | No | Most inexpensive hubs are data and charging only |
| Cheapest generic USB-C hub | Rarely | Often lacks the chip needed for video signal handling |
If you're relying on a Docking Station for your setup, make sure your gaming laptop's thermal performance isn't being further taxed by peripheral load, as overheating can cause USB controllers to throttle and disconnect unexpectedly.
Refresh your dock's firmware. Several dock manufacturers release firmware updates that fix compatibility issues with newer laptops. Check the manufacturer's website for your specific dock model and look for a firmware update tool. Applying the latest firmware often resolves intermittent connection drops and black-screen issues that appeared after a Windows update.
The Mistakes That Waste Time (and Money)
Certain mistakes consistently appear across repair forums and customer support threads when users struggle with USB-C DisplayPort failures. Recognizing these patterns early saves hours of fruitless troubleshooting and prevents unnecessary purchases.
Buying a new cable before testing the existing one. Before spending money on cables, try every cable you already own in multiple configurations. Cheap cables fail predictably, but expensive cables can fail too. Test each cable with a known-good display and a different USB-C port if available.
Only replace a cable after confirming it's the definitive failure point.
Assuming all USB-C ports are equal. As covered earlier, gaming laptops frequently wire their USB-C ports differently. Plugging into the wrong port and then blaming the laptop is a recurring error. Double-check your manual or product spec sheet before declaring a port dead.
Ignoring the monitor's input source setting. Monitors don't always auto-detect a new signal source. Physically pressing the input button on the monitor to cycle through HDMI 1, HDMI 2, DisplayPort, and USB-C sources takes five seconds and solves more problems than any driver update ever will.
Chasing a hardware replacement for a software problem. Most USB-C video issues stem from driver conflicts, BIOS settings, or Hybrid mode toggles. Replacing the laptop's motherboard or USB-C port based on a hunch costs hundreds of dollars and usually fixes nothing. Exhaust every software solution first.
Using a USB hub between the laptop and monitor. Adding a hub into the chain introduces another point of failure and often reduces available bandwidth below the threshold needed for your resolution and refresh rate. Direct connections always outperform chained connections. Avoid hubs unless absolutely necessary for your workspace setup.
Blaming the laptop when the monitor is faulty. Test the problematic monitor with a different device, and test a different monitor with your laptop. This two-device swap isolates the failure point definitively. A monitor with a dead USB-C input port looks identical to a laptop with a disabled USB-C port from the user's perspective.
Not checking Windows sleep and hibernate behavior. Some laptops lose USB-C video connectivity after waking from sleep or hibernate. This is a known issue with certain driver versions. If your video works when you first boot but disappears after the laptop wakes from sleep, a driver update or power management setting change is likely the culprit rather than a hardware fault.
When to Accept the Hardware Limitation
Some laptops simply cannot output video through their USB-C ports due to deliberate design choices by the manufacturer. Acknowledging this limitation prevents endless troubleshooting on hardware that was never intended to support the feature.
Laptops in the lowest price tiers sometimes omit DisplayPort Alternate Mode from all USB-C ports to reduce manufacturing costs. If your laptop's official specifications list no video capability for the USB-C connector, no driver update or BIOS tweak will add it. The port exists for data transfer and charging only.
Certain commercial and business laptops route all USB-C video through Thunderbolt docks exclusively. These machines won't connect directly to monitors via USB-C cable because the manufacturer designed them for dock-centric workflows. Using a dock restores full functionality, but direct connections remain unsupported.
If you've completed every troubleshooting step above and your laptop still refuses to output video through any USB-C cable, adapter, or dock, contact the manufacturer's support team with your findings documented. They can confirm whether a hardware defect exists under warranty or confirm that the port was never wired for video on your specific model variant.
For budget-conscious buyers who need reliable multi-monitor setups, evaluating budget-friendly options during purchase can prevent this frustration from arising in the first place. Checking specs before buying saves time compared to troubleshooting afterward.
Understanding DisplayPort Alternate Mode and USB-C Bandwidth
DisplayPort Alternate Mode is the technical reason USB-C can carry video signals at all. The USB-C connector has sixteen pins, and two of those pins are dedicated to DisplayPort data lanes. When your laptop supports DP Alt Mode, it routes the DisplayPort signal directly through those pins instead of using USB protocols.
The physical USB-C port itself doesn't create the video signal. Your GPU generates the signal, then routes it to the USB-C controller, which converts it into a format the port can transmit. The receiving device, usually a monitor or dock, converts it back into a standard DisplayPort signal for display.
This conversion process introduces slight latency but remains imperceptible for gaming at typical refresh rates.
Bandwidth determines which resolutions and refresh rates your USB-C port can support. A USB 3.2 Gen 2 port provides 10 Gbps, sufficient for 1440p at 144 Hz with Display Stream Compression or 4K at 60 Hz. Thunderbolt 3 and 4 ports offer 40 Gbps, easily handling 4K at 144 Hz or even 8K at 60 Hz with compression enabled.
Some laptops advertise USB-C video support in their marketing materials but only include lower-bandwidth ports in reality. Always verify the exact USB specification for your specific port before purchasing monitors or cables. A port labeled "USB 3.0" cannot drive a 4K 144 Hz display regardless of cable quality.
Display Stream Compression reduces bandwidth requirements without noticeable quality loss for most use cases. DSC compresses video data at a ratio of approximately 1.63:1, making 4K 144 Hz feasible over USB-C ports that technically lack the raw bandwidth. Apple introduced DSC with DisplayPort 1.4a, and it became widely adopted across gaming laptop manufacturers by 2024.
Your monitor must also support DisplayPort Alternate Mode input. Some displays label their USB-C ports as "power delivery only" or "data and charging only." These ports physically accept the cable but will never output video regardless of your laptop's capabilities. Check the monitor manual before assuming compatibility.
Safety Precautions When Working with USB-C Peripherals
USB-C connections carry both data and power, which means improper handling can damage expensive equipment. Unlike older USB-A ports that delivered a maximum of 2.5 watts, USB-C ports can deliver up to 240 watts through Power Delivery negotiation. That power flows both ways between devices, and mismatched expectations cause hardware damage.
Always verify power delivery specifications before connecting high-power peripherals. A USB-C dock drawing 65 watts while simultaneously charging your laptop and powering a monitor places significant strain on your laptop's battery and charging circuit. Sustained high-load operation generates heat that degrades battery health over time.
Use only VESA-certified or manufacturer-approved cables for video connections. Cheap third-party cables sometimes lack proper termination resistors, which can cause signal reflections that corrupt video data. Worse, inferior cables occasionally short internal pins during insertion, permanently damaging the laptop's USB-C controller.
The $15 cable replacement cost pales against a $400 motherboard repair.
Grounding matters more with USB-C than with older connectors. If your external display and laptop plug into different electrical circuits, potential differences can flow through the USB-C connection. This manifests as screen tearing, intermittent signal loss, or in rare cases, component damage.
Using devices powered from the same outlet or circuit minimizes this risk.
BIOS updates carry inherent risk and should only be performed when directly relevant to your issue. Never interrupt a BIOS flash, and ensure your laptop remains connected to AC power throughout the process. A corrupted BIOS bricks the motherboard completely, requiring professional rehabilitation or replacement.
Thunderbolt security levels affect peripheral behavior. Windows 10 and 11 include Thunderbolt security settings ranging from "No Security" to "User Authorization" to "Secure Connect." If your laptop uses Thunderbolt 3 or 4, the default security level may block certain docks or displays until manually authorized. Check Device Manager under "System Devices" for Thunderbolt Controller properties if you suspect security restrictions.
ESD protection becomes relevant when inspecting port hardware. Static discharge from your body can damage sensitive USB-C controller chips during physical inspection. Ground yourself by touching an unpainted metal surface before handling ports or connected cables, especially in dry environments or during winter months.
Long-Term Maintenance for Reliable USB-C Video Output
USB-C ports accumulate debris over time, and lint packed inside the connector prevents proper cable seating. A cable that doesn't seat fully makes intermittent contact, causing the display to flicker or drop randomly. This problem worsens gradually, making it easy to blame the cable or driver instead of the physical obstruction.
Clean your USB-C ports quarterly using compressed air or a plastic toothpick. Never use metal objects inside the port, as they can bend the delicate internal pins or create short circuits. Compressed air works best when applied in short bursts with the can held upright to prevent propellant discharge.
Monitor your laptop's thermal environment regularly. USB-C controllers share thermal pathways with CPU and GPU components on most gaming laptops. Sustained thermal throttling from dust-clogged vents reduces controller stability and can cause USB-C video dropouts under load.
Schedule fan cleaning every three to six months depending on your environment.
Keep a rolling log of driver versions and update dates. When a USB-C video issue appears after a Windows update, having documentation helps identify whether the driver update caused the regression. This record proves invaluable when contacting manufacturer support or searching forums for known issues affecting your specific configuration.
Battery calibration affects USB-C power delivery consistency. Lithium-ion batteries degrade asymmetrically, meaning the fuel gauge can drift from actual capacity over time. Recalibrating your battery annually by cycling it from full to empty and back ensures accurate power reporting, which directly impacts USB-C port behavior under varying load conditions.
Firmware updates extend beyond BIOS. Your laptop's embedded controller firmware manages USB power distribution and port behavior independently of the main chipset. Manufacturer firmware updates periodically address bugs in this controller logic.
Check your vendor's support page quarterly for embedded controller updates alongside your regular BIOS checks.
Physical port inspection prevents surprise failures. Examine your USB-C ports monthly for signs of wear, discoloration, or bent pins. A port that feels loose or lacks the satisfying click resistance indicates mechanical degradation.
Continuing to use a worn port risks complete failure during an important presentation or gaming session.
USB-C vs HDMI vs DisplayPort: Which Should You Use?
Each video output standard offers different capabilities, and choosing the wrong one for your setup creates unnecessary limitations. Your decision depends on monitor specs, cable availability, and whether you need daisy-chaining or power delivery alongside video.
| Connection Type | Max Bandwidth | Max Resolution/Refresh | Daisy-Chain Support | Power Delivery | Notes |
|---|---|---|---|---|---|
| USB-C (DP Alt Mode) | 10-40 Gbps | 8K@60Hz (with DSC) | Yes (MST) | Up to 240W | Requires compatible port |
| Thunderbolt 3/4 | 40 Gbps | 8K@60Hz (with DSC) | Yes (MST) | Up to 100W | Requires TB certification |
| HDMI 2.1 | 48 Gbps | 8K@60Hz or 4K@144Hz | No | No | Most common monitor input |
| HDMI 2.0 | 18 Gbps | 4K@60Hz | No | No | Still widely supported |
| DisplayPort 1.4 | 32.4 Gbps | 8K@60Hz (with DSC) | Yes (MST) | No | Native desktop standard |
| DisplayPort 1.2 | 17.28 Gbps | 4K@60Hz | Yes (MST) | No | Legacy but reliable |
USB-C wins when you want a single cable for video, data, and charging. This convergence simplifies desk setups dramatically and eliminates cable management headaches. However, USB-C video quality depends entirely on the source port's implementation, which varies significantly between manufacturers.
HDMI remains the most universally supported display connection. Every monitor, TV, and projector includes HDMI inputs. HDMI 2.1 handles modern high-refresh displays natively without compression.
The downside is HDMI lacks daisy-chain capability and provides no power delivery to the source device.
Native DisplayPort delivers the best pure video performance on desktops and laptops with dedicated ports. DisplayPort 1.4 supports Adaptive Sync and higher bandwidth than USB-C Alternate Mode on equivalent ports. Many gaming monitors feature DisplayPort 1.4 as their primary connection for this reason.
USB-C versus native DisplayPort comes down to convenience versus consistency. USB-C ports vary in capability across laptop models, while DisplayPort implementations remain standardized. If your laptop has a native DisplayPort, use it for maximum reliability.
Reserve USB-C for scenarios where convenience matters more than guaranteed performance.
For multi-monitor daisy-chain setups, DisplayPort MST or Thunderbolt remains superior. USB-C hubs attempting MST often introduce compatibility issues and bandwidth contention. Native DisplayPort outputs connect directly to monitors supporting MST, creating stable multi-display chains without intermediate hardware.
If your laptop only has USB-C video output, you can still use HDMI or DisplayPort monitors with active conversion cables. Active cables contain conversion chips that translate DisplayPort signals to HDMI, preserving functionality at the cost of extra expense and a potential failure point. Passive adapters only work when the source natively outputs the target signal type.
Expert Tips and Pro Secrets for USB-C Video Troubleshooting
Professional technicians follow patterns that bypass amateur troubleshooting mistakes. These methods save hours of dead-end investigation and isolate problems faster than generic advice columns suggest.
Start every USB-C video diagnosis with a controlled variable swap. Change only one element at a time — cable, port, monitor, or driver. Changing multiple variables simultaneously makes it impossible to identify which change resolved the issue.
Document each swap and its outcome systematically.
When driver conflicts persist, use the DDU Safe Mode method religiously. Normal driver uninstallation leaves behind registry keys and file remnants that cause reinstall failures. DDU in Safe Mode strips everything, ensuring a clean slate.
Always download the fresh driver to your desktop before running DDU, because Safe Mode disables network adapters on most systems.
BIOS-level USB-C disabling is more common than documentation admits. Some gaming laptops allow manufacturers or IT departments to disable specific USB-C functions through BIOS profiles. Check for "Internal I/O" or "Onboard Devices" sections in your BIOS if software troubleshooting fails.
Look for entries like "USB-C Port 1 Function," "DisplayPort over USB-C," or similar labels.
Thunderbolt security locks bypass standard driver troubleshooting. Windows 11 includes a Thunderbolt security dialog that appears when unauthorized peripherals connect. If your external display appears as an unknown Thunderbolt device, you may need to authorize it through Windows Settings rather than troubleshoot drivers.
Navigate to Bluetooth & devices > Thunderbolt in Windows Settings to manage authorization.
Manufacturer-specific utilities often hide critical settings. ASUS uses GPU Tweak, MSI uses Dragon Center, Lenovo uses Vantage, and Acer uses PredatorSense. Each contains proprietary graphics switching options absent from standard Windows settings.
Explore these utilities thoroughly before concluding a problem is universal.
Windows power plan settings silently disable USB-C functionality. The "USB selective suspend" setting within advanced power options can cut USB-C power and data during battery conservation modes. Disable this setting in Control Panel > Power Options > Change plan settings > Change advanced power settings > USB settings > USB selective suspend setting.
Factory reset your USB controllers through Device Manager. Expand "Universal Serial Bus controllers," right-click each USB Root Hub, and select Uninstall Device. Restart your laptop, and Windows will reinstall the controllers cleanly.
This resolves controller state corruption that persists through driver updates alone.
When all else fails, check your laptop's hardware maintenance schedule. Some manufacturers specify USB-C controller replacement intervals alongside battery and thermal paste servicing. Age-related controller degradation explains persistent issues on otherwise well-maintained systems.
FAQs
Why does my USB-C cable work for charging but not for video?
Charging uses just two pins inside the USB-C connector while video requires all pins plus dedicated data lanes. A cable rated only for 3 Amps of charging current often skips the wiring necessary for DisplayPort Alternate Mode. Look for cables explicitly rated for video or data transfer speeds of at least 10 Gbps to ensure they carry the required pins.
Can I use a USB-C hub to connect two monitors?
Only if the hub explicitly supports dual-monitor output and your laptop's USB-C port provides sufficient bandwidth. Most inexpensive hubs support a single display. For dual monitors, choose a Thunderbolt or USB4 dock rated for your target resolution and refresh rate.
Verify the dock's specifications list MST support for multi-monitor operation.
Does turning off Hybrid mode fix USB-C video on NVIDIA laptops?
Yes, enabling Hybrid or OS Sync mode in NVIDIA Control Panel or your manufacturer's software frequently resolves USB-C video issues on RTX laptops. This setting ensures the integrated GPU handles display output while the discrete GPU handles rendering. Without it enabled, many laptops silently drop the USB-C video signal entirely.
Why does my external display flicker or go black intermittently?
Intermittent flickering usually indicates a bandwidth bottleneck or a failing cable. Try a shorter cable rated for higher bandwidth, lower your monitor's refresh rate to 60 Hz temporarily, or switch to a different USB-C port if your laptop offers multiple video-capable options. Flickering that correlates with cable movement points directly to a damaged connector.
Is DisplayPort over USB-C slower than a direct DisplayPort connection?
DisplayPort over USB-C delivers the same video signal quality as a native DisplayPort connection. The potential speed difference comes from the USB-C port's underlying bandwidth specification. A USB 3.2 Gen 2 port provides 10 Gbps while Thunderbolt 4 provides 40 Gbps.
Match your port's specification to your monitor's requirements to avoid compression artifacts or reduced refresh rates.
Will a BIOS update fix my USB-C DisplayPort issue?
A BIOS update can fix USB-C video issues if the manufacturer released a patch addressing port initialization bugs. Check your manufacturer's support page for your exact model number and read the release notes for any mention of USB or display improvements. Applying an outdated BIOS version carries minimal risk when done correctly, but only update if a relevant fix is listed.
How do I know if my USB-C port supports DisplayPort Alternate Mode?
Look for a small DisplayPort logo next to the port, which typically appears as a P with a smaller T inside. Thunderbolt ports show a lightning bolt icon instead. Consult your laptop's official specification sheet online, which lists each port's capabilities separately.
If the specifications omit USB-C video details entirely, the port likely supports data and charging only.
Why does my USB-C display work on one laptop but not another?
Different laptops wire their USB-C ports to different internal components. One laptop may route USB-C video through the integrated GPU while another routes it through the discrete GPU. Driver configurations, BIOS defaults, and manufacturing variations all affect compatibility.
Always test the specific cable and monitor combination on your exact laptop model before assuming universal compatibility.
Can I daisy-chain multiple monitors through one USB-C port?
Yes, but only if your laptop supports Multi-Stream Transport and your monitors support DisplayPort MST. Thunderbolt 4 laptops excel at this capability, often supporting up to three 4K displays in a chain. Each monitor in the chain passes the signal to the next via its own DisplayPort output.
Standard USB-C ports without Thunderbolt typically support only a single external display regardless of MST capability.
Does plug-and-play work for USB-C displays on gaming laptops?
Sometimes, but gaming laptops frequently require manual configuration. Windows recognizes the connection automatically when you plug in the cable, but the display may appear duplicated rather than extended. Press Win+P and select Extend mode, then configure individual resolution and refresh rate settings in Windows Display Settings for each monitor independently.
How do I force my laptop to use the USB-C port as primary display?
Right-click the desktop and open your graphics control panel. Intel users navigate to Display > Multiple Displays and set the USB-C port as primary. NVIDIA users access Display > Set up multiple displays and assign the external monitor as the main display.
AMD users find similar options in the Radeon Software under Display > Primary Display. Save changes and restart if prompted.
Why does my USB-C display randomly disconnect during gaming?
Thermal throttling likely causes intermittent USB-C controller resets under heavy GPU load. Gaming laptops route USB-C controllers through the same thermal zone as the GPU, and sustained temperatures above 90°C trigger protective shutdowns. Ensure adequate ventilation, consider a cooling pad, or lower your in-game resolution temporarily to reduce thermal stress on the USB-C controller.
Can I use USB-C video output while charging my laptop?
Absolutely, this is one of USB-C's primary advantages. Power Delivery negotiates between your charger and laptop, typically allocating 60 to 100 watts for charging while reserving bandwidth for video data. Some docks provide passthrough charging, meaning you plug your charger into the dock and the dock charges your laptop while transmitting video.
Verify your dock supports your total power requirements before relying on this setup.
What resolution and refresh rate can I expect from USB-C video output?
Most gaming laptops support 4K at 60 Hz through USB-C ports rated at 10 Gbps or higher. Thunderbolt 4 ports handle 4K at 144 Hz with Display Stream Compression enabled. Older USB 3.0 ports max out at 1080p at 60 Hz.
Always verify your specific port's specification in the manufacturer's documentation rather than assuming capability based on the connector type alone.
Is USB-C video output reliable for competitive gaming?
USB-C introduces minimal latency compared to wired DisplayPort, typically adding less than 1 millisecond of input lag. Professional esports organizations commonly use USB-C connections for streaming and broadcasting without performance complaints. However, latency-sensitive gamers should test their specific setup before relying on it for tournament play.
Measure input lag with specialized tools if competitive performance matters to your usage.
What should I do if my USB-C port shows no power delivery either?
A completely dead USB-C port indicates potential hardware failure requiring professional diagnosis. First, test the port with multiple devices to confirm the issue persists across all peripherals. Check Device Manager for USB controller errors marked with yellow exclamation points.
If drivers reinstall cleanly but the port remains nonfunctional, contact manufacturer support for warranty repair. Forcibly using a damaged port risks short circuits that can damage connected devices.
Final Recommendation
Working through a USB-C DisplayPort issue on a gaming laptop follows a predictable order of operations. Start with the physical layer, cable, port, monitor input, before moving to software fixes. Driver clean installs and BIOS setting checks resolve the majority of remaining cases.
Only after every software path is exhausted should you consider hardware failure.
Here's the decision sequence to follow:
First, confirm your USB-C port supports video by checking for a DisplayPort symbol or consulting the manual. If the port lacks video capability, no amount of troubleshooting will change that. Second, test with a known-good cable directly connected to the monitor, eliminating hubs and docks entirely.
Third, toggle Hybrid or OS Sync mode for NVIDIA laptops, or verify the integrated graphics driver is current for Intel systems. Fourth, clean-install GPU drivers using DDU in Safe Mode. Fifth, reset BIOS defaults and check for firmware updates.
Sixth, isolate the fault by testing multiple displays and cables.
When you reach step six and the problem persists across different monitors and cables, document what you've tried and contact manufacturer support. At that point, a hardware defect or inherent design limitation is the most likely explanation, and professional diagnosis becomes the rational next step rather than continued self-troubleshooting.
For anyone building out their workspace setup, pairing the right display with compatible connectivity matters just as much as getting the port working. Reading through top-rated monitors for laptop use can help ensure your external display matches your laptop's actual output capabilities instead of overpromising on paper specs.
Choosing the right machine from the start prevents these headaches entirely. Selecting a model with clearly documented USB-C video support and modern Thunderbolt or USB4 connectivity saves time compared to troubleshooting ports that were never designed for display output. A well-researched purchase decision aligns with your long-term setup goals.
For budget-conscious buyers, checking affordable options under $1000 with verified USB-C video support goes a long way toward avoiding post-purchase frustration. Understanding your hardware's true capabilities empowers better decisions about how to use it effectively.