What are common mistakes when assembling a gaming pc? Most are small physical fit problems, not bad parts. A cable can look plugged in while one pin stays exposed.
A cooler can sit crooked by a few millimeters. These visual cues matter because they point to the real cause before power is applied.
Manufacturer specifications indicate that a fully seated connector usually clicks and leaves no gap. As of 2026, many boards include debug LEDs that help spot boot faults. We'll walk through what to look for before you turn the system on.
what are common mistakes when assembling a gaming pc
What are common mistakes when assembling a gaming pc? Most are fit and connection errors. CPU pins bend when the chip is forced.
RAM can look seated while one side floats. GPU power cables may click halfway. PSU switches can stay off.
These small cues cause no POST.
Why Visual Cues Matter When Building a Gaming PC
A gaming PC build is a hands-on spatial task. A diagram or photo often shows more than a paragraph because it reveals angle, depth, and latch position. You are looking for gaps, tilt, uneven pressure, and cable strain.
Before you start, set up a clean, static-safe workspace. That keeps screws, standoffs, and small parts visible. It also reduces the chance of dropping a board or shorting a component.
If a part does not look square, stop. Do not force it. Re-check orientation, support, and clearance.
A few extra seconds here can prevent bent pins, cracked slots, or damaged power connectors.
Common Physical Mistakes and What They Look Like
These are the errors builders most often miss during a first build. Many look almost correct until you compare both sides of the part.
| Mistake | What you see | Why it matters |
|---|---|---|
| CPU forced into socket | Tilted chip or bent pins | Can damage the CPU and socket |
| RAM not fully clicked | One side higher than the other | Memory may not register at POST |
| GPU not fully seated | Card tilts or slot gap remains | PCIe connection can fail |
| PCIe power half connected | Plastic latch not closed | GPU can lose power under load |
| Cooler mounted unevenly | One side higher or paste squeeze-out | Poor cooling and uneven pressure |
| Standoff in wrong hole | Board rocks or touches metal | Risk of shorting the motherboard |
Follow the correct build order so parts support each other while you work. Install the CPU and cooler before the board goes into the case when the manual allows it. Route cables before final tightening so nothing gets trapped.
CPU and Cooler Assembly Errors You Can Spot by Alignment
CPU installation is mostly about alignment. The triangle marker on the chip should match the socket marker. The CPU should drop in with almost no pressure.
If you feel resistance, lift it and inspect the pins.
Thermal paste should be a small amount, roughly the size of a grain of rice. Too much can spread onto socket edges. Too little can leave dry spots.
A cooler should sit flat and even on all sides.
When mounting an air cooler or AIO, tighten screws in a cross pattern. That keeps pressure even. The cooler should not rock when you gently press a corner.
If it does, loosen and reseat it.
Review CPU installation steps before you handle the chip. Check thermal paste application if you are unsure about amount. For cooler mounting pressure, follow the cooler manual closely.
Motherboard, Standoff, and RAM Seating Issues
Standoffs must match the case mounting pattern and the board form factor. Extra standoffs under the board can cause a short. Missing standoffs can let the board flex during GPU installation.
RAM should click into place with firm, even pressure. Press straight down on both ends of the module. A fully seated stick usually shows little or no gap above the slot.
Use the slots recommended by the motherboard manual, often marked A2 and B2 on many boards.
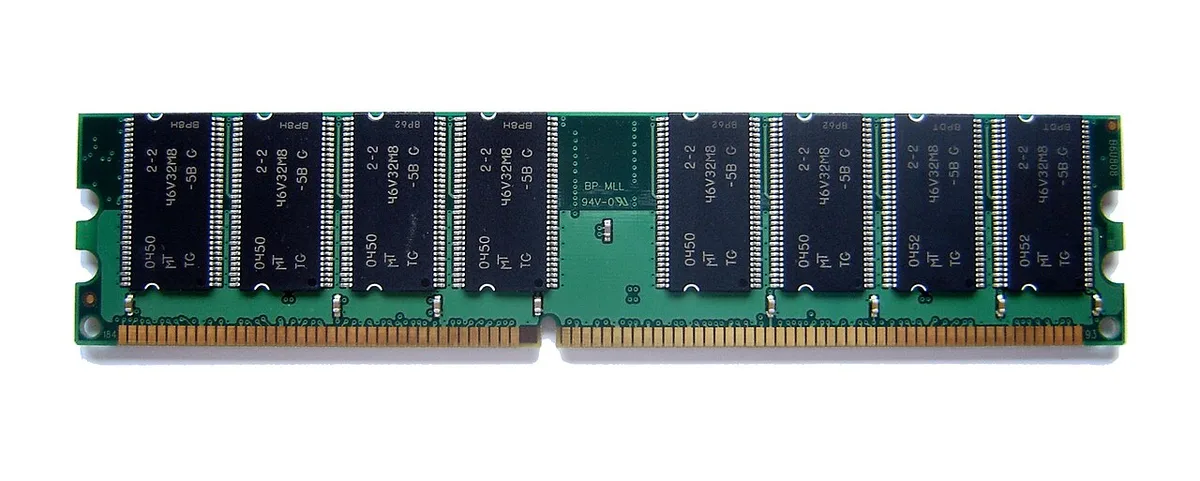
Image source: Wikimedia Commons / Utente:Sassospicco (CC BY-SA)
Memory standards organizations such as JEDEC define common DDR4 and DDR5 behavior. That helps explain why a board may need a BIOS update or an XMP or EXPO profile for rated speed. If one RAM stick fails, test each slot and module separately.
Use RAM slot placement guidance before choosing positions. If the board will not boot, check whether the memory is supported by the motherboard.
GPU, Power Cable, and PSU Connection Mistakes
The GPU should sit fully in the PCIe x16 slot before you tighten the bracket screw. Look for the slot latch closing over the card. The card should not sag after installation.
GPU power cables need a firm click. Each connector should sit flush with the GPU socket. Do not mix modular cables between power supplies.
Only use the cables that came with that PSU.
The motherboard also needs its main 24-pin power and the CPU EPS power cable. The EPS cable is often forgotten because it routes through a tight top corner. Check both before first boot.
The PSU switch must be on, and the wall connection must be secure. Use GPU power connection steps and motherboard power cable steps before testing. For GPU seating, review graphics card installation steps.
A PSU with proper safety certification can reduce electrical risk. UL safety standards are one example of a recognized testing mark. Still, safe handling matters more than the label on the box.
Airflow, Cable Routing, and Cooling Problems
Cooling mistakes are often invisible until the system is under load. A fan spinning backward looks identical to one spinning forward at a glance. Cable bundles can block exhaust paths even when every fan works.
Fan orientation matters. Intake fans should pull cool air in from the front or bottom. Exhaust fans should push warm air out the rear or top.
Many fans have arrows on the frame showing airflow direction.
Cable routing affects airflow more than many builders expect. A thick bundle behind the GPU can block rear exhaust. Front panel cables can sit in front of intake fans.
Tuck cables into case channels and use zip ties or Velcro straps.
AIO radiator placement also matters. Top-mounted radiators can leak coolant onto components if the pump sits above the radiator. Side or front mounting is usually safer.
Check the cooler manual for approved orientations.
Thermal throttling is the symptom. The CPU or GPU drops speed to protect itself. Monitor temperatures during a stress test after assembly.
Idle temps should be well below load temps.
Use case fan installation steps for proper fan setup. For cable routing, review cable management best practices.
First Boot Checks and BIOS Mistakes
The first boot is where many small errors surface. No POST means the system did not complete its power-on self test. The screen stays black.
Fans may spin, but nothing happens.
Check the monitor connection first. It should plug into the GPU, not the motherboard. Many first-time builders use the wrong output.
Swap the cable and test again.
Debug LEDs are your best friend here. Most boards have LEDs for CPU, DRAM, VGA, and BOOT. The lit LED points to the problem area.
Q-code displays show a number you can look up in the manual.
BIOS version matters for CPU compatibility. A newer CPU may need a BIOS update before it boots. Check the motherboard's CPU support list before assembly.
Some boards support BIOS flashback without a CPU installed.
XMP or EXPO profiles are often left off. RAM runs at a safe default speed instead of its rated speed. Enable the profile in BIOS after a successful first boot.
This is not a mistake, but it is a common missed step.
Front panel wiring errors can prevent power-on. The power switch must connect to the correct pins. Polarity usually does not matter for switches, but it does for LEDs.
Review front panel cable connection steps.
Pre-Assembly Compatibility Mistakes
Compatibility errors happen before you touch a screwdriver. They are the most expensive mistakes because parts arrive and do not fit. Check compatibility before buying, not after.
CPU and motherboard socket must match. LGA1700 boards take Intel 12th through 14th gen CPUs. AM5 boards take AMD Ryzen 7000 and newer.
An AM4 CPU will not fit an AM5 socket.
RAM type must match the board. DDR4 and DDR5 use different slots and are not interchangeable. Check the motherboard QVL for tested memory kits.
This avoids stability issues with high-speed kits.
PSU wattage needs headroom. Add CPU and GPU TDP, then add 20 to 30 percent. A 350W GPU plus 125W CPU needs at least a 600W PSU.
Undersized PSUs can shut down under load.
Physical clearance matters too. GPU length must fit the case. Cooler height must clear the side panel.
Radiator size must match case support. Measure before buying.
PCIe compatibility is usually fine for GPUs. Most modern GPUs work in older PCIe slots. The slot may run at a lower generation, but it will work.
Check PCIe compatibility issues if you are reusing an older board.
Expert Tips for a Clean First Build
Preparation prevents most mistakes. Lay out parts and tools before opening anything. Read the motherboard manual cover to cover.
It contains standoff maps, front panel pinouts, and BIOS recovery steps.
Build outside the case first. This is called breadboarding. Install the CPU, cooler, RAM, and GPU on the motherboard.
Power it on with just the PSU and a monitor. If it POSTs, move everything into the case.
Take photos at each step. A phone photo of cable routing before final assembly helps later. It also helps if you need to troubleshoot.
You can compare the current state to a working state.
Do not overtighten screws. Finger-tight plus a small turn is usually enough. Stripped threads are common on cooler mounting and M.2 slots.
Use the right screwdriver size.
Keep the build order logical. CPU first, then cooler, then RAM, then board in case, then PSU, then GPU, then cables. Review the correct assembly order if you are unsure.
Test before final cable management. Boot the system with minimal connections first. Add fans and tidy cables only after confirming POST.
This saves time if something needs to come apart.
Frequently Asked Questions
What is the most common mistake when building a gaming PC?
The most common mistake is forgetting the CPU power cable. The EPS 8-pin connector sits in a tight corner and is easy to miss. Without it, the system powers on but will not POST.
Always check both the 24-pin and EPS cables before first boot.
How do I know if my RAM is seated correctly?
A fully seated RAM module clicks at both ends. The retention clips should snap into the notch on the module. There should be almost no gap between the module and the slot.
If one side sits higher, press firmly until both clips engage.
Can a bent CPU pin be fixed?
Minor bends can sometimes be straightened with a mechanical pencil or thin tool. Severe bends or broken pins usually mean replacing the CPU. Prevention is easier.
Always align the triangle marker and let the chip drop in without force.
Why does my PC turn on but show no display?
The monitor may be plugged into the motherboard instead of the GPU. Switch the cable to the GPU output. Also check that the GPU is fully seated and powered.
If the problem persists, reseat the RAM and check debug LEDs.
Do I need to update BIOS before building?
Not always. Update only if your CPU requires a newer BIOS version. Check the motherboard CPU support list before assembly.
Some boards support BIOS flashback without a CPU, which makes updates easier before installation.
How much thermal paste should I use?
A small amount, roughly the size of a grain of rice, is enough. Too much can spread onto socket edges. Too little can leave dry spots under the cooler.
The pressure from mounting spreads it evenly across the CPU.