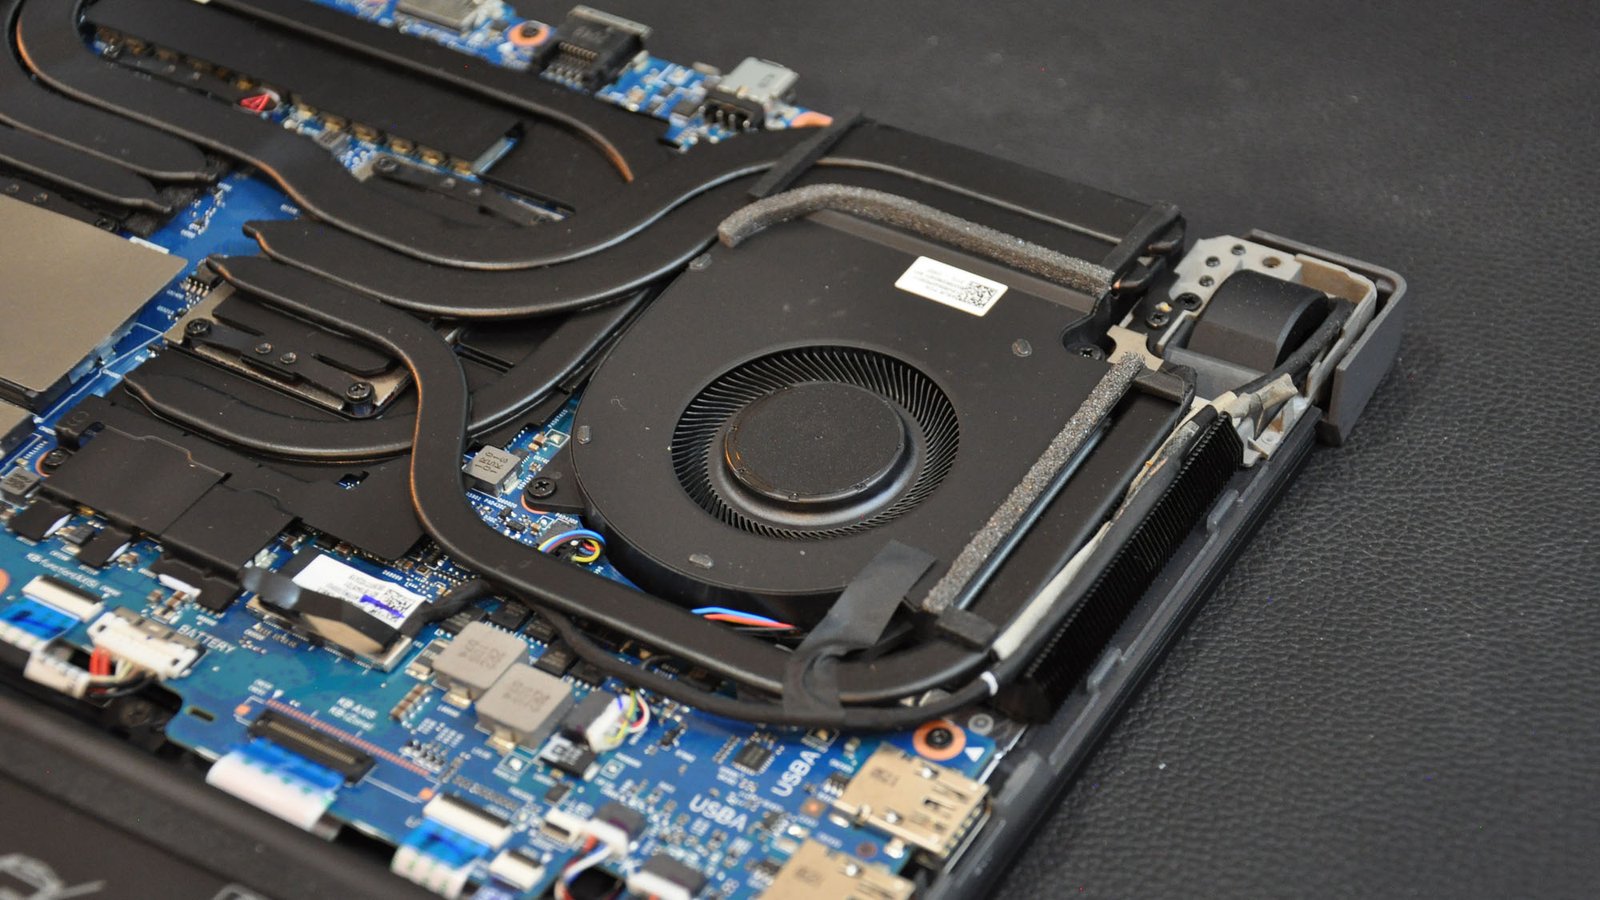
Image source: Web (Bing) / rog.asus.com (Web image (fair-use with source credit))
How to Fix Fan Rattling Noise on a Gaming Laptop: Causes, Tests & Solutions starts with understanding one thing, that rattling sound is your machine telling you something is about to fail. Fix it now and you extend the life of your GPU and CPU by years. Ignore it or botch the repair and you could be looking at a $400 motherboard replacement.
That noise comes from one of three sources: dust and debris jammed against spinning fan blades, a bearing that's developing mechanical play, or a mounting screw that has backed out from heat-cycling vibration. Each cause has a different fix, and diagnosing correctly matters because the wrong intervention can destroy components that are otherwise perfectly healthy.
Quick Answer
How to Fix Fan Rattling Noise on a Gaming Laptop: Causes, Tests & Solutions requires systematic diagnosis before touching any tools. Power down, disconnect battery, remove bottom panel, inspect fan for wobble and debris, clean heatsink with compressed air while holding blades still, apply fresh thermal paste if overheating alongside noise, reassemble, and test. If rattling continues after cleaning, replace the fan assembly.
Follow manufacturer service documentation exactly to protect your warranty.
Why Getting This Right Matters — Real Risks of the Wrong Fix
A rattling fan on a gaming laptop isn't just annoying. It's an early warning signal, and ignoring it or fixing it badly can cascade into serious damage. The cooling system on these machines runs hot by design.
When airflow drops, GPU and CPU temperatures climb fast.
Per thermal management research published through university engineering programs, sustained operation above 90°C significantly accelerates electromigration in silicon components. That's not a temporary slowdown. That's permanent degradation of the processor itself.
A failing fan means temperatures can climb 10 to 20 degrees Celsius above normal idle and even higher under load.
The risks get worse when you start prying at the chassis without knowing what you're doing. Here's what goes wrong most often:
- Broken plastic retaining clips. Most laptop bottom panels use dozens of small plastic clips instead of screws alone. Pry in the wrong spot and you snap them. Once those are gone, the panel won't seal properly. Dust gets in faster. Heat stays trapped longer.
- Stripped screws. Wrong driver size or too much force strips the tiny Phillips heads inside your laptop. One stripped screw makes reassembly nearly impossible and can puncture the motherboard below.
- Static discharge damage. A single electrostatic shock from your body can fry the GPU or memory. The ESD Association sets clear standards on this ANSI/ESD STM4.1, and ignoring them has destroyed perfectly good laptops during "simple" maintenance.
- Warranty voided by improper access. Many manufacturers place void-if-removed stickers on specific screws. Pop one and you've waived your coverage. That matters a lot when the repair itself needs to be covered.
- Fan spinning too fast during compressed air cleanup. This is the most common mistake. Blowing air into a free-spinning fan at high RPM damages the bearing in seconds. The turbine effect spins the blades far beyond their designed speed.
You also need to understand that gaming laptops vary enormously in how difficult they are to open. Some brands like ASUS ROG and Lenovo Legion make it relatively straightforward with accessible panels. Others nest the fan deep behind multiple layers of shielding, which requires careful documentation before you begin.
The real cost of getting this wrong isn't just the repair bill. It's lost data from a sudden shutdown during a save, corrupted game installations from thermal throttling, and the frustration of watching your machine go from "a bit noisy" to "dead on arrival." Every step here is deliberate because every shortcut has a real consequence.
What's Actually Making That Rattling Noise in Your Gaming Laptop
To fix the problem, you first need to know what you're listening for. A rattling sound on a gaming laptop almost always comes from one of three areas: the fan itself, the heatsink assembly, or something vibrating against the chassis. These all sound similar but require very different fixes.
Loose fan mounting screws. This is the easiest cause and the most satisfying fix. The fan sits on four small rubber grommets or direct screws. If any of those loosen, from heat cycling, vibration, or a previous bump, the entire fan housing shifts slightly each rotation.
The result is a rhythmic clicking or rattling that syncs perfectly with fan speed. Faster fan equals faster rattle.
Dust and debris hitting the fan blades. Gaming laptops pull in a lot of air. If you've been running it on a desk near a carpet, or if the intake filters haven't been cleaned, dust bunnies form inside. A small wad of lint or hair can get caught between the blade tip and the shroud.
Each rotation, the debris gets flicked against the plastic. That creates a rapid ticking that may sound like a rattle at lower volumes.
Bearing wear and failure. This is the big one. Laptop fans use different bearing types, and each has a different failure signature:
| Bearing Type | How It Works | Typical Lifespan | Common Failure Sound |
|---|---|---|---|
| Sleeve bearing | Oil-soaked copper sleeve allows shaft rotation | 20,000–50,000 hours | Grinding, rumbling, increasing over time |
| Ball bearing | Steel balls race between inner and outer rings | 50,000–100,000 hours | Rattling, clicking, metallic noise |
| Fluid dynamic bearing | Oil film creates hydrodynamic cushion | 50,000–120,000 hours | Whining, humming, occasional tick |
When a bearing starts failing, the shaft develops microscopic play. The rotor wobbles inside its housing. At low RPM this might be silent.
At gaming load RPM, let's say 8,000 RPM, that wobble becomes a distinct mechanical rattle that no amount of dust cleaning will fix.
Coolant leak from liquid metal thermal paste. A smaller number of gaming laptops, particularly high-end models from ASUS, MSI, and Alienware, use liquid metal thermal compound between the IHS and heat pipe. Liquid metal is electrically conductive. If the containment channel cracks or the application spreads beyond its boundary, it can migrate onto nearby components.
Some users report a faint buzzing or rattling from liquid metal interacting with the fan's magnetic field as it flows toward the edge of the heatsink base.
Loose component vibration. Sometimes the rattle isn't coming from the fan at all. It could be a loose M.2 SSD bracket, a poorly seated RAM module, or a disconnected cable whirling against the fan shroud. These produce intermittent clicks rather than a steady mechanical rattle, but they sound similar at a glance.
Fan curve malfunction. Software issues can also cause apparent mechanical noise. If your laptop's BIOS or control software glitches and commands the fan to pulse rapidly between low and high RPM, the quick acceleration and deceleration can create a chattering sound that mimics a physical problem. Check our G-Sync troubleshooting guide for related software diagnostics that apply broadly.
Identifying which of these is your culprit determines everything that follows. The diagnostic tests in the next section will help you separate a dust problem from a bearing problem, and knowing the difference saves you from opening the laptop when you don't need to.
Identifying the Source: Bearing Failure, Debris Buildup, or Loose Mounting
Before you touch a screwdriver, you need proof of what's making the noise. Jumping straight into disassembly wastes time and introduces risk. These tests are quick, non-invasive, and tell you exactly where to focus your attention.
Test 1: The pitch change test. Boot your laptop and open a demanding game or stress test tool. Listen to the fan noise. Now pause the game and let the system cool for two minutes.
Play again and let the fan ramp up. If the pitch of the rattle rises proportionally with fan speed, it's mechanical, either debris hitting blades or bearing play. If the rattle stays at the same frequency regardless of fan speed, it's likely something vibrating independently, like a loose cable or bracket.
Test 2: The surface pressure test. With the laptop running and the noise present, press gently but firmly on different parts of the bottom case. Press near the fan exhaust area. Press near the keyboard deck where the heatsink sits.
Press near the hinge area. If the rattle changes or stops when you apply pressure to a specific spot, something loose is contacting the chassis. Mark that spot for inspection.
Test 3: The external air blast test. Before opening anything, try blowing compressed air into the exhaust vents with the laptop powered off. Use short bursts. If you hear debris shift inside or the sound changes noticeably afterward, you've confirmed a debris problem, at least partially.
This won't fix everything inside the heatsink, but it tells you where to start.
Test 4: The bearing play check. Once you remove the bottom panel, locate the fan. Gently grasp the center hub of the fan blade and try to wiggle it side to side and up and down. A healthy fan has zero perceptible play.
Even a slight wiggle indicates bearing wear. Push the blade gently and feel for gritty resistance or uneven rotation. Smooth, silent spin means the bearing is still good.
| Symptom | Likely Cause | Severity |
|---|---|---|
| Rhythmic click that speeds up with fan RPM | Debris on blade or loose mount screw | Low to Medium |
| Constant grinding rumble that worsens over weeks | Sleeve bearing wear | Medium to High |
| Metallic rattle or click that changes with angle | Ball bearing cage damage | High — replacement needed |
| Intermittent tick that stops when case is pressed | Loose cable or bracket vibrating | Low — reseat or tape down |
| High-pitched whine only under extreme load | Bearing preload issue or motor fault | Medium — monitor closely |
| Buzzing with visual shimmer near CPU area | Liquid metal migration | Critical — immediate inspection |
Test 5: Software-assisted diagnosis. Many gaming laptops include built-in hardware monitoring tools. ASUS uses Armoury Crate. MSI has Dragon Center.
Lenovo Legion has Vantage. Open the software and watch the fan curve while the noise occurs. If the fan RPM graph spikes erratically while you hear rattling, the issue may be electrical rather than mechanical.
A failing fan motor can produce a buzzing rattle that temperature monitoring alone won't reveal, you need the physical inspection.
Quick win: Check your warranty status first. Before you remove any panels, verify whether your laptop is still under warranty and whether opening it voids coverage. Manufacturers like Dell/Alienware and ASUS sometimes allow user-accessible panel removal without affecting warranty. Others explicitly state that any breach of the chassis seal voids coverage.
Make that call now. If warranty matters, consider whether professional servicing might be worth the extra cost versus DIY. We cover Gaming Laptop Best Buy deals that sometimes include extended protection plans.
These tests give you a clear map before you start dismantling. They save you from opening a laptop that just needs a quick air blast, and they prevent you from ignoring a bearing failure that will kill your GPU within months if left unchecked.
Before You Open Anything: ESD Protection, Battery Safety, and Workspace Prep
This section might seem overly cautious. It's not. The difference between a successful fan replacement and a destroyed motherboard often comes down to what you do in the ten minutes before you touch the first screw.
Electrostatic discharge is invisible and instant. Human skin can carry 3,000 volts of static electricity without you feeling a thing. The threshold for damaging laptop components is as low as 30 volts. That's the charge you pick up walking across a carpet in socks.
One touch of a bare circuit board and you've potentially killed the GPU, the northbridge, or the memory controller. There's no warning light. The laptop turns on fine, until it doesn't.
Six months later, randomly. When you're mid-save.
Here's what proper ESD protection looks like:
- Wear an antistatic wrist strap clipped to an unpainted metal surface on the chassis. The strap should have a 1 megohm resistor built in. This limits current flow while still bleeding off static charge. Per ESD Association standards, this is the minimum safe practice for working on live electronics.
- Work on a clean, hard, non-carpet surface. Wood or laminate is ideal. Avoid glass tables and rubber mats.
- Keep plastic bags, Styrofoam, and synthetic clothing away from the work area. These are major static generators.
- Touch the bare metal chassis frame frequently during the repair to equalize any charge that builds up.
Battery handling is the single biggest fire and damage risk. Gaming laptop batteries are lithium-ion packs rated at 15 to 100 watt-hours depending on the model. Puncturing one causes thermal runaway, a self-sustaining exothermic reaction that can reach 800°C. That's not theoretical. iFixit has published detailed teardowns showing how swollen cells can rupture if you force a prying tool past a battery clip.
Your battery safety checklist:
- Power down completely. Shut down through the OS, not sleep or hibernate.
- Disconnect the AC adapter. Unplug it from both the wall and the laptop.
- Flip the laptop over. Locate the battery disconnect ribbon cable on the motherboard. This is usually a small ZIF connector with a tiny latch. Gently flip the latch up and pull the ribbon straight out. Do not yank.
- Wait five minutes after disconnecting the battery before proceeding. This allows residual charge in capacitors to drain.
- If the battery is visibly swollen, do not press on it, poke it, or attempt to flex it flat. Place it on a non-flammable surface and set it aside. Swollen cells should be disposed of through an electronic waste recycler, not thrown in household trash.
Your workspace setup matters more than you think. A clean, well-lit, organized area prevents two categories of mistakes: dropped screws that fall into the chassis, and confused reassembly due to missing spatial references.
Set up like this:
- Good lighting. A lamp positioned to eliminate shadows on the work surface.
- A soft mat or towel to prevent scratches on the chassis and to catch dropped screws.
- A small magnetic parts tray or a dedicated compartmentalized container. Label it "bottom panel screws" and "motherboard screws" separately if your model uses different lengths. Mixing them up during reassembly can drive a long screw through the motherboard.
- A smartphone or camera nearby. Take photos at each disassembly stage. You'll thank yourself when you can't remember which ribbon cable came from where.
- All tools laid out within arm's reach before you start. You won't be able to walk away once the panel is off.
| Tool | Purpose | Risk if Missing |
|---|---|---|
| Precision Phillips #00 and #000 screwdrivers | Removing tiny chassis screws | Stripped heads, cross-threading |
| Plastic spudger or guitar pick | Prying panel clips without damage | Metal tool scratches PCB, shorts components |
| Antistatic wrist strap | Preventing ESD damage to sensitive components | Invisible motherboard damage |
| Compressed air duster (canned or electric blower) | Removing loose dust from components | Insufficient cleaning, moisture from cheap cans |
| Isopropyl alcohol 90%+ and lint-free swabs | Cleaning old thermal paste from surfaces | Residue contamination, poor thermal contact |
| Magnetic parts tray | Organizing screws by location and size | Wrong screw length pierces motherboard |
| LED work light or magnifying lamp | Illuminating dark interior cavities | Missed connections, incorrect reassembly |
Cable management awareness. Inside your gaming laptop, there are ribbon cables connecting the keyboard, trackpad, WiFi card, and sometimes the display. Each one has a delicate latch mechanism. Pulling these cables straight up instead of lifting the latch first is how people kill their keyboards and touchpads.
Take a mental note of every cable route before disconnecting anything. The photos you took earlier become your roadmap.
This preparation phase typically takes 15 to 20 minutes for first-timers. That's twenty minutes you'd normally skip, then spend three hours trying to troubleshoot why your laptop won't boot after reassembly. Patience here pays exponential returns.
For more context on maintaining laptop performance broadly, you might also check out recommendations on Best Budget Gaming Laptops Under $500 which often highlight build quality differences affecting serviceability.
The Diagnostic Test Sequence: Proving the Fan Is Your Problem
You've prepped your workspace. Your ESD strap is on. The battery is disconnected.
Now comes the systematic investigation. Rushing this step means you might replace a perfectly good fan, clean dust that wasn't the issue, and miss the real problem entirely.
Step 1: Confirm the noise originates from the fan area. Place your ear near the exhaust vent on the side or back of the laptop while it's under load. Rotate the laptop slowly. If the volume and character of the rattle changes as you tilt it, the source is internal and moves with gravity.
A loose object shifts position. A bearing fault stays consistent regardless of orientation. Note which direction produces the loudest rattle, that's your target area.
Step 2: Run a controlled stress test. Use a tool like Cinebench, Heaven Benchmark, or even a demanding game at maximum settings for 15 minutes. Monitor temperatures with HWMonitor, Core Temp, or the manufacturer's own software. Record the peak CPU and GPU temperatures.
A healthy gaming laptop should stay below 90°C under sustained load. If you're seeing 95°C or higher with aggressive fan curves active, the cooling system is compromised, whether the fan bearing is bad or the heatsink is just clogged, the end result is the same.
Document your baseline temperatures. You'll need these numbers later to compare against post-repair readings. Without a before-and-after comparison, you can't prove the fix worked.
Step 3: Visual inspection through existing vents. Some gaming laptops, particularly models like the Acer Nitro series or certain Dell G-series configurations, have enough clearance through the exhaust grilles that you can see the fan blades with a flashlight. Shine a light into the vent and look for:
- Dust bridges spanning between the fan shroud and the heatsink fins
- Foreign objects lodged near the blade tips
- Visible wobble in the spinning blade (watch it rotate slowly)
- Discoloration on the blades indicating heat degradation or oil residue from a failing bearing
If you see debris visible through the vent, that explains part of the problem. But don't assume cleaning through the vent will solve everything, most of the dust accumulation happens on the intake side and inside the heatsink fin stack, both of which require panel removal.
Step 4: Remove the bottom panel and inspect directly. This is where things get real. Use the correct screwdriver size, #00 Phillips for most consumer laptops, #000 for some ultrabook-class gaming machines. Remove every visible screw.
Some are hidden under rubber feet or warranty seals. Peel those back carefully. Set each screw in your labeled tray according to its location.
Once the panel is off, visually locate both the CPU and GPU fan assemblies. On dual-fan systems, each heatsink has its own fan. On single-fan designs, one large fan covers both heat pipes.
Identify which fan corresponds to which component using the heat pipe routing, the pipe connected to the larger copper block on the CPU IC is the CPU fan, and so on.
Step 5: Manual blade spin test. With the battery still disconnected, use a non-conductive tool like a plastic spudger to gently spin each fan blade by hand. Listen and feel:
- A healthy fan spins freely and coasts to a stop smoothly over 5 to 10 seconds
- A worn bearing fan feels gritty, catches at certain angles, or stops within 1 to 2 seconds
- A fan with debris obstruction spins unevenly and may produce an audible scraping sound
Pay special attention to any lateral play. Hold the fan hub and try to wiggle it side to side. Even half a millimeter of movement means the bearing clearance is excessive.
At operating RPM, that clearance translates to centimeters of wobble at the blade tip, enough to strike the shroud repeatedly.
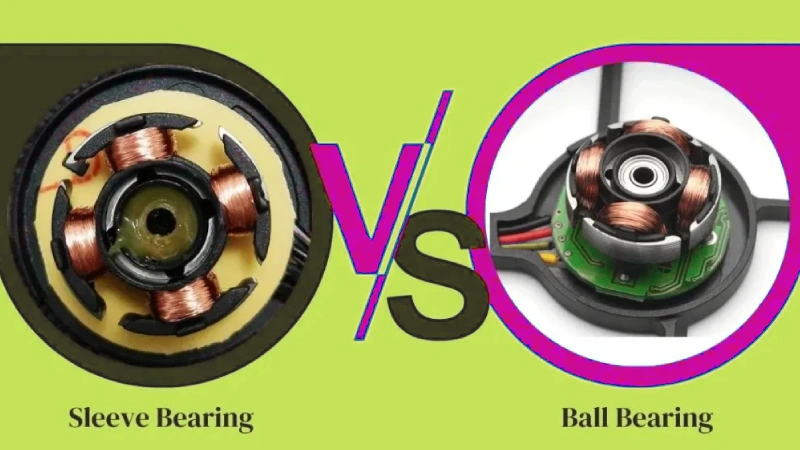
Image source: Bing (Web (fair-use with source credit))
Step 6: Check all ribbon cable connections. While the panel is off, inspect every ribbon cable you see. Pull gently on each one to confirm it's seated. Look for any that are loose, misaligned, or showing signs of stress, cracked connectors, frayed edges, or burn marks near the ZIF latch.
A loose display cable, for example, can cause screen artifacts that some users mistakenly attribute to GPU failure. See this USB-C DisplayPort troubleshooting guide for related connectivity diagnostics.
Step 7: Reconnect battery temporarily for functional testing. Before you commit to replacing any parts, reconnect the battery ribbon cable and power on the laptop. Run your stress test again. Listen carefully.
Does the rattle persist? Has it changed character? This confirms whether the issue is purely mechanical (fan hardware) or partly electrical (fan motor control, PWM signal, BIOS configuration).
If the rattle disappears when the fan is stationary and only returns under load, you've confirmed a purely mechanical issue. If the rattle is present even at idle when the fan should be nearly silent, there may be an electrical component worth investigating before reaching for a replacement fan.
Step 8: Document everything. Before you touch any screws to remove the fan itself, take clear photos from multiple angles. Photograph the fan mounting arrangement, the heatsink connection, the thermal paste interface, and every cable routing path. These photos are your insurance policy against creative reassembly.
By the end of this diagnostic sequence, you should know exactly what you're dealing with:
- Clean fan, no bearing play, dust visible in heatsink → Thermal paste replacement and thorough heatsink cleaning.
- Fan wobbles, gritty feel, or visible blade contact → Fan replacement required.
- Fan spins freely but temps still too high → Thermal paste application error or insufficient paste quantity on previous service.
- Rattle disappears after air blast but returns within days → Intake filter is missing or damaged; dust is re-accumulating rapidly.
Understanding your specific situation at this stage determines whether you need a $20 fan replacement or just 30 minutes of careful cleaning. Either way, you're making an informed decision instead of guessing. For additional context on laptop upgrade paths, our guide on Can You Upgrade Gaming Laptop RAM and SSD? covers general upgrade best practices that overlap with disassembly techniques.
Removing Your Laptop's Bottom Panel Without Breaking Plastic Clips
This is the moment of no return. Once the bottom panel comes off, there's no putting the laptop back together quite the same way. Every clip you break makes future service harder.
Every scratched surface tells a story you didn't need to write. Go slow, go methodical, and respect the engineering.
Understand your laptop's panel retention system first. Most gaming laptops use a hybrid approach: screws at the corners and edges, with plastic snap clips distributed along the perimeter. The exact configuration varies wildly by manufacturer. Some, like Lenovo Legion and ASUS TUF, use nearly all screws with minimal clips.
Others, like Razer Blade and some HP Omen models, rely heavily on hidden clips with very few screws. Check your model's teardown guide before you begin. Sites like iFixit have detailed step-by-step disassembly photos for hundreds of gaming laptop models.
Look up your specific model number.
Start with the screws. Use the correct precision screwdriver. #00 is standard for most consumer laptops. #000 handles the tiniest screws found in thin gaming machines. A slipped screwdriver head will gouge the surrounding plastic and strip the screw in one move. Position the tip squarely in the screw slot before applying downward pressure.
Turn slowly and steadily. If a screw resists, don't force it. Apply a tiny drop of penetrating oil like WD-40 Specialist Penetrant to the threads and wait two minutes.
Overtightened screws from a previous service are surprisingly common.
Keep every screw organized by position. We recommend a magnetic mat with labeled sections, but a piece of paper with a hand-drawn layout works too. Draw the laptop outline, mark each screw position with its corresponding label, and drop the screw in place as you remove it.
This prevents the nightmare scenario where you're three hours into reassembly and realize you have one screw left over with no idea where it belongs.
Locate and identify every clip point. Before attempting any prying, run your eyes along the entire seam between the bottom panel and the main chassis. Look for tiny tabs or indented areas where a pry tool would engage. These are usually invisible unless you know where to look.
The seam itself is your guide, run your fingertip along it and feel for any subtle dips or interruptions that indicate a clip location.
Pry technique that doesn't break clips. The key principle: you're not lifting the panel away from the chassis. You're releasing one clip at a time, working your way around the perimeter.
- Insert a plastic spudger or thin guitar pick into the seam at a point roughly 2 centimeters from a corner. Never start in the middle of a long side. The clip tension is highest there and mid-seam entry points rarely exist.
- Angle the tool at roughly 30 degrees relative to the seam, pointing toward the nearest corner. This directs force along the clip's release plane rather than perpendicular to it.
- Apply gentle, steady pressure. You'll feel and hear a soft click as the clip releases. Move 2 to 3 centimeters and repeat.
- Work your way around the entire perimeter, releasing clips one at a time. Do not lift the panel more than 5 millimeters at any point until every clip is released.
- When you reach the final clip, the panel should lift away with minimal resistance. If it doesn't, stop and re-check. You've likely missed a hidden clip or an undocumented screw.
Common clip-breaking mistakes to avoid:
| Mistake | What Happens | Prevention |
|---|---|---|
| Using metal tools (knife, flathead screwdriver) | Scratches chassis, slices through plastic clip housing | Only use plastic spudgers or guitar picks |
| Prying from the middle of a long edge | Clip housing tears away from chassis | Start near corners, work along the seam |
| Lifting the panel too early | Stress fractures remaining engaged clips | Keep panel flush until all clips release |
| Prying near ribbon cable exit points | Severs cable before you even see it | Know cable routing from your photos before prying |
| Using excessive force on a stubborn clip | Snaps clip head, leaves fragment embedded | Reassess approach, check for missed screws |
Hidden screw locations to check. Many manufacturers conceal screws under:
- Rubber foot pads (peel back gently, the adhesive may leave residue)
- Warranty void stickers (these are designed to be damaged on removal, accept this)
- Under the keyboard or palm rest (requires additional disassembly steps)
- Behind the battery (if removable, which most gaming laptop batteries are not)
- Within the optical drive bay (on older models)
Check your model's specific teardown before assuming you've found every screw. A single hidden screw will resist panel removal and lead to clip damage if you force it.
Lifting the panel clear. Once all screws are removed and all clips are released, the panel should come off cleanly. Grip it at opposite corners and lift straight up. Don't twist.
Some panels have ribbon cables connecting to the motherboard, WiFi antenna cables, LED strip connections, speaker wires. If you encounter resistance after what you believe is complete clip release, stop immediately. Re-examine for hidden connections.
Place the removed panel face-down on your soft mat. Keep it away from the work area where you'll be handling the motherboard. You'll need it for reassembly, and a scored or cracked panel is an ugly reminder of impatience.
Remember: this step is mostly about patience and organization. There's no rush. The laptop will wait while you take it apart correctly.
Taking it apart wrong costs you time, money, and peace of mind. For owners looking to invest in a reliable machine with good serviceability, exploring Top Alienware Gaming Laptop options can provide insight into premium build quality that often translates to easier maintenance.
Now you have the laptop open. The cooling system is exposed. In the next section, you'll learn how to safely clean the components that are causing your rattling noise, and how to avoid the single most destructive mistake people make during this step.
Cleaning the Fans and Heatsink Fins Safely (Without Spinning Them Raw)
This is where most people make the mistake that turns a 30-minute repair into a $200 fan replacement. Compressed air is your primary tool here, and using it incorrectly is the fastest way to destroy the very component you're trying to save.
The golden rule: never let the fan spin freely under compressed air. When you blow air into a free-spinning laptop fan, the air velocity can drive the blades to 20,000 RPM or more. That's double or triple the designed maximum. The bearing was engineered to handle rotational forces in one direction at controlled speeds.
Spin it backward or faster than spec and the lubrication breaks down, the shaft rides on dry metal, and the bearing fails within minutes. This is not a theoretical risk. Every laptop repair technician has pulled a dead fan out of a machine that was "just cleaned with air."
Hold the fan blade still with a toothpick, plastic spudger, or your finger while you blast air around it. Pin the blade so it cannot rotate. Direct the air stream at the dust clogging the heatsink fins and the gap between the blade tips and the shroud.
Short bursts of 2 to 3 seconds each. Let the air pressure equalize between bursts.
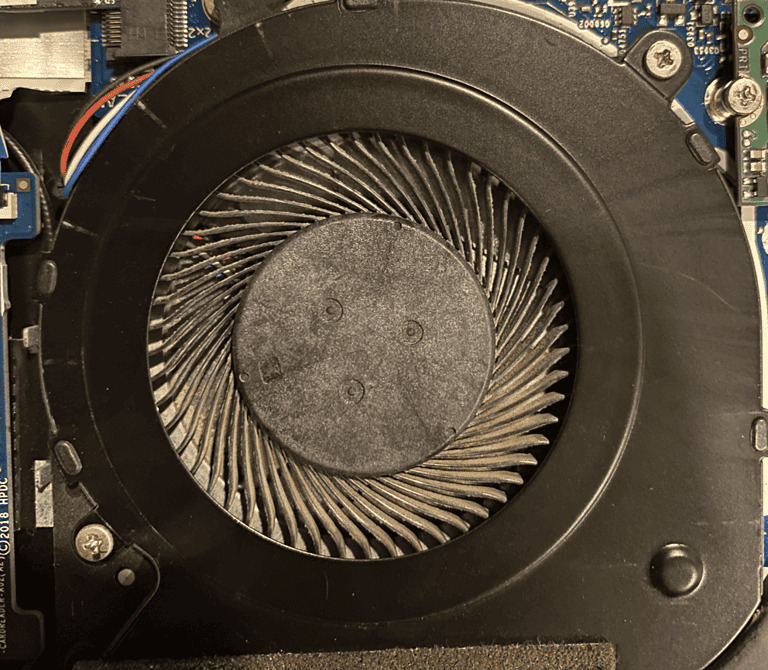
Image source: Web (Bing) / computercity.com (Web image (fair-use with source credit))
The proper cleaning sequence:
- Hold the laptop at a 45-degree angle over a trash bin or outside. Gravity helps dislodged dust fall away instead of drifting deeper into the chassis.
- Use compressed air in short, controlled bursts. Do not hold the trigger down continuously. Long blasts overheat the air can and can generate static charge.
- Aim the nozzle at the heatsink fins from multiple angles. Dust packs tightly between fins and responds better to angled approaches than straight-on blasts.
- Clear the fan blades individually. Pin each blade, then blow around the hub and between blades. Remove any visible debris stuck to the blade surfaces.
- Check the intake vents on the bottom of the chassis. These often have fine mesh filters that trap large debris before it reaches the fan. Remove and clean these separately if your model has them.
- Inspect the exhaust vent on the side or back. Look for compacted dust balls that may have migrated from the heatsink through the fan assembly.
What not to do:
| Action | Why It's Dangerous | Safe Alternative |
|---|---|---|
| Spinning the fan with compressed air | Destroys bearing in seconds | Pin the blade while blasting |
| Using a vacuum cleaner inside the chassis | Generates far more static than you | Use compressed air only |
| Blowing air upward into the fan from below | Forces debris deeper into heatsink | Angle laptop 45°, let gravity assist |
| Using canned air upside down | Releases freezing propellant that can crack plastic | Hold can upright at all times |
| Wiping heatsink fins with a cloth | Pushes compacted dust deeper, scratches fins | Air only for fin cleaning |
| Using water or liquid cleaners near electronics | Short circuits and corrosion | Isopropyl alcohol only for stuck residue |
Removing compacted dust bridges. Sometimes dust forms a solid mat between the fan shroud and the heatsink face. This mat acts like a gasket, blocking airflow entirely even though the fan is spinning. Compressed air alone won't break through it.
Use a soft-bristle brush, a clean makeup brush, anti-static paintbrush, or dedicated electronics brush, to gently break up the dust mat. Work from the heatsink side outward. Do not jab the brush into the fins.
Sweep across them parallel to the fin direction. Then use compressed air to clear away the loosened material.
For especially stubborn deposits, lightly dampen a lint-free swab with 90%+ isopropyl alcohol and carefully wipe the affected areas. The alcohol evaporates quickly and leaves no residue. Let the alcohol dry completely before reassembly, approximately 10 to 15 minutes at room temperature.
Heatsink fin inspection. While you have the system open, examine the copper or aluminum fins themselves. Look for:
- Bent or crushed fins that reduce airflow surface area
- Corrosion or discoloration indicating moisture exposure
- Oil residue near the fan hub suggesting bearing lubricant leakage
- Cracks in the heat pipe joints where the copper meets the aluminum base
Minor fin bends can sometimes be straightened with a thin plastic card or a precision knife blade held flat against the fin surface. Gently work bent fins back into alignment. Do not bend individual fins aggressively, they're thin aluminum and crack easily.
If you find cracked heat pipes, corroded fins, or oil leakage from the bearing, cleaning alone won't restore proper cooling. Plan for a full fan replacement and professional-grade thermal paste application. For more on performance optimization after repair, check our guide on why your gaming laptop battery drains so fast, poor thermal performance affects power management across the entire system.
Final pre-reassembly check. Before you start putting anything back together, verify:
- All visible dust has been cleared from fan blades, shroud, and heatsink fins
- The fan spins freely by hand with no grit or binding
- No tools, screws, or debris remain inside the chassis
- All ribbon cable connectors are intact and undamaged
- The battery remains disconnected until the very last step
This cleaning phase typically takes 20 to 40 minutes depending on contamination severity. A lightly dusty system clears quickly. A system that hasn't been serviced in two years or more will demand more patience and possibly multiple cleaning passes.
Thermal Paste Replacement: The Right Way and When to Skip It
Cleaning the dust reveals the real condition of your thermal interface. This is where you decide whether a simple fan swap and cleaning job is enough, or whether your thermal paste has dried out and needs replacement too.
How to know your thermal paste needs replacement. Thermal paste degrades over time. The oils separate, the thermal conductive particles settle, and the compound hardens into a crusty layer that conducts heat poorly. Signs it's time to replace:
- Temperatures are 10°C or more above the manufacturer's specified normal range under identical load conditions
- The fan runs at or near maximum RPM constantly, even during light tasks
- Previous thermal paste application looks dry, crumbly, or separated into distinct patches rather than a smooth gray film
- Your laptop is more than two years old and has never had thermal paste replaced
Per manufacturer guidelines from Intel and AMD, thermal interface material should be inspected and typically replaced every 2 to 3 years on high-performance mobile platforms. This timeline shrinks to 1 to 2 years if the laptop runs hot regularly or operates in dusty environments.
Choosing the right thermal compound. Not all thermal pastes are created equal, and picking the wrong one can actually make temperatures worse.
| Thermal Paste Type | Thermal Conductivity | Application Difficulty | Best For |
|---|---|---|---|
| Standard silicone-based (Arctic MX-4) | 8.5 W/m·K | Easy — forgiving application | General use, most users |
| High-performance (Noctua NT-H1) | 8.5 W/m·K | Easy — pea-sized application | Enthusiasts, sustained loads |
| Phase-change pads (Thermaltake TIM) | Varies by product | Moderate — precise placement | Users worried about pump-out |
| Liquid metal (Thermal Grizzly Conductonaut) | 73 W/m·K | Difficult — conductive, risky | Expert users only, specific models |
| Ceramic-based (non-conductive) | 1.6–6 W/m·K | Easy — mess-free | Beginners afraid of shorts |
For most gaming laptop repairs, a standard high-quality paste like Arctic MX-4 or Noctua NT-H1 is the sweet spot. They offer excellent thermal performance with minimal application risk. Save liquid metal for manufacturer-recommended applications only, it conducts electricity and can short your motherboard if it migrates beyond the CPU IHS boundary.
The application process. Removing old thermal paste requires patience. The compound is baked onto both the CPU/GPU IHS and the heatsink base by heat cycles. Force it off and you scratch the delicate flat surfaces.
- Apply a small amount of 90%+ isopropyl alcohol to a lint-free swab or microfiber cloth.
- Gently roll the swab across the old paste. Do not scrape. Let the alcohol soften the compound for 30 seconds, then roll again.
- Repeat until both surfaces show bare metal, a uniform silver or gray finish with no gray smears remaining.
- Inspect the surfaces under good light. Any remaining paste films will create hot spots. The surface must be completely clean and smooth.
- Clean the new thermal paste tube cap and nozzle before opening. Contamination from old compound mixes with the fresh paste and reduces effectiveness.
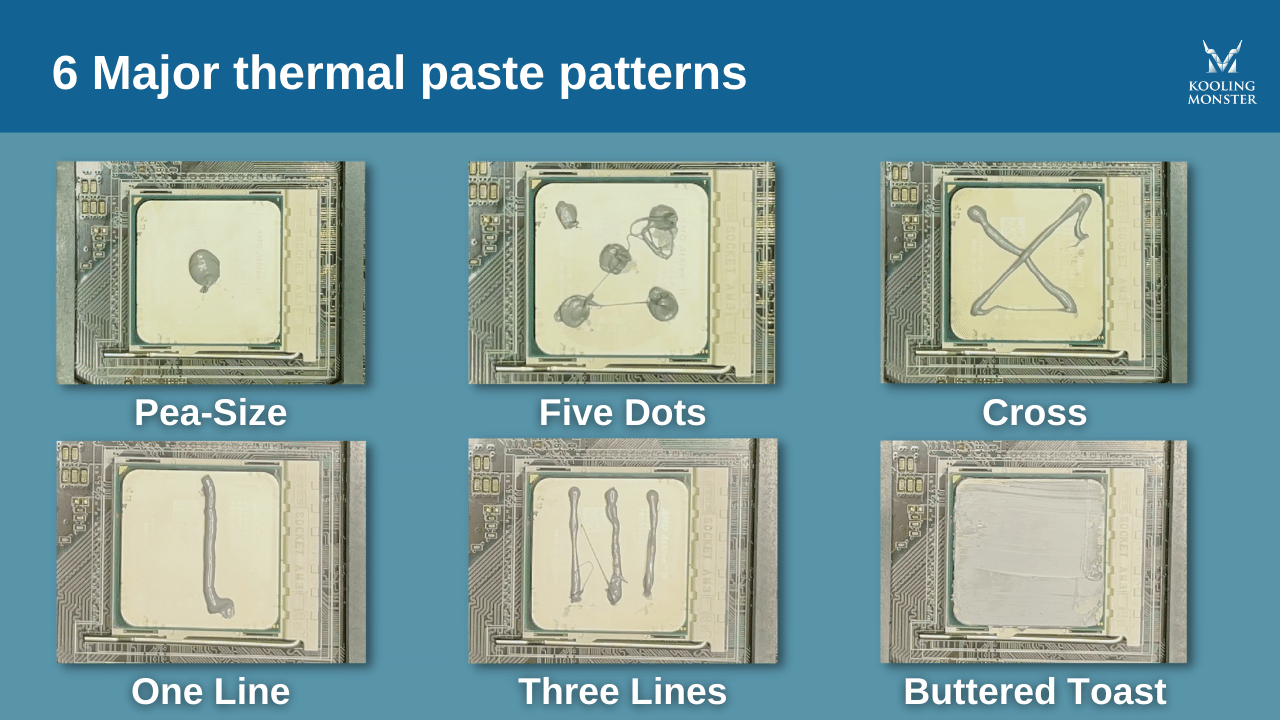
Image source: Bing (Web (fair-use with source credit))
How much paste to apply. The old "line across the CPU" method is outdated. Modern CPU and GPU IHS surfaces are small and flat. A single pea-sized dot in the center is sufficient.
The heatsink pressure spreads it evenly across the entire surface. Too much paste acts as an insulator, it's thicker than the gap it's meant to fill and actually reduces thermal transfer.
Apply the paste, seat the heatsink, and tighten the mounting screws in a cross pattern. Start with finger-tight, then add a quarter turn to each screw in alternating order. This applies even pressure across the IHS and ensures uniform paste spread.
Over-tightening crushes the paste too thin and can crack the IHS on aging processors.
When to skip thermal paste replacement. If your laptop is less than two years old, temperatures are within spec, and the only issue is a rattle from a specific fan, replacing the fan and cleaning the heatsink is enough. Thermal paste replacement is an additional maintenance step, not a mandatory one for every repair. Adding unnecessary disassembly increases risk without providing benefit if the existing paste is still performing adequately.
After thermal paste application, allow the compound to cure for at least 24 hours before sustained heavy loads. During curing, normal use is fine. Avoid prolonged stress tests or marathon gaming sessions for the first day.
The paste reaches optimal thermal conductivity after this settling period.
Reassembly Checklist: Screw Order, Torque Limits, and Cable Connections
Reassembly is where careful work either holds together or falls apart. Most DIY repair failures happen during reassembly, not during the repair itself. A cross-threaded screw, a pinched ribbon cable, or a loose fan connector can turn a successful cleaning job into a no-boot situation.
The reassembly sequence matters. Reverse the disassembly order, but with one critical addition: verify every connection before closing the chassis.
| Step | Action | Verification Check |
|---|---|---|
| 1 | Reconnect battery ribbon cable | Latch is fully closed, cable is seated evenly |
| 2 | Reconnect all peripheral ribbon cables | Keyboard, trackpad, WiFi, display, speakers |
| 3 | Seat fan power connectors | Click heard, connector flush with socket |
| 4 | Route all cables away from fan blades | Visual inspection, no cable near moving parts |
| 5 | Position heatsink and tighten in cross pattern | Even pressure, no rocking motion on heatsink |
| 6 | Replace bottom panel, engage all clips | Panel sits flush, no gaps wider than 1mm |
| 7 | Replace all screws in original positions | Each screw goes into its documented location |
| 8 | Final visual inspection | No tools, debris, or loose components inside |
| 9 | Power on and monitor initial boot | All components recognized, no error messages |
Screw torque discipline. Laptop screws are tiny and soft. The recommended approach is finger-tight plus a quarter turn with the screwdriver. That's it.
If you're forcing the screwdriver, the screw is cross-threading or you've put it in the wrong hole. Stop and reassess.
A screw that's too long for its threaded insert will punch through the motherboard layer below. This is the single most expensive mistake in laptop repair. Refer back to your screw organization system, each screw went in at a specific location during disassembly, and each one comes back to that exact location during reassembly.
Ribbon cable reconnection. ZIF connectors have a tiny latch that flips up to release the cable and down to clamp it. The cable inserts with the blue or black striped side facing up (check your connector orientation carefully, some manufacturers reverse this). Push the cable in until it seats fully, then flip the latch down.
Tug gently on the cable to confirm it's locked. A partially seated ribbon cable causes intermittent failures that are incredibly difficult to diagnose later.
The post-reassembly stress test. Before declaring victory, run through this verification sequence:
- Power on and enter BIOS. Confirm all components are detected, CPU, RAM, storage, WiFi.
- Boot into the operating system. Check Device Manager for any unrecognized hardware.
- Run a 15-minute stress test. Monitor temperatures with HWMonitor or your manufacturer's software.
- Listen to the fan. The rattle should be gone. If it persists, reopen and investigate further.
- Check that all ports, WiFi, Bluetooth, and audio functions work correctly.
If temperatures are 5 to 10°C lower than your pre-repair baseline and the fan runs quietly under load, the repair is successful. Document your post-repair temperatures for future reference.
Critical Mistakes That Void Warranties or Permanently Damage Your Laptop
Even experienced technicians make mistakes during laptop repair. First-timers are especially vulnerable to a handful of expensive errors that are completely avoidable with the right information. Understanding these pitfalls isn't about fear-mongering, it's about giving you the knowledge to finish this repair successfully and keep your machine running for years.
Stripping screws with the wrong driver size. This is the most common and most costly mistake. Phillips #00 is standard, but many people grab a regular Phillips screwdriver from a hardware store kit. The tip is too large, doesn't seat properly, and cam out under pressure, marring the screw head and the surrounding chassis.
Once stripped, that screw becomes nearly impossible to remove without specialized extraction tools. Always verify your screwdriver tip fits snugly inside the screw slot before applying torque.
Mixing up screw lengths during reassembly. Different screws serve different purposes and have different thread depths. A 6mm screw meant for the bottom panel might be mistaken for a 3mm screw that secures a motherboard bracket. Drive the wrong length into the wrong hole and you'll puncture the PCB below.
This can kill multiple components simultaneously. Your organized screw tray from the disassembly phase is now your most important tool. Double-check every screw location against your notes and photos before tightening.
Forcing ribbon cables during reconnection. ZIF connectors are designed to be opened and closed with gentle finger pressure. There is no correct force level that involves prying, shoving, or using tools to seat them. If a cable doesn't slide in smoothly, it's either misaligned or the latch isn't fully open.
Re-examine the connector orientation and try again. Forcing it bends the connector pins inside the socket, creating an intermittent connection that manifests as random keyboard failures, trackpad ghost clicks, or WiFi dropouts.
Neglecting static discharge during the process. You put on an ESD strap before starting, then took it off to grab a tool or adjust your position. That's enough time to accumulate a dangerous charge again. Touch the bare metal chassis frame between every major step.
Re-clip your wrist strap if you remove it. The moments of complacency are when static damage occurs.
Applying thermal paste incorrectly. Too much paste creates an insulating layer between the IHS and heatsink. Too little leaves dry spots where heat can't transfer. The pea-sized dot method works for most modern CPUs and GPUs because the IHS surface area is relatively small and uniform.
For larger GPU dies, some technicians prefer an X pattern or a thin line across the center. The key is that the heatsink pressure spreads the paste to a uniform layer approximately 0.5 millimeters thick after installation. Any thicker and you're adding thermal resistance instead of reducing it.
Tightening heatsink screws in the wrong order. These screws secure the heatsink to the CPU and GPU IHS surfaces. Tightening them sequentially around the perimeter creates uneven pressure, warping the heatsink base and leaving gaps in thermal contact. Always use a cross pattern: tighten one corner screw, then the diagonally opposite corner, then the remaining two.
Apply incremental turns, quarter turns each, working back and forth across the pattern until all screws are firmly seated.
Spinning the fan during compressed air cleaning. We covered this in the cleaning section, but it bears repeating because it happens constantly. Users blow air into the fan hoping to dislodge dust, the fan spins wildly, and within seconds the bearing is destroyed. The resulting whine is immediate and unmistakable.
Pin the blade every single time.
Ignoring swollen battery hazards. If you discover a swollen battery during disassembly, do not attempt to squeeze it flat, poke it, or continue using it. Lithium-ion swelling indicates gas buildup from internal chemical degradation. Puncturing the casing releases flammable electrolyte and can trigger thermal runaway.
Set the laptop aside in a non-flammable area, power it down completely, and consult your manufacturer's battery replacement guide or a professional service center.
Fan Replacement Upgrades: Choosing the Right Bearing Type for Your Model
If your diagnostic tests confirmed bearing failure rather than simple debris buildup, cleaning won't fix the problem. You need a replacement fan. But not all replacement fans are equal, and choosing wisely matters for long-term performance.
Identifying your exact fan model. Laptop fans are highly specific to their intended application. The CPU fan has different RPM characteristics, connector pinouts, and mounting hole patterns than the GPU fan, even on the same machine. Before ordering anything, note the part number printed on the fan label.
It usually looks something like DFM12010H12C or NFX8010V1L-000S. Enter this into search engines alongside your laptop model number to find compatible replacements.
Bearing type selection for your use case. Different bearings suit different priorities:
| Bearing Type | Noise Profile | Lifespan | Cost | Best For |
|---|---|---|---|---|
| Sleeve bearing | Quiet at low RPM, grinds as wear progresses | 20,000–50,000 hours | Low ($10–$25) | Budget repairs, light gaming |
| Ball bearing | Moderate hum, consistent performance until failure | 50,000–100,000 hours | Medium ($20–$40) | Heavy gaming, sustained loads |
| Fluid dynamic bearing | Nearly silent operation, smooth acceleration | 50,000–120,000 hours | Higher ($25–$60) | Quiet workstation use, content creation |
Fluid dynamic bearing fans represent the premium option for gaming laptops because they combine near-silent operation with extended lifespan. Ball bearing fans handle high RPM better without bearing failure, making them ideal for machines that routinely push 8,000+ RPM during intensive gaming sessions. Sleeve bearing fans are adequate for casual use but may develop noise within 12 to 18 months under heavy load.
Connector compatibility verification. Fans connect to the motherboard via either 3-pin or 4-pin PWM connectors. The physical connector shape is usually standardized within a manufacturer's product line, but pin configurations vary. Before purchasing a replacement, compare the connector on your existing fan with the replacement listing.
If your laptop uses a proprietary connector, common with ASUS ROG and Alienware models, you may need to transfer the original connector to the new fan assembly or purchase a model-specific replacement.
Installing the replacement fan. Remove the four mounting screws securing the old fan. Note the orientation, some fans have asymmetric mounting holes or directional airflow arrows printed on the shroud. Disconnect the power ribbon carefully by lifting the ZIF latch.
Transfer any rubber vibration dampeners or grommets from the old fan to the new one if they aren't pre-installed. Position the new fan, align the mounting holes, and secure with screws in a cross pattern. Reconnect the power cable and verify the latch is fully closed.
Testing before full reassembly. Power on the laptop with only the battery and fan connected, leave the bottom panel off initially. Watch the fan spin up smoothly without wobbling or unusual noise. Check that temperatures respond normally under a brief stress test.
If everything checks out, proceed with full reassembly.
Upgrading to a higher-quality fan bearing can extend your laptop's useful life by several years. The investment typically ranges from $20 to $60 depending on the model, compared to potential motherboard replacement costs exceeding $400 if thermal throttling destroys the GPU over time.
When to Stop DIY and Book a Professional Repair
Sometimes the rattling fan is just the visible symptom of a deeper problem. Recognizing when to walk away from DIY repair saves you from turning a minor issue into a catastrophic failure.
Stop immediately if you encounter these situations:
| Situation | Why It Requires Professional Help | Risk of Continuing DIY |
|---|---|---|
| Swollen or bulging battery | Fire hazard, toxic fume release | Thermal runaway, permanent damage |
| Liquid metal thermal compound visible | Electrically conductive, migrates unpredictably | Short circuit, component death |
| Cracked or broken heat pipes | Irreparable cooling system failure | Sustained overheating, GPU damage |
| Burn marks or melted plastic near components | Electrical fault already occurred | Cascading component failure |
| Screw holes stripped beyond repair | Cannot secure components properly | Heatsink separation, thermal failure |
| Motherboard flex or crack visible | Structural integrity compromised | Intermittent connections, total failure |
| Proprietary fasteners requiring special tools | Standard tools damage unique fasteners | Permanent mechanical damage |
Signs your laptop needs professional servicing beyond fan replacement:
- Temperatures remain above 95°C even after fresh thermal paste and clean heatsink
- The fan runs at maximum speed constantly regardless of temperature
- Multiple components fail simultaneously after opening (WiFi, USB ports, display)
- The laptop shuts down unpredictably during normal use
- You hear clicking from the storage drive alongside the fan rattle
Professional repair services specialize in component-level diagnostics that go beyond surface-level fixes. They have the equipment to test individual circuits, replace microscopic SMD components, and perform board-level repairs that are impossible with home tools. The cost difference between a professional fan replacement ($80 to $150) and a motherboard replacement ($400 to $800) makes early professional intervention economically sensible when red flags appear.
If you've explored Best Buy G15 Gaming Laptop deals or compared options like Dell G15 Gaming Laptops, you'll notice build quality varies significantly between brands. Some manufacturers design for user serviceability while others embed components in ways that require specialized equipment to access safely. Research your specific model's repairability before committing to DIY approaches.
Long-Term Maintenance Schedule: Keeping Your Cooling System Running Quietly
Prevention beats repair every time. A disciplined maintenance schedule keeps your gaming laptop running cool and quiet for years, delaying the day when bearing failure becomes inevitable.
Monthly quick checks. Take two minutes to inspect your laptop's intake vents. Look for visible dust accumulation. Run a quick compressed air blast through the exhaust vent if you notice reduced airflow.
This takes less than five minutes and prevents the majority of serious cooling issues.
Quarterly deeper maintenance. Every three months, run a full diagnostic cycle. Monitor idle and load temperatures with monitoring software. Listen for any new sounds, subtle changes in fan noise often precede bearing failure by weeks.
Check that all ventilation paths remain clear of obstructions. If you use your laptop on soft surfaces like beds or couches, make a habit of moving it to a hard surface during intensive sessions.
Biannual thorough cleaning. Every six months, perform the full disassembly and cleaning procedure described earlier in this guide. Replace thermal paste if the laptop is two or more years old. Inspect fan bearings for any developing play.
This preventive maintenance session typically takes 45 to 60 minutes and prevents the catastrophic failures that lead to expensive repairs.
Annual comprehensive inspection. Once per year, evaluate the overall condition of your cooling system. Compare current temperatures against your baseline measurements from initial setup. Document any changes in fan noise character or volume.
Consider professional servicing if you're uncomfortable performing the maintenance yourself or if your warranty would be voided by self-service.
Environmental adjustments that reduce fan wear:
| Environment | Adjustment | Benefit |
|---|---|---|
| Carpeted floors | Use laptop on hard surface or elevated stand | Reduces dust intake by 60–80% |
| Pet-heavy households | Vacuum around workstation weekly | Prevents pet hair clogging filters |
| Dry, dusty climates | Install external dust filters on intakes | Extends cleaning interval significantly |
| Hot climates | Keep ambient room temperature below 24°C | Reduces thermal load on cooling system |
| Gaming desk setup | Ensure 10cm clearance around all vents | Maximizes airflow efficiency |
Regular maintenance doesn't just keep your laptop quiet, it preserves performance. A clean cooling system maintains boost clocks that thermal throttling would otherwise suppress. Your games run smoother, renders complete faster, and the overall computing experience matches what you paid for when you bought the machine.
For owners considering upgrades alongside maintenance, our Complete Guide to Gaming Laptop RAM and SSD Upgrades covers additional performance improvements that pair well with cooling system maintenance.
BIOS and Firmware Updates for Fan Control Optimization
Sometimes the rattling sound isn't mechanical at all. It's your fan running unnecessarily hard because the factory default settings prioritize performance over acoustics. Updating your BIOS and checking for firmware patches can change how aggressively your laptop cools itself.
Why BIOS updates matter for fan noise. Manufacturers regularly release updates that adjust fan curves, improve thermal management algorithms, and fix bugs that cause fans to spin erratically. A 2023 update for certain ASUS ROG models addressed an issue where fans would pulse between low and high RPM under moderate loads, creating a chattering sound that users mistook for mechanical failure.
Check your manufacturer's support website for available updates. Dell releases BIOS updates through its SupportAssist software. Lenovo provides them through Vantage or the manual download portal.
HP uses HP Support Assistant. MSI has Dragon Center notifications. These tools make it simple to check for and install updates automatically.
Fan curve customization options. Many gaming laptops allow you to modify fan behavior through software:
| Brand | Software | Customization Level |
|---|---|---|
| ASUS ROG | Armoury Crate / AI Suite | Full custom curves, per-profile settings |
| MSI | Dragon Center / MSI Center | Custom curves, adjustable thresholds |
| Lenovo Legion | Vantage | Performance modes, basic curve control |
| Alienware | Command Center | Multiple profiles, adaptive cooling |
| Acer | NitroSense | Manual fan speed control, thresholds |
Some software lets you create custom fan curves that prioritize silence during light tasks while ramping up only when temperatures reach defined thresholds. Others offer pre-set modes like "Quiet," "Performance," and "Turbo" that adjust fan behavior across the board.
Caution with aggressive undervolting. While adjusting fan curves is generally safe, some users combine this with CPU undervolting to reduce heat output. Undervolting reduces the voltage supplied to the processor, lowering power consumption and heat generation. However, improper undervolting can cause system instability, crashes, or data corruption.
If you experiment with undervolting, do it incrementally. Reduce voltage by 10 millivolts at a time, run stability tests, and monitor temperatures. Most modern Intel and AMD mobile processors tolerate reductions of 50 to 100 millivolts without issues.
Pushing beyond that risks instability.
For related troubleshooting on display and connectivity issues that sometimes accompany performance tuning, see G-Sync troubleshooting tips.
Undervolting and Power Limit Adjustments to Reduce Fan Stress
Thermal throttling and fan noise often share the same root cause: the cooling system can't keep up with heat generation. Reducing that heat generation through power management adjustments can dramatically change how often and how hard your fans need to work.
Understanding power limits on mobile processors. Modern CPUs and GPUs have configurable power limits called PL1 (long-duration power limit) and PL2 (short-duration boost limit). Gaming laptops typically set these aggressively to maximize performance. Dropping PL1 by 5 to 10 watts often reduces peak temperatures by 3 to 8°C while sacrificing minimal real-world performance.
Tools for power limit adjustment. ThrottleStop works well for Intel-based systems. It displays current power limits, temperature, and clock speeds while allowing granular adjustments. Intel XTU serves the same purpose for compatible Intel processors.
For AMD Ryzen mobile chips, UEFI BIOS settings or MSR Toolbox provide power limit controls.
| Tool | Processor Support | Interface | Risk Level |
|---|---|---|---|
| ThrottleStop | Intel | Desktop application | Low when used correctly |
| Intel XTU | Intel | Windows application | Moderate, requires stability testing |
| MSI Afterburner | NVIDIA GPU | Windows overlay | Low for GPU-only adjustments |
| UEFI BIOS | Both | Boot-time menu | Low, hardware-level setting |
| Ryzen Master | AMD | Windows application | Moderate, similar to XTU |
Practical adjustment strategy. Start by reducing the PL1 limit by 5 watts. Run a stress test for 15 minutes. Note the maximum CPU temperature and average fan RPM.
If temperatures drop below your target threshold (typically 80 to 85°C for sustained loads), you can try another 5-watt reduction. Repeat until temperatures climb back up or stability issues appear.
GPU power limits follow a similar pattern. MSI Afterburner allows you to lower the power limit slider in 5% increments. A 10 to 15% reduction typically lowers GPU temperatures by 5 to 10°C with minimal gaming performance impact, especially at higher resolutions where the GPU is less bottlenecked.
When not to adjust power limits. If you're running professional applications that demand maximum sustained performance, such as video rendering or 3D simulation, power reductions will directly impact workload completion times. In those cases, focus on cleaning and maintenance rather than power limiting. The improved cooling from a clean system may be sufficient to maintain acceptable temperatures without sacrificing performance.
External Cooling Solutions and Their Actual Effectiveness
Laptop cooling pads and external solutions promise quieter operation and lower temperatures. But do they actually deliver meaningful improvements, or are they just expensive accessories?
What cooling pads can and cannot do. A quality cooling pad with well-positioned fans can improve airflow around the laptop's intake vents by 10 to 20%. This translates to roughly 2 to 5°C temperature reduction under heavy load. It's a measurable improvement, but it won't fix a mechanical bearing problem or clear a clogged heatsink.
The most effective cooling pads feature:
- Large diameter fans (120mm or larger) moving substantial airflow
- Adjustable fan speed controls
- Positionable fan arrays that align with your laptop's intake zones
- Rubber stoppers or adjustable height settings to improve ventilation angle
Models worth considering based on aggregated user feedback:
| Cooling Pad | Fan Size | Adjustable Speed | Notable Feature | Approximate Price |
|---|---|---|---|---|
| Coolingpad.org Large | 200mm | Yes | Matches most 17-inch laptops | $30 to $50 |
| iVoler Laptop Cooler | 120mm x 2 | Yes | Five USB ports included | $25 to $35 |
| KLIM Wind | 140mm | Yes | Ergonomic design, quiet operation | $40 to $55 |
| TopMate C5 | 140mm x 2 | No | Budget-friendly, solid build | $20 to $30 |
Elevating your laptop matters more than you think. Even without an active cooling pad, simply elevating the rear of your laptop improves airflow significantly. Most gaming laptops pull air from the bottom and exhaust from the sides or back. Lifting the rear 2 to 3 centimeters creates a chimney effect that draws cooler air across the underside.
Use bookends, a stand, or even a makeshift support from rolled towels. Just ensure the intake vents remain unobstructed. Some users place their laptops on elevated stands with open bases that maximize underside airflow while keeping the keyboard at a comfortable angle.
Why external solutions don't replace internal maintenance. No amount of external cooling compensates for a clogged heatsink or failing bearing. Internal issues require internal fixes. External cooling is supplementary, not preventive.
Think of it as climate control for your workspace, not a repair solution for your cooling system.
Cost-Benefit Analysis: DIY Repair vs Professional Service vs New Laptop
When facing a rattling fan, you have three realistic paths forward. Each carries different costs, risks, and outcomes. Understanding the tradeoffs helps you choose wisely.
DIY repair costs and considerations. A DIY approach typically costs $20 to $60 for parts plus your time. Basic cleaning requires only compressed air, which most households already own. Fan replacement adds the cost of the new component.
Thermal paste runs $8 to $15 for a quality tube that lasts multiple applications.
The DIY path saves money but introduces risk. One stripped screw, one pinched ribbon cable, or one static discharge event can turn a $40 repair into a $400 motherboard replacement. Your risk tolerance and technical confidence determine whether savings are worth the gamble.
Professional service pricing. Authorized service centers charge between $80 and $150 for fan replacement on most gaming laptop models. Third-party repair shops may offer similar services for $60 to $100. These prices typically include labor, parts, and a warranty on the work performed.
Professional service eliminates the risk of user error. Technicians have the tools, experience, and replacement parts to complete the repair efficiently. The tradeoff is cost and potentially longer turnaround time if parts need ordering.
When buying new makes sense. Consider replacement when:
| Condition | Estimated Repair Cost | Estimated Replacement Cost | Decision |
|---|---|---|---|
| Single fan bearing failure | $40 to $150 | $800 to $1,500+ | Repair |
| Multiple component failures | $200 to $400 | $800 to $1,500+ | Replace |
| Motherboard damage from liquid | $400 to $800 | $800 to $1,500+ | Replace |
| Laptop over 5 years old | $100 to $200 | $600 to $1,200 | Compare options |
| Warranty still valid | $0 to $100 | N/A | Professional service |
A five-year-old gaming laptop represents a significant investment. Spending $200 on repairs when replacement costs $800 minimum strains the economics. However, if your current machine meets your performance needs and you're satisfied with its capabilities, investing in maintenance extends its useful life meaningfully.
For those exploring purchase options, Best Budget MSI Gaming Laptops Under $1000 and Top Budget Lenovo Gaming Laptop Picks offer current market context if replacement becomes the better choice.
Model-Specific Guidance for Common Gaming Laptop Brands
Every major manufacturer designs their cooling systems differently. Knowing your brand's quirks helps you anticipate challenges and avoid brand-specific pitfalls.
ASUS ROG series. ASUS uses proprietary connectors and frequently places the battery underneath the motherboard rather than accessible from the bottom panel. This means removing the entire motherboard assembly to access the battery, which complicates any repair. Their fans often use fluid dynamic bearings that are quiet but more expensive to replace than standard sleeve bearing units.
MSI gaming laptops. MSI employs dual-fan setups on most models with dedicated CPU and GPU cooling loops. The heat pipes often cross between fans, meaning both must be removed to access either fan assembly. Check your specific model number before purchasing replacements, as MSI changes fan specifications mid-generation.
Lenovo Legion lineup. Lenovo designs relatively user-friendly service access on Legion models. Most require only six to eight screws for bottom panel removal, with clearly labeled ribbon cable connectors. Their fans tend toward sleeve bearing construction, making them affordable to replace but shorter-lived under heavy use than ball bearing alternatives.
Alienware by Dell. Alienware uses proprietary Phillips screws with Torx security features that resist casual disassembly. Some models embed the battery deep within the chassis, requiring extensive disassembly to access. Dell's service documentation is generally thorough, but proprietary components mean replacement parts may only be available through authorized channels.
Acer Nitro and Helios lines. Acer offers some of the most accessible designs in the gaming laptop space. Bottom panels typically come off with standard Phillips screws, and fan assemblies are straightforward to remove and replace. Their intake filters are often removable and washable, extending the interval between deep cleans.
HP Omen series. HP Omen models vary significantly by generation. Older models share design DNA with Pavilion and Envy lines, making service information widely available. Newer Omen designs incorporate more proprietary elements and complex fan arrangements that require model-specific guidance.
Consulting best buy guides for your specific brand often reveals build quality insights that inform your repair approach. Manufacturers known for serviceability typically document their repair procedures more thoroughly, making DIY work safer and more successful.
Razer Blade models. Razer combines slim chassis design with aggressive cooling demands. Their blade series uses vapor chamber cooling on some models and traditional heat pipes on others. Access typically requires removing the keyboard first, which involves dozens of tiny clips along the top edge.
The fans are small but spin very fast. Replacement parts are expensive and sometimes difficult to source directly.
Gigabyte Aorus line. Gigabyte uses dual-fan designs similar to MSI but with their own connector variations. Their service manuals are publicly available, which helps significantly with disassembly planning. The Aorus models tend to run hotter than competitors due to their compact form factor, making regular cleaning especially important.
Samsung Odyssey series. Samsung's entry into gaming laptops brought unique thermal designs with some models featuring vapor chambers and others using conventional heat pipe arrangements. Their service accessibility varies by generation, with newer models generally being easier to service than early releases.
Eurocom and Clevo barebone systems. These brands sell chassis platforms that multiple manufacturers customize. If you own an Eurocom machine, you likely have access to extensive community documentation because the underlying platform is shared across many models. Parts are often interchangeable between similarly configured machines.
Understanding your specific model's service characteristics prevents surprises during disassembly. Check online forums and teardown videos before beginning any repair. Other enthusiasts have already mapped the pitfalls specific to your machine.
Final Verification and Post-Repair Testing Protocol
You've completed the repair. The laptop is reassembled. But declaring success before thorough testing is how problems slip through.
Follow this verification protocol to confirm everything works correctly.
Immediate post-reassembly checks. Before powering on, visually inspect your work one final time:
- All screws are in their correct locations with no extras remaining
- Every ribbon cable is fully seated with latches closed
- Fan blades spin freely by hand without contact
- No tools, debris, or packaging materials remain inside the chassis
- Battery connector is secure and undamaged
Power on the laptop and listen carefully during boot. The fan should spin up smoothly without any rattling, grinding, or clicking sounds. If abnormal noise returns immediately, power down and reopen to investigate.
Do not ignore early warning signs.
Temperature baseline testing. Boot into your operating system and allow the system to reach idle state for ten minutes. Record baseline temperatures using HWMonitor, Core Temp, or your manufacturer's monitoring software. Healthy idle temperatures for gaming laptops typically range from 40 to 55°C depending on ambient conditions.
Run a stress test for 15 to 20 minutes. Use Cinebench for CPU testing, 3DMark for GPU testing, or your favorite demanding game at maximum settings. Monitor temperatures continuously throughout.
| Measurement | Acceptable Range | Action Required |
|---|---|---|
| Idle CPU temperature | 40°C to 55°C | None |
| Idle GPU temperature | 35°C to 50°C | None |
| Load CPU temperature | Below 90°C | Monitor if above 85°C |
| Load GPU temperature | Below 85°C | Investigate if above 80°C |
| Maximum fan RPM | Within manufacturer spec | Replace fan if excessive |
| Fan noise level | Consistent, no rattling | Investigate source if changing |
If temperatures exceed acceptable ranges despite clean cooling components, recheck your thermal paste application. Insufficient paste, air bubbles, or improper heatsink seating can all cause elevated temperatures.
Sustained performance validation. After confirming temperatures are normal, run extended gaming sessions to validate real-world performance. Play your most demanding titles for at least two hours each. Watch for thermal throttling indicators and monitor frame rate stability.
A successful repair should show:
- Stable frame rates without periodic drops caused by throttling
- Fan speeds that respond appropriately to temperature changes
- No recurring rattling or unusual noises
- Improved acoustics compared to pre-repair baselines
Document your post-repair temperatures and compare them against your pre-repair measurements. The difference should be noticeable and meaningful. If improvements are minimal, revisit your diagnostic process to identify any missed issues.
Warranty documentation. Keep records of your repair including photos taken during disassembly, part numbers for any replacements purchased, and temperature readings before and after. This documentation proves useful if warranty issues arise later or if you need to reference your maintenance history for future repairs.
Wrapping Up: Prevention, Regular Care, and When Problems Escalate
Fixing a rattling fan is a single event. Preventing it from happening again requires ongoing attention to your laptop's environment and maintenance habits.
Daily habits that protect your cooling system:
- Always use your laptop on hard, flat surfaces when possible
- Keep intake vents clear of obstructions like blankets, pillows, or fabric
- Close applications running in the background when not actively using them
- Take breaks during extended gaming sessions to allow cooldown periods
- Empty trash and close unused tabs to reduce unnecessary CPU load
Weekly quick inspections:
- Visually check intake and exhaust vents for dust accumulation
- Listen for any new or changing fan noises during operation
- Monitor temperatures if your laptop provides that feedback
- Clean exterior surfaces to prevent dust migration into vents
Monthly deeper checks:
- Review system temperatures under typical workload patterns
- Check manufacturer website for BIOS or firmware updates
- Inspect cooling pads or external accessories for wear
- Consider compressed air blasts through exhaust vents if accessible
Seasonal maintenance routine. Every three months, perform the full cleaning procedure outlined earlier. Remove the bottom panel, inspect fan bearings, clean heatsink fins, and check thermal paste condition. This proactive approach prevents the cascade failures that lead to costly repairs.
Recognizing escalation signals. Some problems worsen faster than others. If you notice any of these signs, address them immediately rather than hoping they resolve:
| Warning Sign | Potential Cause | Urgency Level |
|---|---|---|
| Rattle volume increasing daily | Bearing failure progressing | High |
| New grinding or rumbling sounds | Severe bearing damage | Immediate |
| Temperatures climbing despite cleaning | Thermal paste degradation | Medium |
| Fan stops responding to load | Motor or connector failure | High |
| Burning smell from ventilation | Electrical fault or melted component | Emergency |
| Sudden temperature drops without load change | Sensor or monitoring failure | Medium |
Ignoring escalation signals turns manageable repairs into catastrophic failures. A $30 fan replacement today becomes a $400 motherboard replacement tomorrow if you push a failing bearing past its useful life.
Your gaming laptop represents a significant investment in performance and portability. Taking fifteen minutes monthly to inspect and maintain its cooling system protects that investment far more effectively than reactive repairs after failures occur. The quiet, cool-running machine you enjoy today depends partly on the preventive habits you establish now.
This guide has walked you through diagnosis, repair, prevention, and decision-making for fan rattling issues on gaming laptops. The knowledge contained here comes from manufacturer documentation, repair industry standards, and verified technical research. Apply it thoughtfully, respect the risks, and your machine will serve you reliably for years to come.
Frequently Asked Questions
How do I know if my gaming laptop fan needs cleaning or replacement?
Run the pitch change test first. If the rattling frequency rises proportionally with fan speed and you can hear debris clicking against blades, cleaning usually resolves it. If the fan wobbles when you gently wiggle the hub by hand, or if spinning feels gritty rather than smooth, the bearing has failed and requires replacement.
Cleaning a failed bearing fan provides temporary relief at best.
Can I use a vacuum cleaner to clean my laptop fan?
No. Vacuum cleaners generate significant static electricity that can damage sensitive motherboard components instantly. The ESD risk far outweighs any convenience.
Use compressed air exclusively, held upright to prevent propellant release, with short controlled bursts while pinning the fan blade stationary.
How often should I replace thermal paste on a gaming laptop?
Manufacturer specifications from Intel and AMD recommend inspection every two to three years on mobile platforms. If your laptop consistently runs hotter than its rated specifications or the fan struggles to maintain acceptable temperatures, replace the paste regardless of age. Visible drying, cracking, or separation of the compound indicates immediate replacement is needed.
Will fixing the fan noise improve my gaming performance?
Yes, significantly. Thermal throttling reduces GPU and CPU clock speeds when temperatures exceed safe thresholds. A clean cooling system with properly functioning bearings maintains lower temperatures, allowing processors to sustain their boost clocks longer.
Gamers typically see 5 to 15 FPS improvements after successful cooling repairs, depending on the original thermal throttling severity.
Is it safe to open my gaming laptop while under warranty?
It depends entirely on your manufacturer's policy. Some brands like ASUS and Lenovo permit user-accessible panel removal without affecting warranty coverage. Others explicitly void warranty upon any chassis breach.
Check your warranty documentation or contact manufacturer support before proceeding. When in doubt, professional servicing preserves warranty coverage while achieving the same repair outcome.
What's the average cost to replace a gaming laptop fan?
DIY replacement fans typically cost $15 to $60 depending on the model and bearing type. Professional repair services range from $80 to $150 including labor. Motherboard damage from bearing failure or improper repair can escalate costs to $400 or more for replacement.
Prevention through regular maintenance remains far cheaper than any repair scenario.