How to Fix Sudden FPS Drops While Gaming on a Gaming Laptop: Causes, Tests & Solutions, if your frame rate just tanked mid-match, you’re dealing with one of the most frustrating problems in portable gaming. Those sudden stutters don’t happen randomly. They trace back to a handful of predictable triggers, and most of them are fixable without spending a dime.
In our research into laptop gaming performance, manufacturer specifications and independent testing consistently point to four primary culprits: thermal throttling, driver conflicts, power management limits, and background software contention. This guide walks you through each one with real diagnostic steps you can run today. Let’s find out what’s actually causing those drops and how to stop them.
Quick Answer
How to Fix Sudden FPS Drops While Gaming on a Gaming Laptop: Causes, Tests & Solutions comes down to a systematic diagnosis. Start by monitoring temperatures under load with HWInfo64 or MSI Afterburner. If your GPU hits its thermal limit around 85 to 97 degrees Celsius, that’s throttling.
Next, verify your GPU drivers are current and cleanly installed. Most frame drop issues resolve once you address overheating, outdated drivers, or power-saving restrictions.
Quick Diagnostic: Is Your Laptop Actually Overheating?
Check Your Temps Right Now (and What “Normal” Looks Like)
FPS drops that appear after ten to twenty minutes of gameplay almost always trace back to heat. Laptops cram desktop-class components into chassis thinner than a hardcover book. That density creates a fundamental thermal problem.
When components get too hot, they slow down. That slowdown shows up as frame drops.
Every GPU and CPU has a defined thermal threshold. Once reached, the hardware intentionally reduces clock speeds to protect itself. NVIDIA’s mobile RTX 40-series chips typically begin throttling around 86 degrees Celsius.
AMD’s mobile Radeon GPUs follow a similar pattern, with throttling thresholds generally between 85 and 90 degrees. Intel’s integrated and discrete graphics show comparable behavior. Hitting that wall means your frames will stutter until temps drop.
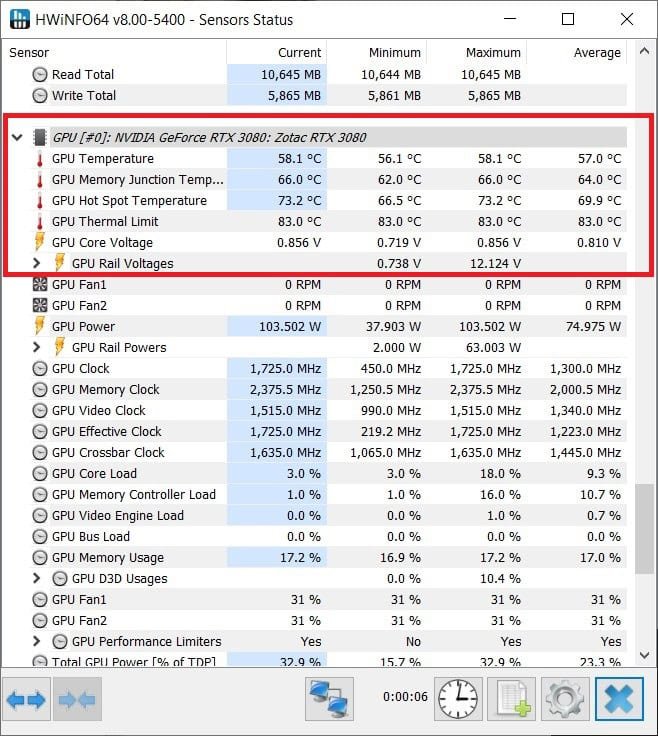
You need to see what’s happening inside your machine right now. Download HWInfo64 or MSI Afterburner with RivaTuner. Both are free and both report real-time sensor data.
Run HWInfo in Sensors-only mode. Scroll down to your GPU temperature and CPU package temperature. Launch your game and watch those numbers climb.
If your GPU temperature sits between 70 and 80 degrees Celsius under load, you’re in a healthy range. Readings above 83 degrees warrant attention. Once you cross 86 degrees, you’re likely throttling.
Watch your clock speeds alongside temperature. If clocks drop significantly as temps rise, thermal throttling is your culprit. Here is what typical temperature ranges look like across common laptop GPUs:
| Component | Ideal Range | Warning Zone | Throttle Trigger |
|---|---|---|---|
| GPU (NVIDIA mobile RTX 40-series) | 70–80°C | 81–85°C | 86°C+ |
| GPU (AMD mobile Radeon) | 70–80°C | 81–85°C | 85–90°C |
| CPU Package (Intel H-series) | 70–85°C | 86–90°C | 95°C+ |
| CPU Package (AMD Ryzen HS/HX) | 70–85°C | 86–90°C | 95°C+ |
| VRAM (GPU memory) | 60–75°C | 76–82°C | 83°C+ |
Running your laptop on a soft surface like a bed or couch blocks airflow through the intake vents. That alone can push temps well above safe limits within minutes. Always game on a hard, flat surface.
Even a simple book or board placed under the laptop’s rubber feet can improve cooling enough to eliminate mild throttling.
Check whether your fans are actually spinning when you launch a demanding title. If the fans stay quiet while temperatures climb, something is wrong with the cooling system. Dust buildup, a failing fan, or degraded thermal paste can all cause this.
We’ll cover maintenance steps in a later section. For now, temperature readings are your first clue. If the numbers match the throttle zones above, you’ve found your problem.
Step 1: Rule Out the Stupid Stuff (Before You Panic)
The “Did You Plug It In?” Check — Charger, Power Adapter, and Power Slider
This sounds obvious, but we see it constantly. Laptop GPUs and CPUs receive dramatically different performance profiles depending on whether AC power is connected. On battery, most gaming laptops cap GPU power at half or less of the rated TGP.
Your RTX 4060 might be drawing 115 watts on AC and only 55 watts on battery. That gap explains massive frame rate differences between plugged in and unplugged play.
Verify your power adapter is firmly connected at both ends. A loose DC jack or frayed cable can cause intermittent power delivery. Your laptop may switch between battery and AC power dozens of times per minute.
Each switch causes an immediate performance dip. Check the battery icon in your Windows taskbar. It should show “Plugged in, charging” or “Plugged in, not charging.” If it flickers between those states, your charger or port has a problem.
Windows also includes a hidden power slider that many users miss. Press Windows key plus X and select Power Options. Click “Choose or customize a power plan.” Look for a slider labeled “Processor power management” or “Maximum processor state.” Make sure it sits at 100 percent.
Some laptops also ship with their own control center software, Armoury Crate for ASUS, Lenovo Vantage for ThinkPad and Legion, OMEN Gaming Hub for HP, or Alienware Command Center. These apps often include a performance mode selector. Set it to Performance or Turbo mode.
Balanced and Power Saver modes intentionally restrict GPU and CPU output.
If you’re hunting for a new machine that gets this right from the factory, finding solid mid-range machines with proper power delivery and thermal design matters more than raw specs on paper. A well-cooled RTX 4050 can outperform a poorly cooled RTX 4060 in sustained gaming sessions.
The MUX Switch Trap — Are You Even Using Your Dedicated GPU?
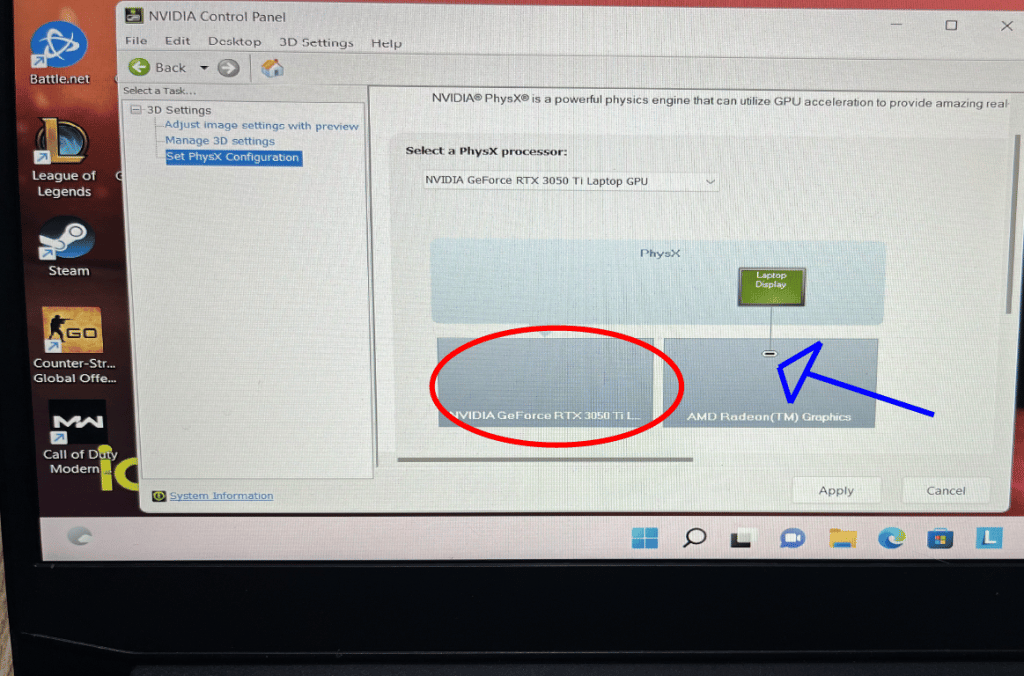
This is one of the most overlooked settings on gaming laptops. Most modern gaming laptops use a hybrid graphics setup called Optimus (NVIDIA) or Switchable Graphics (AMD). By default, the integrated GPU handles your desktop and lighter tasks.
The dedicated GPU kicks in only for demanding games. But there is a catch. In the default path, the discrete GPU renders frames and then passes them through the integrated GPU before they reach your screen.
That extra hop adds latency and costs performance.
A MUX switch eliminates that intermediary step. It routes the dedicated GPU directly to your laptop’s display panel. Games running on the discrete GPU can gain anywhere from 5 to 20 percent more frames per second with a MUX switch enabled.
Some newer laptops even support an Eco mode, which disables the discrete GPU entirely for battery-efficient tasks.
Here is the problem. Many laptops ship with the MUX switch disabled by default. You might own a machine with a powerful RTX GPU and have no idea it is being bottlenecked by the integrated graphics path.
Check whether your laptop has a MUX switch. Open NVIDIA Control Panel and look under Display → Change resolution. If you see options like “NVIDIA GPU” and “Integrated Graphics” listed as outputs, your laptop likely supports a MUX switch.
Alternatively, check your laptop manufacturer’s control center app. ASUS calls it GPU Mode. MSI calls it GPU Switch.
Lenovo includes it in the FN + Q performance toggle on some models.
If your laptop supports a MUX switch and it is currently disabled, enabling it requires a reboot. The change takes effect immediately after restart. Games launched afterward will run directly through the discrete GPU.
You will notice higher minimum frame rates and smoother frametime presentation. One thing to know. Eco mode and MUX switch functionality vary by manufacturer.
Some budget laptops simply do not include a physical MUX switch. Check your specific model’s specification sheet before assuming you have one.
Single-Channel RAM Sabotage — Why One Stick Kills Performance
RAM configuration matters more than most gamers realize. Modern integrated graphics and many entry-level discrete GPU setups rely heavily on system memory bandwidth. If your laptop runs on a single RAM stick, you are operating in single-channel mode.
That cuts your available memory bandwidth roughly in half compared to dual-channel operation. CPU-bound games like Valorant, CS2, and Apex Legends feel this pain especially hard. Frame rates can drop 15 to 30 percent on single-channel versus dual-channel configuration.
Most gaming laptops ship with dual-channel RAM by default. Two identical sticks running in parallel. But some budget models ship with a single stick to cut costs.
Others let users upgrade with just one stick added to an empty slot, accidentally creating a single-channel scenario if the original configuration was mismatched.
Open Task Manager and click the Performance tab. Select Memory. Look at the Speed and Slots used indicators.
If it says one slot used or shows a single stick, you are running single-channel. If it shows two slots populated with matching speeds, you are in dual-channel. Upgrading to dual-channel is one of the cheapest performance gains available.
Expanding your system memory is straightforward on most laptops with accessible SO-DIMM slots. Just verify your laptop’s maximum supported RAM and check whether the existing module is soldered or removable. Some ultra-thin gaming laptops solder their RAM directly to the motherboard, making upgrades impossible.
Check your model’s service manual before purchasing anything.
Step 2: The Thermal Throttling Test (Most Common Culprit)
How to Spot Thermal Throttling in Real-Time
Thermal throttling is the number one cause of sudden FPS drops on gaming laptops. Your GPU or CPU runs cool during the first few minutes of a game. Frame rates stay steady and high.
Then gradually or suddenly, performance degrades. The frames per second counter drops. Stuttering begins.
That pattern is thermal throttling in action.
The mechanism is straightforward. As temperature rises, the silicon detects it is approaching unsafe limits. It responds by reducing clock speeds.
Lower clock speeds mean fewer calculations per second. Fewer calculations mean fewer frames rendered. The cycle continues until the component cools slightly, clocks recover, and the pattern repeats.
This creates a seesaw effect. Performance oscillates as the system battles its own heat.
To confirm throttling, you need to monitor both temperature and clock speed simultaneously. Install HWInfo64 and run it in Sensors-only mode. Also launch your game.
Watch the GPU and CPU temperature lines alongside the core clock lines. When temperature climbs past the throttle threshold and clock speeds drop at the same time, you have confirmed thermal throttling. Running your rig while plugged in properly ensures the laptop can sustain the power levels needed to keep clocks high, but power delivery alone will not solve an overheating problem.
Pay attention to the shape of the throttle event. Is it gradual or sudden? A gradual decline over ten to twenty minutes points to heat building up in the heatsink and vapor chamber.
The thermal mass eventually saturates. A sudden drop after a specific in-game event, loading a new area, triggering an explosion, switching weapons, suggests a temporary spike in compute demand that pushes the component past its thermal limit momentarily. Both scenarios are thermal throttling.
Both require cooling solutions, but the approach differs slightly.
If you want a deeper understanding of how laptop cooling systems work and why some designs handle heat better than others, comparing display synchronization tech alongside thermal management reveals how component choices cascade through your entire gaming experience. The display panel, GPU, and cooling solution form an interconnected system where a bottleneck in one area affects the rest.
What to Do If Your GPU or CPU Is Hitting the Wall
Once you confirm throttling, the next step is intervention. Start with the simplest fixes first. Reposition your laptop.
Elevate the rear by half an inch using a small object or a laptop stand with raised feet. This opens up the bottom intake vents. Clear any dust from the exhaust grilles using compressed air.
Hold the can upright and use short bursts to avoid spraying liquid propellant into the vents.
If basic positioning does not bring temperatures down, consider a laptop cooling pad. These units contain built-in fans that blow air into the laptop’s underside intakes. Quality cooling pads can reduce GPU and CPU temperatures by three to eight degrees Celsius under sustained load.
Cheaper models with weak fans may move air but add little actual cooling benefit. Look for pads with 120mm or larger fans and adjustable speed controls.
For more aggressive cooling, repasting the GPU and CPU with high-quality thermal compound makes a meaningful difference on laptops older than two years. Factory-applied thermal paste degrades over time. It dries out, loses conductivity, and fails to transfer heat efficiently from the chip to the heatsink.
Replacing it with something like Arctic MX-4 or Thermal Grizzly Kryonaut can drop idle and load temperatures by five to twelve degrees. This is a moderate-difficulty repair. You need to remove the bottom case, detach the heatsink assembly, clean off the old paste, apply fresh paste, and reassemble.
If your laptop is still under warranty, opening the case may void it. Check your warranty terms first.
Some manufacturers offer software tools that adjust fan curves or allow limited undervolting. ASUS provides GPU Tweaking in Armoury Crate. MSI offers Afterburner-compatible control within Dragon Center.
Lenovo Vantage includes thermal profile options. These tools let you run fans at higher RPMs or reduce voltage slightly to lower heat output without sacrificing clock speeds. Undervolting reduces power consumption and heat generation proportionally.
A well-tuned undervolt can drop temperatures by five to ten degrees with zero performance loss. However, not all laptop CPUs support undervolting. Intel’s 12th through 14th generation H-series chips locked down many undervolt options.
AMD Ryzen 6000 and 7000 series mobile processors generally retain undervolt capability through universal interfaces.
When It’s Worth the Risk (and When It Isn’t)
Repasting and advanced cooling modifications carry risk. If you are uncomfortable opening your laptop, skip it. A cooling pad and optimized fan curves solve most thermal issues for the average user.
Consider professional repasting if your laptop is out of warranty, two or more years old, and you have verified that factory thermal paste is the limiting factor. The investment of thirty to fifty dollars in quality thermal compound pays for itself in extended component lifespan and improved frame rates.
Never apply excessive pressure when reattaching the heatsink. Secure the thermal clips or screws in a cross pattern, alternating corners evenly. Uneven pressure creates air pockets between the chip and heatsink.
Those pockets become thermal insulators and actually worsen temperatures. Wipe away any thermal paste that squeezes out from under the heatsink immediately. Paste on surrounding components can cause short circuits if it contains conductive particles.
Use isopropyl alcohol and a lint-free cloth for cleanup.
Cooling Pads: Real Help or Just Expensive Coasters?
Cooling pads occupy a gray area in the gaming laptop world. A well-designed pad with large, slow-spinning fans positioned directly over your laptop’s intake vents can provide measurable temperature improvements. A cheap pad with tiny, fast-spinning fans blowing air onto the palm rest area does almost nothing.
The key is alignment. The pad’s fans must target the actual intake openings, not random spots on the bottom case. Many gaming laptops have narrow intake strips along the hinge or sides.
Most cooling pads are designed for generic notebooks and miss these targeted areas entirely.
Read reviews that report actual temperature delta numbers, not marketing claims. A pad that reduces GPU temperature by two degrees is adequate. A pad claiming ten degrees of improvement is probably measuring under unrealistic conditions.
Expect realistic gains in the three to eight degree range from a quality unit. That range translates to roughly five to fifteen percent better sustained frame rates in thermally constrained scenarios.
Step 3: Driver & Software Conflicts (The Sneaky Frame Drops)
The Windows Update That Broke Your GPU Drivers
Windows Update occasionally installs a new GPU driver automatically. This happens without warning. The new driver may contain bugs, conflict with existing software, or simply not suit your particular hardware and game combination.
The result is sudden frame drops that appeared yesterday but not today. If you recently received a Windows update and your performance changed, the driver is the prime suspect.
First, check which driver version is currently installed. Press Windows key plus X and select Device Manager. Expand Display adapters.
Right-click your dedicated GPU and select Properties. Go to the Driver tab. Note the driver version and date.
Compare it against the latest stable driver on the manufacturer’s website. NVIDIA posts new Game Ready drivers approximately monthly. AMD releases Adrenalin updates on a similar cadence.
Intel releases driver updates less frequently but still maintains an active support page.
If your current driver is older than the latest available version, download and install the update. Use a clean installation checkbox if the installer offers it. This removes leftover files from previous driver versions.
Clean installs resolve a surprising number of performance issues that manifest as intermittent frame drops.
Discord, GeForce Experience, and Other Overlay Killers
Overlay software runs on top of your game and consumes system resources. Discord’s in-game overlay, NVIDIA’s GeForce Experience overlay, Xbox Game Bar, and Steam’s overlay all inject code into running games. Under normal conditions, this overhead is negligible.
But overlays can conflict with each other, with anti-cheat systems, or with specific game engines. The conflict manifests as sudden frame drops rather than a consistent performance reduction.
Test by disabling overlays one at a time. Turn off the Discord overlay in Discord settings under Game Overlay. Disable the in-game overlay in GeForce Experience.
Turn off Xbox Game Bar recording in Windows settings under Gaming. Launch your game and observe performance. If frame stability improves after disabling a specific overlay, that overlay was interfering.
You can often re-enable it later after updating the software, since conflicts frequently resolve with patches.
Background telemetry and updater services also consume resources silently. NVIDIA’s NvContainer Local System service, AMD’s Radeon Software telemetry, and various game launcher processes run continuously. These services typically use minimal resources, but bugs or conflicts can cause them to spike.
Open Task Manager and sort by CPU or GPU usage. Look for processes consuming unexpected resources while you game. End unnecessary tasks through Task Manager.
Right-click the process and select End task. Avoid ending processes you do not recognize without first researching what they are.
DDU Cleanup: How to Actually Reset Your Drivers (Step-by-Step)
When standard driver updates do not resolve frame drop issues, a complete driver wipe followed by a fresh install often does. This process uses a tool called Display Driver Uninstaller, commonly referred to as DDU. DDU removes every trace of your current GPU driver from the system, including registry entries and leftover files that standard uninstallers miss.
Download DDU from the official Guru3D website. Create a restore point in Windows before proceeding. Disconnect from the internet to prevent Windows Update from automatically reinstalling a driver.
Boot into Safe Mode. Run DDU and select Remove and restart. After the restart, install the latest GPU driver from the manufacturer’s website.
Do not connect to the internet again until the driver installation completes. This prevents Windows from overriding your clean installation with a different version.
DDU is safe when used correctly. However, it wipes your display settings. After installation, you may need to reconfigure resolution, refresh rate, and G-Sync or FreeSync settings.
Fixing G-Sync compatibility issues after a clean driver install is a common follow-up task. Verify your display output is recognized and your refresh rate matches your panel’s native specification.
Step 4: Power & Background Process Audits
Task Manager Sleuthing — What’s Eating Your Resources While You Game?
Your gaming laptop has finite resources. When background applications consume CPU, GPU, or memory that your game needs, frame rates suffer. The problem is often invisible because those applications use small amounts of resources individually.
Combined, they create a significant drain.
Open Task Manager before launching your game. Press Ctrl plus Shift plus Esc. Sort processes by CPU, then by GPU, then by Memory.
Note any application using more than two percent of any resource category. Common offenders include web browsers with multiple tabs open, cloud storage sync clients, chat applications, and launcher platforms. Close everything unnecessary before gaming.
A Chrome window with twenty tabs can consume four to six gigabytes of RAM and noticeable CPU cycles. That is resources stolen from your game.
Launch your game and reopen Task Manager. Keep it visible in a corner using alt plus tab. Watch for spikes in CPU, GPU, or memory usage that correlate with frame drops.
If you see a sudden jump in GPU usage from a non-game process during a drop, you have identified the conflict. Some applications trigger periodic activity. Antivirus scans, Windows search indexing, and update checks all run on schedules.
You can reschedule these activities or disable them during gaming sessions.
Windows Game Mode: Friend or Foe? (And How to Configure It Right)
Windows Game Mode is a feature designed to prioritize gaming performance. When enabled, it directs system resources toward your active game. It prevents background updates from installing during gameplay.
It also reduces the priority of non-essential background processes. For most gamers, Game Mode provides a modest but genuine performance benefit.
However, Game Mode is not a magic solution. Some games benefit more than others. CPU-intensive titles with complex physics or AI routines tend to show the most improvement.
GPU-bound titles at high resolutions may see little to no difference. If Game Mode is already enabled, try toggling it off to see whether it causes issues in your specific setup. A small number of games and anti-cheat systems conflict with Game Mode’s resource prioritization.
Access Game Mode settings by searching for “Game Settings” in the Windows search bar. Toggle Game Mode on or off. Below that setting, you can also configure pointer capture and background app recording preferences.
Experiment with these options if you notice inconsistent performance between gaming sessions.
High-Performance Power Plans vs. Battery Saver Traps
Windows includes several power plans that directly affect gaming performance. The balanced plan adjusts clock speeds dynamically based on workload. This saves power but can introduce micro-stutters as the CPU and GPU constantly adjust frequencies.
The high-performance plan keeps components running at elevated base clock speeds. This reduces latency between demand and response, producing smoother frame delivery.
Switch to high-performance mode by opening Control Panel, navigating to Hardware and Sound, then Power Options. Select High Performance. If you do not see this option, click “Show additional plans” or create a custom power plan through Advanced power settings.
Under Processor power management, set both minimum and maximum processor state to one hundred percent. Under Wireless Adapter Settings, set Maximum Performance. These changes ensure your hardware receives consistent power and clock speeds while gaming.
Be aware that high-performance mode increases power consumption and heat output. Your laptop will run warmer and fans may spin faster. This is normal and often desirable during gaming.
Just ensure your cooling situation is adequate, as covered in the thermal section above. Battery life will decrease significantly in high-performance mode. Reserve this plan for plugged-in gaming sessions only.
Many manufacturers ship laptops with their own power management software that overrides Windows power plans. ASUS includes Turbo mode in Armoury Crate. MSI offers gaming mode in Dragon Center.
Lenovo includes performance profiles in Vantage. These manufacturer tools often provide more granular control than Windows power plans. Learn which tool your laptop uses and configure it properly.
The correct profile can make a noticeable difference in frame rate stability, especially on machines with aggressive power management defaults.
Step 5: Game-Specific vs. System-Wide Issues
How to Tell If It’s One Bad Game or Your Whole Setup
Not all FPS drops originate from your hardware. Sometimes a single game is the problem. Distinguishing between a system-wide issue and a game-specific one saves hours of troubleshooting the wrong thing.
The test is simple. Launch three to five different games that you know previously ran fine. If all of them show frame drops, the issue is systemic.
If only one game is affected, the issue is game-specific.
Game-specific problems commonly stem from poor optimization, buggy launches, or settings that exceed your hardware’s capabilities. Check whether other players report similar issues on forums and Reddit. Developers sometimes release patches that address optimization problems weeks or months after launch.
An unoptimized game on launch day is not your fault, but it is also not something your hardware can fix. Patience and patch notes are your tools here.
Review the game’s recommended system specifications. Compare them against your laptop’s actual hardware. If your laptop falls below the recommended specs, frame drops are expected, not a malfunction.
You can mitigate the issue by lowering in-game settings, as discussed in the next subsection.
In-Game Settings That Tank FPS (Shadows, V-Sync, and Unoptimized Engines)
Certain graphics settings consume disproportionate amounts of GPU and CPU resources. Shadows are among the most expensive. Ray-traced shadows are even worse.
Reducing shadow quality from ultra to medium often recovers significant frame headroom with minimal visual degradation. Vertical sync (V-Sync) locks your frame rate to your display’s refresh rate. While this eliminates screen tearing, it can also introduce input lag and cause frame rate drops when the GPU cannot maintain the target.
Try disabling V-Sync and enabling adaptive sync instead, if your display supports it.
Texture quality consumes VRAM. If your texture settings push beyond your GPU’s available video memory, the system falls back to system RAM, which is significantly slower. This causes stuttering, especially during level transitions.
Check your GPU’s VRAM capacity before selecting texture quality. An RTX 4050 with 6GB of VRAM struggles with ultra textures at 1080p in some modern titles. An RTX 4070 with 8GB handles them comfortably.
Match your texture settings to your actual VRAM, not the highest available option.
Post-processing effects like motion blur, depth of field, and ambient occlusion add visual polish but cost performance. Screen-space ambient occlusion (SSAO) is particularly GPU-intensive. Turning SSAO off or switching to a lighter alternative like HBAO+ often frees up meaningful frame budget.
Ambient occlusion alone can account for five to fifteen percent of total GPU usage in demanding titles.
Some games offer built-in upscaling technologies. DLSS (Deep Learning Super Sampling) by NVIDIA and FSR (FidelityFX Super Resolution) by AMD render the game at a lower resolution and upscale it to your native display resolution. These technologies deliver substantial performance gains with minimal visual quality loss, especially at higher resolutions.
If your laptop struggles to maintain target frame rates, enabling DLSS or FSR is often the single most effective settings change you can make. Check whether your specific GPU supports DLSS. Only NVIDIA RTX series GPUs support DLSS.
AMD and Intel GPUs support FSR instead.
DLSS, FSR, and Resolution Scaling — Which Upscaler Saves Your Frames?
Upscaling technologies represent one of the biggest advances in gaming performance over the past few years. Instead of rendering every frame at full native resolution, these techniques render at a lower resolution and use algorithms to reconstruct the image. The result is closer to native quality at a fraction of the rendering cost.
DLSS uses neural networks trained on supercomputer hardware to upscale images. It produces sharper results than traditional upscaling methods, especially at higher quality presets. DLSS Quality mode can deliver near-native visual fidelity while cutting rendering workload by forty to sixty percent.
DLSS Performance mode sacrifices more detail for maximum frame gains. Choose the preset that matches your priority. If visual fidelity matters most, use Quality.
If squeezing out every possible frame matters most, use Performance or Ultra Performance.
FSR works across all GPU brands. AMD developed it as an open standard. FSR 3 introduced frame generation technology that inserts AI-computed frames between rendered frames.
This can double your perceived frame rate in compatible titles. FSR 2 and FSR 3 both support Quality, Balanced, and Performance presets. Like DLSS, choose Quality for the best visual result or Performance for the best frame rate.
Resolution scaling offers a simpler alternative. Manually lowering your game’s render resolution from 1920 by 1080 to 1280 by 720 reduces pixel count by nearly fifty percent. This delivers dramatic performance improvements but produces a noticeably softer image.
Use resolution scaling as a last resort when upscaling technologies are unavailable or produce unacceptable visual artifacts in your specific game.
Monitoring Tools You Should Install (HWInfo, MSI Afterburner, CapFrameX)
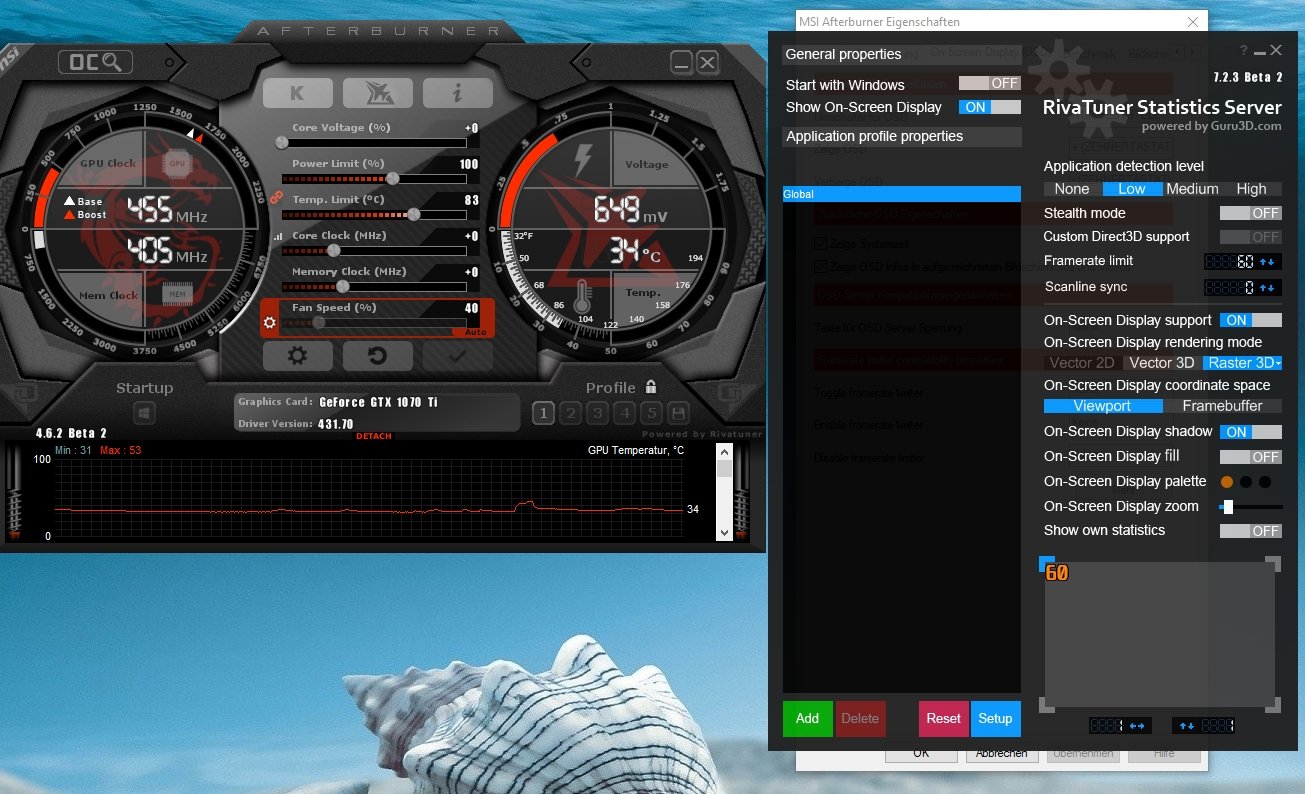
Having the right monitoring tools transforms troubleshooting from guesswork into a precise science. HWInfo64 provides the most comprehensive sensor readout available for free. It reports temperatures, clock speeds, power draw, fan speeds, and utilization for every component in your system.
Run it in the background while gaming to capture data you might otherwise miss.
MSI Afterburner pairs with RivaTuner Statistics Server to display an on-screen overlay. You can customize exactly which metrics appear on your screen during gameplay. Most gamers monitor GPU temperature, GPU utilization, CPU utilization, frame rate, and frametime.
Frametime graphs reveal stuttering patterns that raw FPS counters hide. A consistent sixty frames per second looks smooth. Sixty frames per second with frametime spikes from five milliseconds to eighty milliseconds feels like pure stuttering.
The average is identical, but the experience is completely different.
CapFrameX is a free analysis tool that records frametime data and generates detailed performance reports. It identifies bottlenecks, correlates frame drops with system events, and compares performance across multiple gaming sessions. If you want to understand exactly why your frames drop at specific moments, CapFrameX provides the evidence you need.
Export these reports when seeking help from forums or support communities. They communicate far more information than a verbal description ever could.
Each of these tools is free and widely used by PC enthusiasts and hardware reviewers. Installing them takes five minutes and pays for itself ten times over in diagnostic clarity.
Mistakes People Make When Trying to Fix FPS Drops
“I Updated My Driver and Now It’s Worse” (Rollback vs. Clean Install)
Installing a new GPU driver does not always improve performance. Sometimes it makes things worse. Modern laptops bundle graphics drivers with firmware updates, power management profiles, and software bundles.
A fresh driver installation can override factory-tuned settings that your laptop manufacturer spent weeks optimizing. If your frame rates drop immediately after a driver update, roll back to the previous version rather than chasing the latest release.
Open Device Manager and expand Display adapters. Right-click your dedicated GPU and select Properties. Go to the Driver tab and click Roll Back Driver.
Windows will restore the previous version if it is still available on your system. If the button is grayed out, you need to manually reinstall an older driver using DDU cleanup first. Always download driver installers from the official NVIDIA, AMD, or Intel website.
Do not rely on third-party driver updater tools. Those programs often install incorrect versions or bundle unwanted software.
Throwing Money at a Cooling Pad Instead of Fixing the Real Problem
A cooling pad feels like a solution, but it is rarely the root fix. These accessories move air around your laptop’s exterior. They do not remove heat trapped inside the heatsink assembly.
If your GPU is throttling because dried thermal paste prevents heat transfer, a cooling pad will lower temperatures by maybe two degrees. That is barely enough to shift your clock speeds. You might as well leave your money in your pocket.
Spend your time diagnosing the actual bottleneck instead. Check whether your fans are spinning at full speed when temperatures rise. Listen for unusual grinding or clicking noises.
These indicate fan bearing failure. Check whether the exhaust vents feel hot and airflow is strong. Weak exhaust airflow means dust has blocked the heat pipes internally.
No external cooler can compensate for blocked internal pathways.
If your laptop is two years old or longer and you have never opened it for cleaning, that is your real problem. Compressed air and a screwdriver cost far less than any cooling pad. Remove the bottom panel, blow dust out of the heatsink fins with short bursts, and check that both fans spin freely.
This takes twenty minutes and solves more thermal issues than any accessory you can buy.
Overclocking Laptops — Why It Usually Makes Things Worse
Desktop GPUs have headroom for overclocking because they sit in cases with massive airflow and large power supplies. Laptops have neither. The silicon is packaged tightly against heat spreaders designed for a narrow thermal window.
Pushing clock speeds higher generates more heat than the cooling system can dissipate. The result is not more frames. It is earlier throttling, system instability, and potentially shortened component lifespan.
Some users try software overclocking tools like MSI Afterburner on laptop GPUs. The tool may allow clock adjustments, but the laptop’s power delivery and cooling limits remain unchanged. You might squeeze ten percent more peak performance for thirty seconds before thermal throttling drags everything back down.
The average frame rate over a full gaming session often ends up lower than stock settings because the GPU spends more time throttled.
Manufacturer-specific overclocking utilities sometimes offer limited margin. ASUS includes GPU Tweaking in Armoury Crate. MSI includes it in Afterburner.
These tools apply conservative offsets that respect the laptop’s thermal design. Even these should be used cautiously. Small increments only.
Monitor temperatures after every change. If clocks drop below stock values under load, you have pushed too far. Reset to default immediately.
Final Verdict: Your FPS Drop Decision Guide
You now know the most common causes of sudden FPS drops on gaming laptops and how to test for each one. The key is systematic diagnosis, not random guessing. Start with temperature monitoring.
If your GPU or CPU is hitting throttle thresholds, address cooling first. Clean dust, elevate the laptop, consider repasting if it is old, or enable a better fan curve through manufacturer software.
If temperatures are normal, check your GPU drivers. Perform a clean installation using DDU if you suspect corruption or conflicts. Disable background overlays and unnecessary startup programs.
Verify you are plugged into AC power and running in high-performance mode. Confirm your MUX switch is enabled if your laptop supports one. Test different games to rule out optimization issues specific to a single title.
When all else fails, examine your hardware limits. An RTX 4050 with 6GB of VRAM will struggle with ultra settings in demanding 2024 and 2025 releases. Lower your resolution, disable ray tracing, and use upscaling technologies like DLSS or FSR whenever available.
If your laptop already has single-channel RAM, upgrading to dual-channel is a cheap and effective fix. Checking compatible memory options ensures you pick the right modules for your specific motherboard.
Use this quick reference table to match your symptoms to the likely cause and solution:
| Symptom | Likely Cause | First Action |
|---|---|---|
| FPS drops after 10-20 minutes | Thermal throttling | Monitor temps with HWInfo, clean vents |
| Sudden drop during one game only | Game-specific issue or overlay conflict | Test other games, disable overlays |
| FPS drops randomly while playing | Driver conflict or background process | Clean install drivers, check Task Manager |
| Low FPS even on integrated graphics | MUX switch disabled or single-channel RAM | Enable MUX switch, verify RAM configuration |
| FPS drops on battery, fine on AC | Power plan restriction | Plug in, enable High Performance mode |
| Stuttering during level transitions | VRAM exhaustion or slow storage | Lower texture settings, verify SSD health |
Fixing sudden frame drops is mostly about patience and observation. Watch your temperatures. Watch your clocks.
Watch your background processes. The numbers tell you exactly what is wrong. Once you identify the bottleneck, the fix is usually straightforward and free.
Frequently Asked Questions About Fix Sudden FPS Drops on Your Gaming Laptop
Why does my FPS drop after 10–15 minutes of playing?
This pattern points directly to thermal throttling. Your GPU and CPU heat up gradually as you play. Once they cross their throttle thresholds, clock speeds drop to protect the hardware.
You can confirm this by monitoring temperatures with reliable monitoring software during a session. If temps climb past 85 degrees Celsius while clocks fall, that is your answer. Cleaning dust from vents, elevating the chassis, or repasting thermal compound usually resolves this.
Should I undervolt my laptop CPU to stop throttling?
Undervolting can reduce heat output and allow higher sustained boost clocks. However, modern laptop CPUs have locked voltage controls. Intel’s 12th through 14th generation mobile chips removed most undervolt options through BIOS restrictions.
AMD Ryzen 6000 and 7000 series processors generally retain access through universal interfaces. Check whether your specific CPU model supports undervolting before attempting it. Incorrect voltage settings can cause system instability or failed boots.
Is 60 FPS on a gaming laptop good or bad?
Sixty frames per second is the minimum comfortable standard for modern gaming. It provides smooth enough motion for most single-player titles and casual multiplayer sessions. Competitive gamers typically target 144 FPS or higher for reduced input latency.
Whether 60 FPS feels good depends on your display refresh rate. A 60Hz panel matches 60 FPS perfectly. A 144Hz panel will feel choppy even at 60 FPS because the screen cannot display every frame smoothly.
Matching your laptop specs to your needs helps set realistic performance expectations.
Can a failing SSD cause FPS drops?
Yes, a failing or nearly full SSD can cause stuttering during open-world games. Modern titles stream textures and geometry continuously from storage. When the drive struggles to keep up, frames stall while the system waits for data.
This shows up as brief hitches rather than a consistent low frame rate. Check your SSD health using tools like CrystalDiskInfo. Ensure you always maintain at least fifteen percent free space on your game drive.
Running an SSD near capacity dramatically increases seek times and reduces streaming performance.
How often should I repaste my gaming laptop?
Factory thermal paste typically degrades noticeably after two to three years of regular use. If your laptop runs hotter than it did when new or throttles more frequently, repasting is worth considering. Annual repasting is unnecessary for most users.
Perform the procedure whenever you notice a clear temperature increase of five degrees or more compared to baseline readings from the first few months of ownership. Keep in mind that opening your laptop may void remaining warranty coverage, so verify your terms before proceeding.