How to Fix High FPS But Game Feels Stuttery on a Gaming Laptop: Causes, Tests & Solutions is one of the most confusing performance problems you can hit. Your monitor shows a healthy frame rate yet the game still jerks and catches. That mismatch comes from inconsistent frame delivery, not raw speed.
The real issue lives in frametime consistency, the time each individual frame takes to render. When that timing jumps around, your brain notices micro-stutters even if the average stays high. Fixing it means running targeted tests first, then applying the right tweak for the specific bottleneck you find.
Quick Answer
High FPS but stuttery gameplay means inconsistent frametimes. You need to diagnose which bottleneck causes the spikes. Common culprits include thermal throttling, VRAM exhaustion, shader compilation delays, background software conflicts, single-channel RAM, outdated drivers, or restrictive power plans.
Run HWiNFO64 and MSI Afterburner to monitor temps, clocks, frametimes, VRAM, and RAM usage. Match symptoms to likely causes using a diagnostic table. Apply targeted fixes for the identified bottleneck.
Avoid blindly lowering settings before testing, as that may hide the real problem.
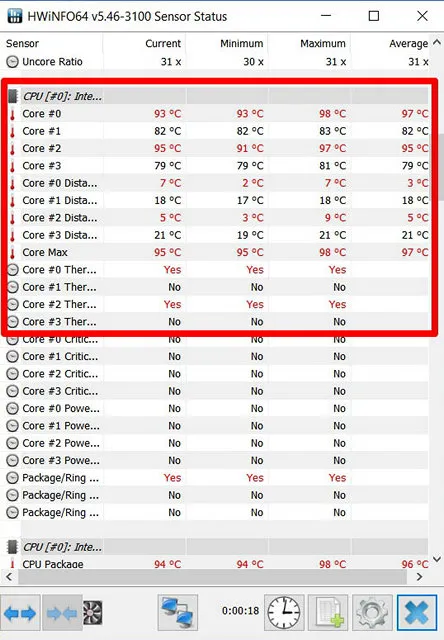
Monitoring tools like HWiNFO64 let you see thermal and clock behavior that average FPS hides.
Why Your Gaming Laptop Feels Stuttery Despite High FPS
Average FPS is a terrible predictor of smoothness. It only tells you the mean frames per second over an entire session. A game averaging 144 FPS could be delivering 144 frames perfectly smoothly or bouncing between 200 FPS and 40 FPS in erratic spikes.
Both scenarios produce the same average but feel completely different.
The metric that actually matters is frametime, the milliseconds required to render each individual frame. When frametimes are consistent, the game feels buttery smooth. When frametimes fluctuate wildly, the game feels stuttery regardless of the average FPS number.
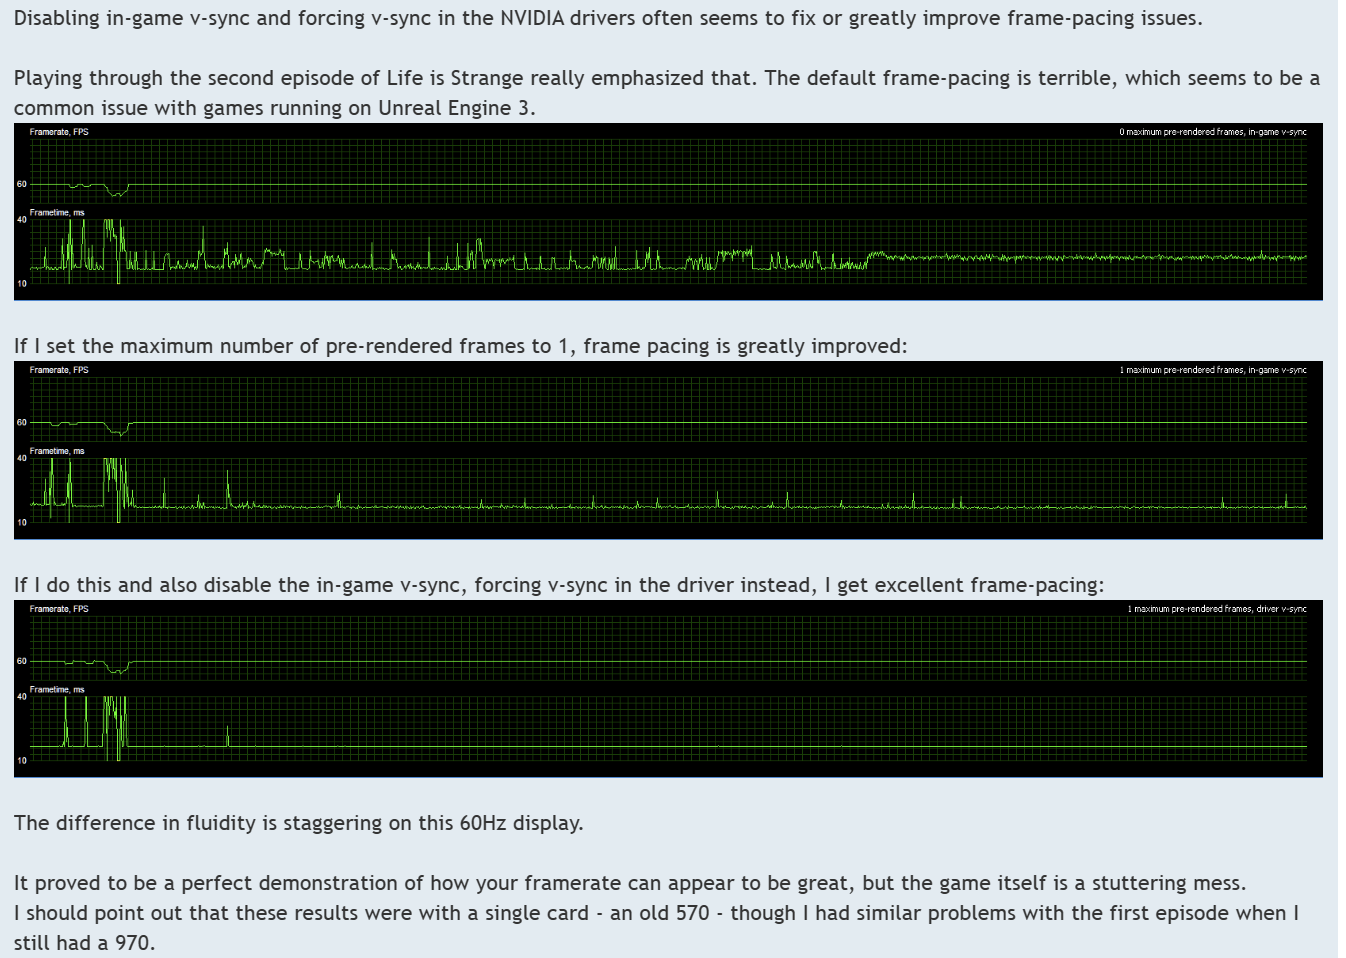
A smooth frametime graph versus a jagged one reveals why two games with identical average FPS feel different.
Manufacturers and reviewers increasingly emphasize 1% lows and 0.1% lows as better indicators of perceived smoothness. These metrics measure the bottom percentile of frame rates, highlighting the worst-case stutters you actually notice. Aggregate reviews from enthusiast sites consistently note that a game with stable 60 FPS plays better than a game averaging 90 FPS with frequent dips.
Several distinct bottlenecks can cause these frametime spikes while keeping averages high. Thermal throttling forces the CPU or GPU to drop clocks when temperatures hit critical thresholds, creating sudden hitches. VRAM exhaustion forces the system to stream textures from slower system RAM, causing momentary freezes.
Shader compilation stutter occurs when a new shader must be built in real time during DirectX 12 or Vulkan games. Background process interference steals CPU cycles. Single-channel RAM doubles memory latency compared to dual-channel, increasing frametime variance.
Driver conflicts or corrupt installations disrupt GPU communication. Power plan restrictions prevent components from boosting to their maximum potential speeds.
Understanding this distinction is crucial because the wrong fix makes the problem worse. Slowing down the CPU to reduce heat might lower average FPS without fixing thermal-induced frametime spikes if the underlying cooling is inadequate. Blindly lowering graphics settings might improve average FPS but do nothing for VRAM-related streaming hitches or background software conflicts.
The diagnostic phase must come first.
Before we move into the detailed diagnostic workflow, consider reviewing our guide to checking G-Sync compatibility if variable refresh rate issues are also affecting your experience.
What Actually Causes Stutter When FPS Looks Fine
Thermal throttling remains the most common cause of stutter on gaming laptops. Laptops pack powerful CPUs and GPUs into thin chassis with limited cooling capacity. Sustained workloads quickly push components to their thermal limits.
When that happens, the hardware automatically reduces clock speeds to prevent damage. Those clock drops create immediate frametime spikes that feel like stutters even though the average FPS might only dip slightly.
You can identify thermal throttling when stutter begins after several minutes of gameplay once the component has reached its temperature ceiling. Temperatures typically climb steadily until hitting the throttle threshold, then drop as clocks reduce, only to climb again once load decreases. This creates a cyclical stutter pattern.
Most modern gaming laptops throttle around 90 to 95 degrees Celsius for CPUs and 85 to 90 degrees Celsius for GPUs.
VRAM exhaustion creates a different stutter profile. When video memory fills beyond capacity, the GPU must request missing textures from system RAM or storage. This streaming delay causes sharp frametime spikes.
Unlike thermal throttling, VRAM stutters often correlate with specific in-game actions. Entering detailed areas, looking at complex textures, or loading high-resolution assets all trigger the problem.
Benchmarks from hardware analysis sites show that VRAM bottlenecks become severe when utilization exceeds 95 percent. A game like Cyberpunk 2077 with ultra textures can easily exceed 8 GB of VRAM on 1080p settings. If your laptop has only 6 GB of dedicated GPU memory, you will experience texture streaming hitches regardless of how fast your average FPS appears.
Shader compilation stutter is unique to certain API implementations. DirectX 12 and Vulkan require shaders to be compiled either at install time or at runtime. When the GPU encounters a new shader combination it has not compiled before, it must pause the rendering pipeline to build it.
This causes a one-time frame drop or series of drops the first time you encounter a particular visual effect.
After initial compilation, the shader cache stores the result for future use. Many gamers mistake this for a permanent stutter problem when it is actually a one-time setup issue. Clearing the shader cache and letting the game recompile it often resolves persistent compilation hitches after game updates.
Background process interference silently steals CPU resources. Modern laptops often run manufacturer utilities, RGB control software, Discord overlays, Steam overlays, and automatic updaters. Even when minimized, these programs consume CPU cycles and can interrupt game thread scheduling.
Windows Update alone can trigger background downloads that cause significant frametime variability.
Diagnostic tests show that closing non-essential background applications can improve 1% low FPS by 10 to 20 percent on systems with limited core counts. Laptop CPUs with four to six cores are especially vulnerable to background interference because they have less headroom than desktop eight-core or 16-core processors.
Single-channel RAM configuration dramatically increases memory latency. Most budget and mid-range gaming laptops ship with a single RAM stick for cost savings. Single-channel mode halves the memory bus width compared to dual-channel, effectively doubling access latency.
This latency increase causes frametime variance even when total capacity is sufficient.
Upgrading from a single 8 GB stick to two 8 GB sticks in dual-channel mode can improve minimum frametimes by 15 to 25 percent according to independent benchmarks. The average FPS might change only slightly, but the perceived smoothness improves significantly because the frame pacing becomes more consistent.
Driver conflicts and corruption disrupt GPU communication. Outdated, incomplete, or corrupted GPU drivers can cause frame pacing irregularities without reducing average FPS. Driver bugs sometimes introduce threading issues or memory management problems that create sporadic stutters.
Rolling back to a previous driver version or performing a clean installation often resolves unexplained performance degradation.
Our comprehensive guide to GPU upgrades explains why driver hygiene matters even more when hardware configurations change.
Power plan limitations prevent components from boosting properly. Windows default power plans often prioritize battery conservation over peak performance. The Balanced plan may limit CPU boost clocks and GPU power limits to extend battery life.
When plugged in, the system should switch to higher performance modes, but manufacturer utilities or misconfigurations can prevent this transition.
Switching to High Performance or Ultimate Performance plans removes artificial throttling boundaries. These plans allow components to maintain boost clocks longer and draw maximum available power from the AC adapter. Gamers reporting stutter that improves when plugged in compared to battery operation often find power plan settings as the root cause.
Fullscreen optimizations sometimes conflict with modern titles. Windows implements fullscreen optimization features to improve compatibility with older games in exclusive fullscreen mode. These optimizations can interfere with frame pacing in DirectX 11 and DirectX 12 titles, causing irregular frametimes that feel like stutter.
Disabling fullscreen optimizations per-game through compatibility properties sometimes resolves stutter in specific titles. Conversely, enabling them can help older games that do not handle Windows compositing well. Testing both modes with your specific game identifies which configuration delivers smoother frametimes.
If you are troubleshooting USB-C DisplayPort issues simultaneously, ensure display connection problems are not contributing to perceived stutter through refresh rate mismatches or synchronization errors.
Step 1: Run the Right Diagnostic Tests Before You Touch Settings
Testing before modifying settings prevents wasted effort and incorrect diagnoses. The diagnostic phase gives you concrete data about what is actually happening during gameplay instead of guessing based on subjective impressions. You will need four primary tools to capture the right metrics.
HWiNFO64 provides detailed sensor readings for CPU and GPU temperatures, clock speeds, power draw, and throttling events. It logs data continuously so you can review what happened after your gaming session. Set it to Sensors-only mode and enable logging if you want post-session analysis.
MSI Afterburner combined with RivaTuner Statistics Server delivers real-time overlay statistics including FPS, frametimes, 1% lows, and VRAM and RAM usage during gameplay. RTSS frametime graph is particularly valuable because it visualizes consistency as a waveform. Flat lines indicate smooth rendering while spikes reveal exactly when stutters occurred.
Windows Task Manager shows which processes are consuming CPU and memory resources in real time. Switch to the Details tab and sort by CPU percentage to identify background processes stealing cycles during gameplay. Keep this window open alongside your game but minimize it frequently to avoid the window itself consuming resources.
GPU vendor control panels, NVIDIA Control Panel or AMD Software, provide driver-level diagnostics and setting verification. Check that your preferred graphics processor is set to high-performance mode, verify driver versions, and confirm that settings like VSync or adaptive sync match your intended configuration.
What to Monitor During Diagnostic Gaming Sessions
| Metric | Tool | Target Value | Problem Indicator |
|---|---|---|---|
| CPU Temperature | HWiNFO64 | Below 85°C under load | Approaching TjMax, usually 90 to 100°C |
| GPU Temperature | HWiNFO64 | Below 85°C under load | Approaching throttle threshold, 85 to 90°C |
| CPU/GPU Clocks | HWiNFO64 | Sustained boost clocks | Significant drops below boost range |
| Frametime Graph | MSI Afterburner plus RTSS | Flat line near target ms | Spikes or sawtooth patterns |
| VRAM Utilization | Afterburner Overlay | Below 90% of total VRAM | Consistently at 95% or above |
| System RAM Usage | Afterburner or Task Manager | Below 80% of total capacity | Near 100% with pagefile activity |
| Background CPU Percent | Task Manager | Less than 10% combined | Any single app exceeding 15% |
| Power Plan Status | Windows Settings | High Performance | Balanced or Power Saver active |
Run each test for at least 20 to 30 minutes to allow thermal buildup and identify delayed throttling. Short benchmark runs often miss thermal-related issues that appear after sustained load. Play your most demanding title at settings where you have observed stutter.
Take screenshots or recordings of your Afterburner overlay showing frametime graphs during problematic moments. Note timestamps when stutter occurs and cross-reference with temperature or usage spikes logged by HWiNFO64 afterward. This correlation between temporal stutter events and specific metric spikes forms the basis of accurate diagnosis.
For readers considering hardware upgrades alongside software tweaks, this guide to upgrading gaming laptop RAM and SSDs covers dual-channel memory installation and storage optimization that complement diagnostic results.
Step 2: Follow the Decision Tree, Match Symptoms to Root Cause
Symptom-based diagnosis saves time by directing you to the most likely fix first. Instead of randomly adjusting settings, use the observable patterns during gameplay to identify probable causes. The table below maps common stutter signatures to their most likely origins.
| Symptom Pattern | Likely Cause | First Diagnostic Check | Immediate Test |
|---|---|---|---|
| Stutter begins after 5 to 15 min of play | Thermal throttling | HWiNFO64, CPU or GPU temps reaching TjMax | Enable hardware monitoring, watch for clock drops coinciding with temp peaks |
| Stutter when viewing detailed textures or entering new areas | VRAM bottleneck | Afterburner, VRAM at 95% or above during gameplay | Lower texture quality one setting, observe if stutter frequency decreases |
| Stutter only during first playthrough or after game updates | Shader compilation | Clear shader cache, replay affected area | Compile shaders fully, compare frametimes across multiple sessions |
| Stutter paired with random CPU usage spikes in Task Manager | Background process interference | Close non-essential apps, monitor CPU percent | Disable overlays and startup programs, retest |
| Stutter worse in exclusive fullscreen than borderless windowed | Fullscreen optimization conflict | Toggle fullscreen mode in-game | Compare frametime graphs in both modes |
| Stutter improves significantly when plugged into AC power | Power plan limiting boost | Check Windows power plan and manufacturer utility | Switch to High Performance, disable battery-saving features |
| Stutter occurs at random intervals with no clear trigger | Driver conflict or corruption | Check driver version and event viewer for errors | Perform clean driver install using DDU |
| Stutter persists despite all settings being low | Single-channel RAM limitation | Verify RAM configuration in CPU-Z or Task Manager | Add matching RAM stick, enable dual-channel mode |
| Stutter correlates with fan ramping up or down | Fan curve causing thermal throttling cycles | Monitor fan speeds alongside temps and clocks | Adjust fan curve to maintain consistent airflow |
| Stutter only in specific games, not others | Game-specific optimization or setting issue | Test multiple titles, compare behavior | Check developer patches or community settings guides |
Use the decision tree effectively by starting with the symptom that most closely matches your experience. If multiple symptoms apply, prioritize the ones that appear most frequently or correlate with measurable metric changes. For example, if you see both temperature spikes and VRAM saturation, address thermal throttling first because it can cause secondary issues like reduced GPU boost clocks that exacerbate other problems.
Document your findings as you test. Note which adjustments improved frametime consistency and which had no effect. This record helps you avoid repeating ineffective fixes and provides evidence if you need to seek technical support.
Step 3: Fix Thermal Throttling, the Most Common Issue on Laptops
Thermal throttling is the leading cause of performance inconsistency in gaming laptops. Compact chassis limit heat dissipation capacity, forcing components to reduce clocks when temperatures approach dangerous levels. Addressing thermal issues often resolves stutter without requiring any graphics setting changes.
Begin with the simplest interventions before moving to hardware modifications. Elevate the laptop rear to improve underside airflow intake. Use a cooling pad with active fans positioned to blow air into vent intakes.
Clean dust from exhaust vents using compressed air in short bursts. Do not spin fans manually with air pressure as this can generate voltage and damage bearings.
If basic cleaning does not resolve overheating, consider repasting the CPU and GPU with high-quality thermal compound. Factory-applied thermal paste degrades over 12 to 24 months, especially under thermal cycling stress. Replacing it with compounds like Arctic MX-6 or Thermal Grizzly Kryonaut can reduce temperatures by 5 to 15 degrees Celsius under load, potentially eliminating throttle-induced stutter entirely.
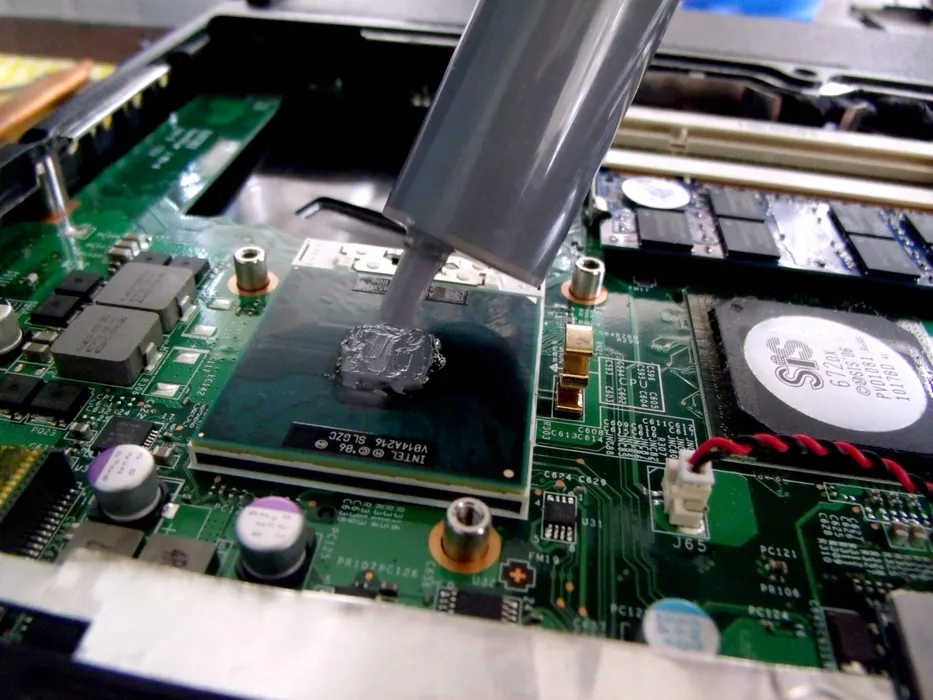
Professional thermal paste replacement requires careful disassembly but can restore lost cooling performance.
Adjust fan curves through manufacturer software or MSI Afterburner to maintain higher RPMs at lower temperatures. Aggressive fan curves keep components cooler but increase noise. Find a balance that maintains temperatures below throttle thresholds without becoming unbearable during extended sessions.
Refer to our recommendations for ASUS TUF gaming laptops for model-specific thermal design notes and manufacturer software guidance.
If undervolting is not possible due to locked BIOS implementations, reducing GPU power limits through MSI Afterburner can decrease heat output while accepting minor performance tradeoffs. A 10 to 15 watt power limit reduction often drops temperatures significantly while losing only 3 to 8 percent performance. This is a worthwhile exchange for eliminated thermal stutter.
Remember that gaming while charging generates additional heat from the charging circuit, potentially worsening thermal throttling. Using the laptop on a hard, flat surface maximizes passive cooling regardless of power source.
Step 4: Fix VRAM Bottleneck Stutter
VRAM exhaustion causes texture streaming hitches that feel like brief freezes. When dedicated video memory reaches capacity, the GPU must request missing texture data from system RAM or storage. This data transfer introduces latency spikes that manifest as frametime inconsistencies even when average FPS remains acceptable.
Monitor VRAM utilization during gameplay using MSI Afterburner overlay. Sustained usage above 90 percent indicates you are approaching capacity limits. Usage at 95 to 100 percent almost guarantees streaming-related stutter in demanding titles.
Modern AAA games increasingly exceed 8 GB of VRAM at high settings. Titles like Cyberpunk 2077, Alan Wake 2, and Hogwarts Legacy can consume 10 to 12 GB with ultra textures and ray tracing enabled. If your laptop has 6 GB or 8 GB of VRAM, you will likely encounter bottlenecks in these titles regardless of how fast your CPU or GPU processing power is.
Lower texture quality settings first, as they directly control VRAM consumption. Most games offer texture quality options ranging from Low to Ultra with significant VRAM differences between tiers. Dropping from Ultra to High or Medium can reduce VRAM usage by 2 to 4 GB while maintaining acceptable visual fidelity.
Enable resolution scaling or dynamic resolution if your GPU supports it. Rendering at a lower internal resolution reduces texture memory requirements while the upscaled image maintains perceived sharpness. NVIDIA Dynamic Resolution Scaling and AMD Radeon Integer Scale offer automatic or manual resolution adjustment based on VRAM availability.
Close background applications that consume VRAM, including web browsers with hardware acceleration enabled, video editors, and streaming software. Each open application competes for the same limited video memory pool.
Consider upgrading to a laptop with greater VRAM capacity if your current hardware consistently bottlenecks. As of 2026, 12 GB of VRAM provides comfortable headroom for most titles at 1440p and 4K resolutions. Check the latest budget gaming laptop deals to find models with adequate VRAM for your target resolutions.
For existing hardware, disabling ray tracing eliminates significant VRAM overhead from ray-traced reflections and lighting calculations. Ray tracing typically adds 1 to 3 GB of VRAM consumption depending on scene complexity. Turning it off often frees enough memory to eliminate streaming stutter in previously problematic titles.
Some games offer texture streaming options or virtual texturing technologies that reduce peak VRAM usage by loading only visible texture chunks. Enable these features when available and adjust streaming quality settings to balance visual fidelity against memory consumption.
Step 5: Fix Shader Compilation Stutter
Shader compilation stutter is a one-time or update-induced problem caused by runtime shader building. When a game encounters a visual effect it has not processed before, the GPU must compile the corresponding shader program before rendering that frame. This compilation pause creates a noticeable frame drop or series of drops.
Shader compilation stutter typically presents as follows: the game runs smoothly initially, then stutters whenever you encounter new visual effects, environments, or character appearances you have not seen before. After experiencing the effect once, the stutter disappears because the shader has been compiled and cached.
The problem often returns after major game updates that add new visual elements or modify existing ones. Updates force recompilation of affected shaders, temporarily reintroducing stutter until caching completes again.
Diagnose shader compilation issues by observing whether stutter correlates with new content discovery rather than specific settings or sustained load conditions. If the game eventually smoothens after repeated exposure to the same scenarios, compilation caching is likely the factor.
Allow complete shader compilation during initial setup. Many games include mandatory compilation phases before gameplay begins or during first entry into new areas. Wait for these processes to finish rather than interrupting them, as partial compilation leads to ongoing stutter throughout play sessions.
Clear and rebuild shader caches when stutter persists beyond expected compilation periods. Both NVIDIA and AMD provide cache-clearing utilities within their control panels. Clearing the cache forces the system to rebuild shaders from scratch, often resolving corrupted or incomplete cached shaders causing abnormal compilation delays.
Verify DirectX runtime installations are complete and uncorrupted. Shader compilation relies heavily on DirectX components, and missing or damaged runtimes can slow compilation processes. Run DirectX End-User Runtime Web Installer from Microsoft to ensure all required components are present.
Some games offer shader pre-caching options in settings menus. Enable these features when available, as they attempt to compile common shaders during installation or loading screens rather than during gameplay.
These insights into Mini LED versus OLED displays might also help if you are noticing stutter specifically related to HDR content processing, as different display technologies can expose varying shader workload characteristics.
For titles known to have extensive shader compilation, consider playing in DirectX 11 mode if a DirectX 12 option exists. While DirectX 12 offers potential performance benefits, its shader compilation model can introduce more pronounced stutter in poorly optimized titles. DirectX 11 handles shading differently and sometimes delivers more consistent frametimes during early play sessions.
Step 6: Fix Background Process and Software Conflicts
Background software silently steals CPU cycles and causes frametime spikes. Modern laptops run numerous programs simultaneously, many of which operate invisibly while gaming. These processes compete for processor time and can interrupt the game thread scheduling that keeps frametimes consistent.
Common culprits include manufacturer utility suites, RGB control software, Discord overlays, Steam overlays, browser tabs with hardware acceleration, and automatic updaters. Even applications you closed earlier may continue running in the system tray or background services.
Open Windows Task Manager during gameplay and switch to the Details tab. Sort processes by CPU percentage to see which applications consume the most resources while your game runs. Look for any process using more than 5 to 10 percent CPU continuously during gaming sessions.
Manufacturer bloatware often runs persistent services that monitor temperatures, control fan curves, and manage power settings. Programs like Armoury Crate, Alienware Command Center, and Lenovo Vantage create background processes that occasionally spike CPU usage during maintenance tasks or synchronization events.
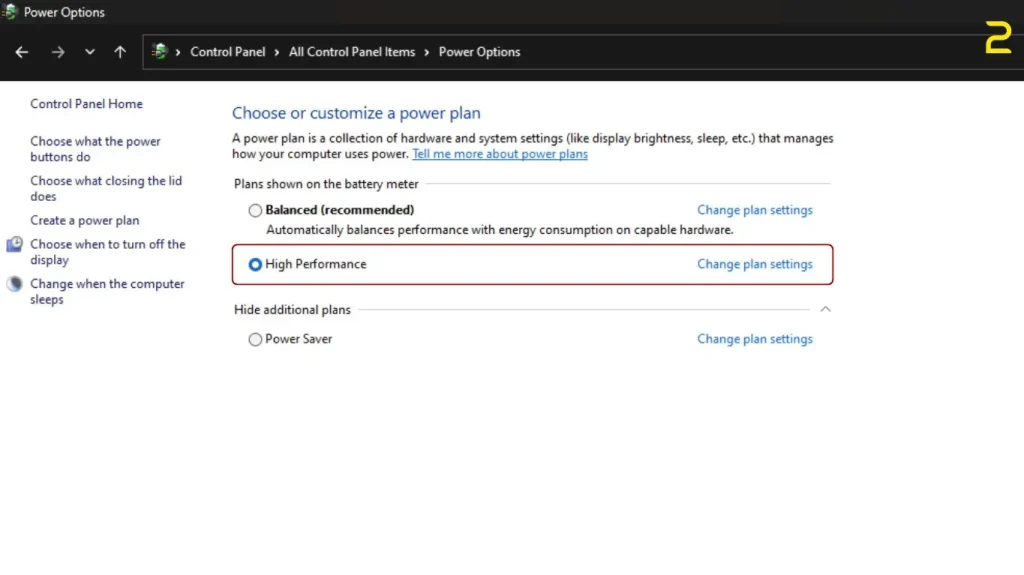
Windows power options and GPU scheduling settings directly affect how background tasks compete for resources.
Browser tabs with video playback or hardware-accelerated content consume significant GPU and CPU resources even when minimized. Chrome and Edge can use multiple GPU processes simultaneously, fragmenting available compute capacity and increasing frametime variance.
Discord overlay and in-game notification systems inject code into the rendering pipeline. These overlays consume additional GPU memory and CPU cycles to capture frames and display information. While individual overlays cause minimal impact, multiple concurrent overlays compound the problem significantly.
Begin by disabling startup programs through Task Manager Startup tab. Right-click each entry and select Disable for non-essential applications. Keep only critical drivers and antivirus software enabled at startup.
This reduces background activity without requiring complete uninstallation.
Turn off in-game overlays individually to isolate conflicts. Disable Discord overlay first, then test gameplay. Re-enable it only if stutter returns, confirming it as a factor.
Repeat this process for Steam overlay, NVIDIA GeForce Experience overlay, and Xbox Game Bar.
Run a clean boot to identify software conflicts systematically. Press Win plus R, type msconfig, and select Selective startup. Disable all non-Microsoft services, then restart and test your game.
If stutter disappears, re-enable services in batches to identify the problematic application.
Set your game executable to high priority in Task Manager. Right-click the game process under Details tab, select Set priority, and choose High. This tells Windows scheduler to allocate more CPU time to your game over background tasks.
Avoid Realtime priority as it can starve system processes and cause instability.
For readers considering hardware upgrades alongside software optimization, these budget Ryzen gaming laptop recommendations highlight models with better multi-threaded performance that handle background tasks more gracefully.
If you are experiencing Bluetooth disconnecting issues simultaneously, ensure wireless peripherals are not causing USB controller interference that affects input response timing.
Step 7: Fix Driver and Power Plan Issues
Corrupt or outdated drivers disrupt GPU communication and cause frame pacing irregularities. GPU drivers control how the operating system communicates with graphics hardware. When drivers contain bugs, become corrupted, or conflict with recent Windows updates, they can introduce frametime inconsistencies without reducing average FPS.
Standard driver updates sometimes leave behind conflicting files from previous versions. Perform a clean installation using Display Driver Uninstaller to remove all traces of existing GPU drivers before installing fresh copies.
Boot Windows into Safe Mode to prevent the operating system from loading current drivers during removal. Download DDU and your target GPU driver from the manufacturer website before starting. Run DDU to completely remove NVIDIA, AMD, or Intel graphics drivers, then restart normally and install the freshly downloaded driver.
Roll back to previous driver versions if the latest release introduces new stutter problems. Both NVIDIA and AMD occasionally release drivers with regressions affecting specific games or configurations. Check driver release notes and community reports before updating to identify known issues.
Some manufacturers provide alternative driver branches like NVIDIA Studio Drivers or AMD Pro drivers optimized for stability rather than peak gaming performance. Switching between Game Ready and Studio driver branches can resolve stutter in certain titles without full driver replacements.
Windows power plans control how aggressively components boost clocks and manage thermal thresholds. The default Balanced plan prioritizes energy conservation over sustained performance, limiting boost durations and reducing maximum clock speeds.
Switch to High Performance or Ultimate Performance power plans through Windows Settings. Navigate to Control Panel, Hardware and Sound, Power Options and select the appropriate plan. Ultimate Performance mode disables most power-saving features entirely, allowing components to maintain maximum boost clocks indefinitely while plugged in.
Adjust advanced power settings for finer control. Expand Processor power management to modify minimum and maximum processor states. Set minimum processor state to 100 percent on battery and plugged in to prevent frequency scaling.
Set maximum processor state to 100 percent to allow full boost access.
Disable USB selective suspend settings to prevent peripheral power cycling during gameplay. Navigate to Change plan settings, Change advanced power settings, USB settings, USB selective suspend setting. Set both battery and plugged in values to Disabled.
Enable Hardware-accelerated GPU scheduling in Windows Settings if your system supports it. This feature allows the GPU to directly access system memory, reducing CPU overhead and improving frametime consistency in DirectX 12 and Vulkan titles. Check the latest Dell G15 deals for models with confirmed hardware GPU scheduling compatibility.
For Acer Nitro 5 owners specifically, this deal guide covers model-specific power management features that may require manual configuration for optimal performance.
Step 8: Optimize RAM Configuration and System Memory
Memory configuration dramatically affects frametime consistency even when total capacity appears sufficient. Single-channel RAM operation doubles memory access latency compared to dual-channel configurations. This latency increase causes irregular frametimes that feel like stutter despite adequate GB quantities.
Check your current RAM configuration using CPU-Z or Windows Task Manager. Open Task Manager, select the Performance tab, and click Memory. Look for Slots used showing how many DIMM slots are occupied.
Two sticks in separate slots typically indicate dual-channel operation.
CPU-Z provides more detailed verification. Download and run the free utility, then check the Memory tab for Channel number field. Dual-channel configuration displays 2 times 64 or similar notation indicating two independent memory controllers operating simultaneously.
Single-channel shows 1 times 64.
Upgrading from single-channel to dual-channel requires adding a matching RAM stick. Purchase identical specifications including capacity, speed, and timings when possible. Mismatched RAM can force the system to run at the slowest module speed or disable XMP profiles, reducing performance below original single-stick speeds.
Most gaming laptops provide one or two accessible SO-DIMM slots. Budget models frequently ship with a single 8 GB stick to reduce manufacturing costs. Adding a matching 8 GB stick creates 16 GB dual-channel configuration, improving minimum frametimes by 15 to 25 percent according to benchmark studies.
Even with dual-channel RAM, insufficient total capacity causes stutter through excessive pagefile usage. When physical RAM fills beyond capacity, Windows moves data to the SSD or HDD pagefile. Storage-backed memory access is orders of magnitude slower than RAM, creating severe frametime spikes.
Monitor system RAM usage during gameplay using MSI Afterburner overlay or Task Manager. Sustained usage above 80 to 90 percent indicates potential paging activity causing stutter. Close unnecessary applications, disable browser hardware acceleration, and reduce in-game resolution scaling to stay within available memory.
Increase pagefile size to prevent memory pressure-related stutter. Right-click This PC, select Properties, Advanced system settings, Performance Settings, Advanced tab, Virtual memory Change. Set custom size to 1.5 times your physical RAM for initial size and 3 times for maximum size.
Place the pagefile on your fastest NVMe SSD if available.
Disable unnecessary visual effects to reduce memory footprint. Navigate to Advanced system settings, Performance Settings, Visual Effects tab. Select Adjust for best performance or manually disable effects like animations and transparency that consume memory without gameplay benefit.
For those considering RAM and storage upgrade options, proper installation procedures and compatibility checks ensure optimal dual-channel performance without voiding warranties.
Budget-conscious builders might explore thin and lightweight gaming laptop options that still offer upgradeable memory configurations for future dual-channel additions.
Common Mistakes That Make Stutter Worse
Blaming low FPS when the issue is frame pacing leads to incorrect solutions. Lowering graphics settings reduces average FPS less effectively than addressing the actual bottleneck. A game running at stable 60 FPS with consistent frametimes feels smoother than one averaging 90 FPS with erratic spikes.
Players frequently adjust resolution, shadows, and anti-aliasing without monitoring whether frametime consistency improves. These settings often reduce average FPS modestly while leaving 1% lows unchanged because they do not address the underlying cause like thermal throttling or VRAM exhaustion.
Updating drivers without cleaning old versions compounds problems. New driver installations sometimes fail to fully replace corrupt or conflicting files from previous versions. Residual settings and registry entries cause instability that manifests as intermittent stutter rather than consistent performance degradation.
Always perform clean driver installations using DDU when switching between major driver versions or troubleshooting unexplained performance issues. This ensures fresh registration of all driver components without legacy conflicts.
Overclocking hot laptops without improving cooling creates thermal instability. Pushing clock speeds higher increases heat output proportionally. Without corresponding cooling improvements, overclocked components reach thermal throttling thresholds faster and more frequently, worsening stutter patterns.
If choosing to overclock, improve cooling first through repasting, enhanced airflow, or undervolting. Maintain conservative overclocks that stay within thermal boundaries during sustained load testing before relying on them during actual gameplay sessions.
Ignoring background processes assumes they consume negligible resources. Many users close visible applications but leave hidden services running. Manufacturer utilities, cloud synchronization clients, and automatic updaters operate invisibly while consuming measurable CPU and memory resources.
Regularly audit startup programs and running services, especially before important gaming sessions. Tools like Autoruns from Microsoft Sysinternals provide comprehensive visibility into all auto-starting components.
Assuming more RAM always fixes stutter overlooks configuration importance. Adding RAM to a single-channel configuration still operates at double latency compared to properly configured dual-channel systems. Eight gigabytes in dual-channel outperforms sixteen gigabytes in single-channel for frametime consistency.
Always verify channel configuration before purchasing additional memory. Confirm current slot utilization and speeds before investing in upgrades that might not deliver expected performance improvements.
Exploring various gaming laptop options reveals how different manufacturers implement thermal designs and memory configurations that affect stutter characteristics across price ranges.
Safety and Warranty Considerations
Opening your laptop may void warranty coverage depending on manufacturer policies. Some companies explicitly prohibit user disassembly while others allow certain upgrades without affecting remaining warranty terms. Check your warranty documentation or contact manufacturer support before removing screws or panels.
Unauthorized modifications like unauthorized BIOS flashing or voltage adjustments can permanently void coverage. Stick to manufacturer-approved utilities and documented procedures when making internal changes.
Undervolting can cause system instability if applied too aggressively. Reducing CPU or GPU voltage beyond stable thresholds causes crashes, corruption, or failure to boot. Always make incremental adjustments of 5 to 10 millivolts and test stability thoroughly before proceeding further.
Use stress testing tools like Prime95 or FurMark after each undervolt change to verify system stability under load. If instability occurs, revert to the previous stable voltage setting rather than pushing further in the same direction.
Improper thermal paste application can damage components. Applying excessive paste creates mess and potentially interferes with heatsink contact. Using conductive pastes near electrical contacts risks short circuits.
Apply only pea-sized amounts of electrically non-conductive thermal compound centered on the die.
Clean old paste thoroughly with isopropyl alcohol before applying new compound. Ensure both CPU and GPU surfaces and heatsink bases are scratch-free and clean for optimal thermal transfer.
Backup your system before major driver changes. Clean driver installations sometimes cause boot issues or require recovery procedures. Create system restore points or full disk images before performing DDU uninstallations or rolling back drivers to protect against data loss.
Follow electrostatic discharge precautions when handling internal components. Ground yourself by touching unpainted metal chassis parts before contacting circuit boards. Work on non-static surfaces and avoid carpeted areas during hardware modifications.
If you are wondering about gaming laptop battery health during intensive sessions, understanding thermal and power dynamics helps you make informed decisions about usage patterns that will not compromise hardware longevity.
Long-Term Maintenance to Prevent Future Stutters
Regular maintenance keeps your gaming laptop performing smoothly over years of use. Dust accumulation, thermal paste degradation, and software bloat gradually worsen frametime consistency even if average FPS numbers appear acceptable. Establishing a routine maintenance schedule prevents small issues from becoming major stutter problems.
Clean your laptop vents every three to six months depending on usage environment. Dust buildup blocks airflow through heatsink fins and fan blades, reducing cooling efficiency and causing earlier thermal throttling onset. Use compressed air in short bursts while holding fans stationary to prevent overspinning.
Create a maintenance log noting cleaning dates and observed temperature changes. If temperatures climb higher after each cleaning cycle, thermal paste replacement may be needed sooner than expected. Monitor fan noise levels as well, since dust accumulation often increases acoustic output before temperatures become problematic.
Factory thermal paste typically degrades within 12 to 24 months of regular gaming use. Thermal cycling causes compound drying and pumping out, reducing heat transfer efficiency between processor dies and heatsinks. Repasting every 18 to 24 months restores thermal performance and can eliminate throttle-related stutter in older machines.
High-quality aftermarket compounds like Thermal Grizzly Kryonaut or Arctic MX-6 maintain effectiveness longer than factory defaults. Look for temperatures increasing 5 to 10 degrees Celsius above baseline or earlier throttle onset as signs repasting is needed. Professional service costs 50 to 100 dollars and may be worth considering if you lack disassembly experience.
Avoid updating GPU drivers immediately upon release for gaming laptops. Manufacturers often ship early driver versions containing bugs affecting specific laptop configurations. Wait two to four weeks for initial bug fixes, then check community forums and review sites for reported stability issues before updating.
When updates do cause problems, maintaining a backup of previous driver versions enables quick rollbacks. Both NVIDIA and AMD provide version archives on their websites. Create system restore points before major driver changes to facilitate recovery if installation issues occur.
Perform periodic clean installations of Windows to remove accumulated registry clutter and background services that contribute to frametime variance. Full reinstalls every 12 to 18 months reset the system to baseline performance without manufacturer bloatware accumulation.
Use built-in Windows tools between full reinstalls for routine maintenance. Run Disk Cleanup monthly to remove temporary files. Execute disk defragmentation on HDD-based systems monthly, though NVMe SSDs require only the trim command which Windows handles automatically.
Monitor startup programs quarterly through Task Manager to remove unnecessary autostart entries.
For readers planning extended gaming sessions while concerned about battery longevity during intensive use, understanding maintenance routines helps preserve both performance and power cell health over time.
When to Consider Hardware Upgrades
Software optimization has limits when hardware constraints become fundamental bottlenecks. After exhausting all diagnostic and adjustment options, certain symptoms indicate your current configuration cannot deliver consistent frametimes regardless of settings tweaks.
Consider RAM upgrades if diagnostic testing reveals single-channel configuration causing excessive memory latency. Adding matching SO-DIMM sticks transforms your system from single-channel to dual-channel operation, improving minimum frametimes by 15 to 25 percent in memory-sensitive titles. This upgrade typically costs 40 to 80 dollars for 8 GB kits and provides immediate, noticeable improvement.
VRAM capacity limitations warrant replacement rather than upgrade on most laptops. Video memory is soldered to GPU modules in nearly all consumer laptops. If your 6 GB card consistently bottlenecks at your target resolution and settings, upgrading requires purchasing an entirely new machine with adequate VRAM.
Thermal solution failures requiring component-level repair signal either professional servicing or replacement considerations. Damaged fan motors, degraded heat pipe performance, or damaged motherboard traces typically exceed DIY repair capabilities. Professional repair costs often approach 50 to 70 percent of replacement value for older models.
External GPU enclosures offer upgrade paths for laptops with Thunderbolt 3 or 4 connectivity. These solutions allow connecting desktop-class graphics cards via USB-C, bypassing internal upgrade limitations. Performance gains range from 20 to 40 percent depending on enclosure quality and CPU bottlenecks.
EGPU solutions require significant investment of 300 to 600 dollars for enclosures plus GPU cost and sacrifice some performance compared to internal equivalents due to bandwidth limitations. They work best for desktop replacement scenarios rather than portable gaming setups.
Before investing in upgrades, calculate expected improvement against current hardware age and remaining value. A 100 dollar RAM upgrade providing 20 percent improvement makes sense on a two-year-old machine. The same investment on a five-year-old system with degraded thermal performance addresses only one symptom while others persist.
Document all attempted software fixes with measured results before pursuing hardware changes. This record prevents wasting money on upgrades addressing problems already solved through configuration adjustments.
This comprehensive guide to gaming laptop processors explains how CPU architecture generations affect upgrade decisions when processing power becomes insufficient.
Advanced Frametime Analysis Techniques
Understanding frametime graphs separates casual troubleshooting from expert-level diagnosis. Once you have identified your general bottleneck category, deeper analysis reveals subtle issues that surface-level monitoring misses. Learning to read these graphs empowers you to catch problems before they seriously impact gameplay experience.
A smooth frametime graph shows minimal vertical fluctuation around a stable horizontal line. For a 60 FPS target, frametimes hover near 16.67 ms with small variations. For 144 FPS, the baseline sits around 6.94 ms.
The key metric is not absolute height but consistency of the line pattern.
Sawtooth patterns indicate periodic processing tasks interrupting game execution. These recurring spikes often match Windows update cycles, antivirus scans, or manufacturer utility maintenance intervals occurring at predictable intervals. Identifying the spike interval helps correlate it with specific software behavior.
Isolated spikes represent one-off events like shader compilation, asset loading from storage, or background process bursts. Clustered spike groups signal sustained interference like thermal throttling cycles or VRAM thrashing. Single-point anomalies usually stem from driver hiccups or temporary system interruptions.
Specialized tools provide deeper frametime analysis than basic overlay displays. PresentMon offers detailed frametime statistics exported to CSV files for spreadsheet analysis. This data reveals patterns invisible during real-time monitoring, including frametime distribution histograms and outlier detection.
UNIGINE benchmarks include frametime visualization showing performance consistency across standardized scenes. Running these benchmarks at different settings isolates whether stutter stems from CPU bottlenecks, GPU bottlenecks, or memory bandwidth limitations. Comparing benchmark results before and after adjustments quantifies improvement objectively.
NVIDIA FrameView provides per-application performance metrics when recording gameplay. The tool correlates frametime data with hardware utilization, helping identify whether stutter occurs during CPU-bound or GPU-bound scenarios. This distinction guides appropriate solution selection rather than guesswork.
Cross-referencing multiple data sources confirms causal relationships between observed symptoms and underlying causes. Aligning HWiNFO64 temperature logs with Afterburner frametime graphs identifies exact moments when thermal throttling impacts frame delivery. Temporal correlation eliminates ambiguous diagnoses.
Comparing VRAM usage spikes with frametime increases reveals texture streaming bottlenecks. When frametime spikes align precisely with VRAM utilization peaks, reducing texture quality directly addresses the issue. When spikes occur without VRAM pressure, investigate alternative causes like CPU single-threaded performance limitations.
Log analysis over extended gaming sessions uncovers progressive degradation patterns. Temperature creep, gradual fan dust accumulation, and thermal paste drying all manifest as slowly worsening frametime consistency over weeks or months. Tracking these trends enables proactive maintenance before stutter becomes unplayable.
Game-Specific Optimization Strategies
Different games exhibit distinct stutter profiles requiring tailored optimization approaches. A one-size-fits-all settings strategy fails because engines, APIs, and optimization quality vary enormously between titles. Understanding each game behavior patterns saves time and delivers superior results compared to generic recommendations.
Competitive shooters like Valorant, CS2, and Apex Legends prioritize consistent frametimes above all else. These titles typically run well above your monitor refresh rate even on low settings, making average FPS irrelevant. Focus entirely on eliminating frametime spikes through background process reduction and power plan optimization.
Lower all graphics settings to minimum values except for resolution, which should match your native display resolution. Disable post-processing effects like motion blur and depth of field that add unnecessary GPU overhead without competitive advantage. Enable low-latency modes in both GPU drivers and game settings whenever available.
Some esports titles benefit from exclusive fullscreen mode rather than borderless windowed. Exclusive fullscreen gives the game direct display access, reducing input lag and frametime variance compared to Windows desktop composition. Test both modes to determine which delivers smoother experience for your specific hardware configuration.
This comparison of G-Sync versus FreeSync technologies helps determine which variable refresh rate implementation delivers better frametime smoothing for your particular monitor and GPU combination.
Modern AAA games like Cyberpunk 2077 and Elden Ring demand different optimization strategies. These titles push GPU and VRAM limits at high settings, creating unique stutter challenges related to texture streaming and shader complexity.
Use preset quality profiles as starting points rather than manually adjusting every setting. Developers tune these presets for typical hardware configurations, providing balanced experiences without requiring extensive trial-and-error experimentation. Adjust individual settings only where specific stutter patterns appear during playtesting.
Enable resolution scaling with adaptive downscaling when frametimes become unacceptable at native resolution. Render at slightly lower internal resolution while maintaining visual sharpness through upscaling techniques like DLSS or FSR. These technologies often deliver better frametime consistency than native rendering at equivalent visual quality levels.
For players exploring the latest ASUS TUF gaming laptop options, understanding how different GPU tiers handle AAA title demands informs purchasing decisions based on your target resolutions and settings preferences.
Indie games and older titles sometimes exhibit counterintuitive performance characteristics. Lightweight games may stutter due to CPU single-thread limitations rather than GPU capabilities. Games using aging engines might struggle with modern operating system changes or driver updates.
When lightweight games stutter despite low hardware demands, investigate CPU-related bottlenecks specifically. Check single-core utilization in Task Manager and look for games maxing out one core while others remain underutilized. Close background applications aggressively and ensure the game process runs with high priority.
Some older DirectX 9 and DirectX 10 titles conflict with modern Windows features like hardware-accelerated GPU scheduling. Disabling these features for specific legacy games can paradoxically improve frametime stability. Experiment with compatibility settings and Windows feature toggles on a per-game basis.
Monitoring and Continuous Optimization
Establishing ongoing performance monitoring prevents stutter from returning unnoticed. Many gamers optimize their systems once, enjoy smooth gameplay temporarily, then encounter degradation months later as conditions change. Continuous monitoring catches emerging problems before they significantly impact gaming experience.
Configure HWiNFO64 to log sensor data automatically during gaming sessions. Enable logging in Sensors-only mode with intervals set to 1000 milliseconds or shorter for detailed tracking. Store logs on your fastest NVMe drive to prevent logging overhead from affecting measured performance.
Create scheduled tasks to automatically start logging when games launch and stop when they close. This automation captures complete session data without manual intervention, building a historical database useful for identifying progressive performance trends.
Schedule weekly review sessions examining logged data for concerning patterns. Look for gradually increasing temperatures, decreasing clock speeds under load, or growing frametime variance over time. Early detection enables preventive maintenance before problems become severe.
Document your optimal performance configuration as a reference baseline. Record average FPS, 1% lows, peak temperatures, and typical frametime ranges under consistent settings and environmental conditions. This baseline serves as a comparison point when troubleshooting future performance issues.
Track baseline metrics monthly under similar conditions to detect gradual degradation. Temperature increases of 5 degrees Celsius or more, clock speed reductions, or frametime variance growth indicate maintenance needs like cleaning or repasting before problems become severe.
Maintain notes documenting configuration changes and their measurable effects. This personal knowledge base accelerates troubleshooting by revealing what adjustments helped or harmed performance on your specific machine.
Game updates frequently alter performance characteristics, potentially reintroducing stutter problems previously resolved. New visual features, increased scene complexity, or engine modifications can shift bottleneck profiles dramatically. Reassess your system after major title updates to confirm continued optimal performance.
Re-run diagnostic tests after significant Windows updates as well. Major feature updates sometimes change power management behavior, driver integration, or background service patterns affecting gaming performance. Verify that optimizations continue working correctly following system changes.
Join title-specific community forums and subreddits to learn about known performance issues and community-recommended settings. Collective player experience often identifies optimization opportunities faster than individual testing, especially for poorly optimized launches that receive incremental improvement patches.
For readers interested in thin and lightweight gaming laptop options that balance portability with sustained performance monitoring capabilities, understanding these practices helps maximize whatever hardware configuration you ultimately choose.
Troubleshooting Persistent or Complex Cases
Some stutter problems resist standard diagnostic approaches, requiring systematic elimination of possibilities. When common fixes fail to resolve issues, methodical troubleshooting isolates obscure root causes through controlled experimentation and professional resources.
When initial diagnostics prove inconclusive, employ systematic elimination testing. Change one variable at a time while holding all other factors constant. This isolation approach identifies exactly which adjustment produces desired performance improvements.
Test games individually to determine whether stutter affects all titles or specific ones only. Universal stutter points toward hardware or system configuration issues. Game-specific stutter indicates title optimization problems or incompatible settings requiring alternate approaches.
Try different games known for good performance optimization as control tests. If well-optimized titles run smoothly while demanding titles stutter, your hardware handles moderate loads adequately but struggles under extreme conditions. This distinction guides appropriate solution selection.
Online communities provide valuable collective troubleshooting intelligence. Reddit hardwarerepair, r/NVIDIA, and r/AMD sections contain experienced users who recognize obscure performance patterns. Search existing threads before posting, as similar issues likely have documented solutions.
Professional repair services offer diagnostic expertise when hardware failure is suspected. Faulty capacitors, degraded solder joints, and component failures sometimes manifest as intermittent stutter rather than complete malfunction. Technician diagnostic equipment identifies issues impossible to detect through software monitoring alone.
Contact manufacturer support when warranty coverage applies and problems persist despite thorough troubleshooting. Document all attempted solutions with timestamps and measurable results before seeking assistance. Comprehensive problem histories enable support representatives to provide targeted guidance rather than generic troubleshooting steps.
When Bluetooth connectivity issues create additional input latency alongside graphical stutter, addressing both problems simultaneously prevents misattribution of symptoms to incorrect causes.
Decision Guide: Choosing Your Optimization Path
Different user profiles require different optimization priorities and effort levels. Your current technical comfort, time availability, and performance expectations determine which troubleshooting path delivers optimal results without frustration.
| User Profile | Recommended Approach | Expected Time Investment | Primary Focus Areas |
|---|---|---|---|
| Casual gamer wanting quick fixes | Software optimizations only | 1 to 2 hours initially | Background processes, power plans, driver updates |
| Enthusiast seeking maximum performance | Complete diagnostic workflow | 4 to 8 hours total | All bottlenecks systematically addressed |
| Competitive player needing consistency | Targeted low-latency optimization | 2 to 3 hours | Input lag reduction, frametime consistency |
| Budget-conscious owner extending hardware life | Cost-effective maintenance focus | 2 to 4 hours | Cleaning, thermal paste, RAM upgrades |
| Tech-curious explorer | Deep dive into all aspects | Ongoing experimentation | Advanced diagnostics, undervolting, custom fan curves |
Casual gamers benefit most from the quick-win software optimizations first. These require no technical skills, carry zero risk, and resolve many common stutter causes. Start with driver updates, background process cleanup, and power plan adjustments before considering anything more involved.
Enthusiasts willing to invest time reap disproportionate rewards through comprehensive optimization. The complete diagnostic workflow combined with hardware maintenance and advanced tuning extracts maximum performance from existing hardware, often improving experience beyond what budget upgrades would achieve independently.
Budget-conscious owners should prioritize cleaning, repasting, and RAM upgrades as highest-return investments. These interventions cost minimal money while addressing the most common laptop performance degradation causes. They extend usable hardware lifespan significantly before replacement becomes necessary.
For those weighing upgrade decisions against optimization efforts, reviewing top Acer Nitro 5 deals provides context for when optimization reaches diminishing returns and new hardware investment becomes justified.
Frequently Asked Questions About Fix Stuttering Despite High FPS
How do I know if my stutter is caused by thermal throttling?
Watch HWiNFO64 temperature readings during gameplay. If CPU or GPU temperatures reach 90 to 95 degrees Celsius coinciding with clock speed drops and increased frametime spikes, thermal throttling is your culprit. Stutter appearing after 5 to 15 minutes of sustained play strongly indicates thermal-related performance reduction rather than other bottlenecks.
Will closing background apps really fix stutter on my gaming laptop?
Yes, closing background applications often improves 1% low FPS by 10 to 20 percent on laptops with limited core counts. Manufacturer utilities, RGB controllers, Discord overlays, and browser tabs consume CPU cycles and GPU memory that your game needs for consistent frame delivery. Task Manager shows real-time resource usage helping identify problematic processes during gameplay.
Is undervolting safe for my gaming laptop?
Undervolting is generally safe when performed gradually using manufacturer-approved tools like ThrottleStop or Intel XTU. Start with 10 mV reductions and test stability with stress benchmarks before proceeding further. Successful undervolting reduces temperatures 5 to 10 degrees Celsius while maintaining performance, potentially eliminating thermal throttling-induced stutter without hardware modifications or warranty concerns.
Should I upgrade from single-channel to dual-channel RAM?
Upgrading from single-channel to dual-channel RAM significantly improves minimum frametimes by reducing memory access latency. Two identical SO-DIMM sticks operating in dual-channel mode provide double the memory bandwidth compared to single-stick configurations. The performance improvement often exceeds what graphics setting reductions achieve for stutter elimination.
Can outdated drivers cause stutter even when average FPS remains high?
Outdated or corrupt GPU drivers frequently cause frame pacing irregularities without noticeably affecting average FPS. Driver bugs introduce threading issues or memory management problems creating sporadic frametime spikes. Clean driver installations using DDU and rolling back to stable previous versions often resolve unexplained stutter patterns in affected titles.
Final Recommendation and Decision Guide
Systematic diagnosis beats random settings adjustments every time. High FPS combined with stuttery gameplay demands methodical investigation rather than hopeful tweaking. Begin with diagnostic tooling to identify your specific bottleneck before applying any fixes.
Use this decision flow for efficient problem resolution. Test frametimes and thermals first to determine if cooling improvements help. Then check VRAM usage patterns to identify memory bottlenecks.
Evaluate background process impact through clean boot testing. Verify driver and power plan configurations last since these usually cause less frequent issues.
| Priority | Diagnostic Focus | Likely Fix | Expected Impact |
|---|---|---|---|
| 1 | Temperature monitoring | Improved cooling, repasting, fan curve adjustment | Eliminates thermal throttle stutter |
| 2 | VRAM utilization tracking | Lower texture quality, close background apps | Reduces texture streaming hitches |
| 3 | Background process audit | Disable overlays, optimize startup programs | Improves CPU availability for game thread |
| 4 | Driver version verification | Clean install, rollback if needed | Resolves GPU communication irregularities |
| 5 | Power plan configuration | Switch to High Performance, disable USB suspend | Enables sustained boost clock operation |
| 6 | RAM configuration check | Add matching stick for dual-channel | Reduces memory latency and improves pacing |
Implement changes incrementally, testing after each adjustment to isolate effective solutions. Document results to build personal troubleshooting knowledge for future performance issues. Most stutter problems resolve through cooling improvement and background process management before requiring hardware investment.
For readers interested in thin and lightweight gaming laptop options that balance portability with sustained performance, understanding these practices helps maximize whatever hardware configuration you ultimately choose.