How to install a cpu cooler in a gaming pc is mostly a visual alignment job, not a force job. You are matching a small metal contact plate to a fragile CPU, then securing it without bending the motherboard. Manufacturer specifications indicate that even a few degrees of tilt can raise idle temperatures.
As of 2026, most tower coolers still use spring screws and socket-specific brackets. The steps below focus on what your eyes should confirm before each screw turns.
The process looks simple on a box diagram, but the parts are small and the clearances are tight. A misread bracket notch or an unpeeled film can turn a quick upgrade into a bent pin repair. We will walk through the visual cues that matter, from socket inspection to final torque.
Why Installing a CPU Cooler Requires More Than Reading Instructions
A paper manual tells you the order of parts, not how those parts sit on your specific board. Real motherboards have tall memory modules, chunky VRM heatsinks, and tight case cutouts. A cooler can look seated while one corner is still lifted.
That is why visual checks matter more than muscle.
Before you start, confirm the cooler fits the case and board layout. If you are planning a compact build, review cooler height and case clearance before you buy. If you have not confirmed socket fit, check CPU and motherboard compatibility in minutes.
Those two checks prevent most physical surprises.
Identifying Your Socket and Bracket Layout at a Glance
Your socket type decides the bracket shape, standoff height, and screw pattern. Intel LGA 1700 and LGA 1851 boards usually need a backplate or supplied retention frame. AMD AM4 and AM5 boards often use the stock plastic retention arms or a supplied bracket set.
Look for arrows, triangles, or notch marks before you touch any hardware.
Do not assume two brackets that look similar are interchangeable. The screw holes may be close, but the pressure points will be wrong. Compare the bracket to the printed diagram on the cooler manual, then compare it to the board.
| Part | What to visually confirm |
|---|---|
| Backplate | Flat, centered, and not touching capacitors |
| Standoffs | Threaded fully and standing straight |
| Retention bracket | Notches or arrows face the documented direction |
| Spring screws | Springs move freely and are not tilted |
Pre-Install Visual Checklist: What to Inspect Before You Start
Start with the CPU socket. The pins should look straight and clean, with no bent rows or dust. If the board has a protective cover, remove it only when you are ready to install.
Keep the socket area well lit and use a phone light if needed.
Next, inspect the cooler contact plate. Many units ship with a clear film over the copper or nickel base. It can be nearly invisible under shop light.
Peel it slowly and check the surface from two angles. Then make sure the motherboard standoffs are in the correct holes for your board size.
- Look for dust on the CPU and contact plate.
- Confirm memory modules will not collide with the heatsink.
- Check fan cable reach before mounting.
- Ground yourself per ESD Association guidance.
A clean contact surface matters more than extra paste. If the base has old residue, clean it carefully and let it dry fully before applying new thermal compound.
Step-by-Step Installation with Visual Checkpoints
- Power down, unplug, and open the case.
- Inspect the socket and remove any protective cover.
- Install or verify the cooler backplate and standoffs.
- Mount the retention bracket in the documented orientation.
- Apply thermal paste or confirm the pre-applied strip is intact.
- Set the cooler straight down onto the CPU.
- Tighten screws in a diagonal pattern, a little at a time.
- Connect the fan to the CPU fan header.
- Check clearance around memory and GPU.
- Boot and watch temperatures at idle.
The key visual checkpoint is step six. The cooler should drop into place with almost no sideways movement. If it rocks, stop and reseat the bracket.
After the first gentle tightening pass, look for even gaps around the cold plate. The base should sit flat, not cocked like a seesaw.
After installation, compare your idle readings with safe CPU temperatures after install. A small drop from stock cooling is normal, but a large jump means contact pressure or paste coverage needs attention.
Thermal Paste Application: What Correct Coverage Looks Like
Thermal paste fills microscopic gaps between the CPU and cooler base. More paste does not mean better cooling. Excess paste can squeeze out and make a mess, while too little leaves dry patches.
If you are new to the process, read how thermal paste works before you open the tube.
For most desktop CPUs, a small pea-sized dot in the center is enough. The pressure from the cooler spreads it outward. A thin line may work on long rectangular dies, but it must still cover the main contact area.
The goal is a thin, even film, not a visible layer.
| Paste style | Visual target | Risk if wrong |
|---|---|---|
| Pre-applied strip | Full pad contact after mounting | Air gaps if film remains |
| Center dot | Round spread near the die edge | Dry corners if too small |
| Thin line | Even oval coverage | Excess squeeze-out if too much |
If you are refreshing an older build, follow replacement timing rather than guessing. Old paste can harden and lose contact, especially after years of heat cycles. Always clean both surfaces before reapplying.
When you finish, the surface should look smooth and lightly glossy, not chunky. If you see bare metal or thick ridges, remove and reapply. Good paste application is one of the few parts you can judge by sight alone.
Air vs. AIO Coolers: Visual Differences and Clearance Checks
Air coolers use a metal heatsink and one or more fans. AIO coolers use a pump head, tubing, and a separate radiator. The visual difference is where the heat goes.
Air coolers dump heat into the case air. AIOs move heat to a radiator mounted on a case wall.
Clearance is the real decision point. A tall tower cooler can block memory slots or touch the side panel. A 360mm radiator needs three fan mounts and enough room for tubing bends.
Measure before buying, especially in compact cases. case clearance measurements can help with those checks.
Who each is best for depends on space and preference. Air coolers are simple and have fewer leak points. AIO coolers help when the CPU area is crowded or you want a larger radiator.
Both can perform well when installed correctly.
| Cooler type | Visual footprint | Best fit |
|---|---|---|
| Air tower | Tall heatsink over CPU | Standard mid-tower |
| Top-flow air | Shorter, fan above fins | Low-profile cases |
| 240mm AIO | Pump head plus side radiator | Tight CPU zones |
| 360mm AIO | Large radiator and three fans | Roomy cases |
Common Visual Mistakes That Ruin CPU Cooler Installs
The most common mistake is leaving the protective film on the cold plate. It looks like part of the metal, especially under bright light. Peel it slowly and inspect both sides.
Another mistake is forcing a bracket that is rotated 180 degrees. The holes may line up, but the pressure points will be wrong.
Uneven screw tightening is another trap. If one corner is fully tight before the others, the cooler tilts and paste spreads unevenly. Tighten in small diagonal steps.
Watch the gap between the cooler base and CPU. It should close evenly.
Cable placement matters too. A fan wire touching a spinning blade can stop the fan or fray the wire. Route cables away from moving parts and secure them with zip ties.
If you are cleaning an older build, clean dust from cooling components before installing the new cooler.
Bent CPU pins are less common but serious. Always inspect the socket before mounting. Good lighting reveals a single bent pin that can stop a boot.
Ground yourself per ESD Association guidance.
Tightening Sequence and Contact Pressure: The Visual Cues
Tighten screws in a diagonal pattern. Start with finger-tight pressure, then add small turns in rotation. Each pass should be equal on all corners.
The visual cue is a shrinking, even gap around the base. If one side closes first, back off and restart.
Spring screws help prevent overtightening. You will feel resistance increase as the spring compresses. Stop when the screw head sits flush or the manufacturer specifies a limit.
Do not lean your body weight into the driver. That can flex the board and crack traces.
A proper mount leaves the cooler level and stable. It should not rock when you press gently at the corners. The fan should spin freely without hitting the heatsink.
If the board bows, loosen and reseat the backplate.
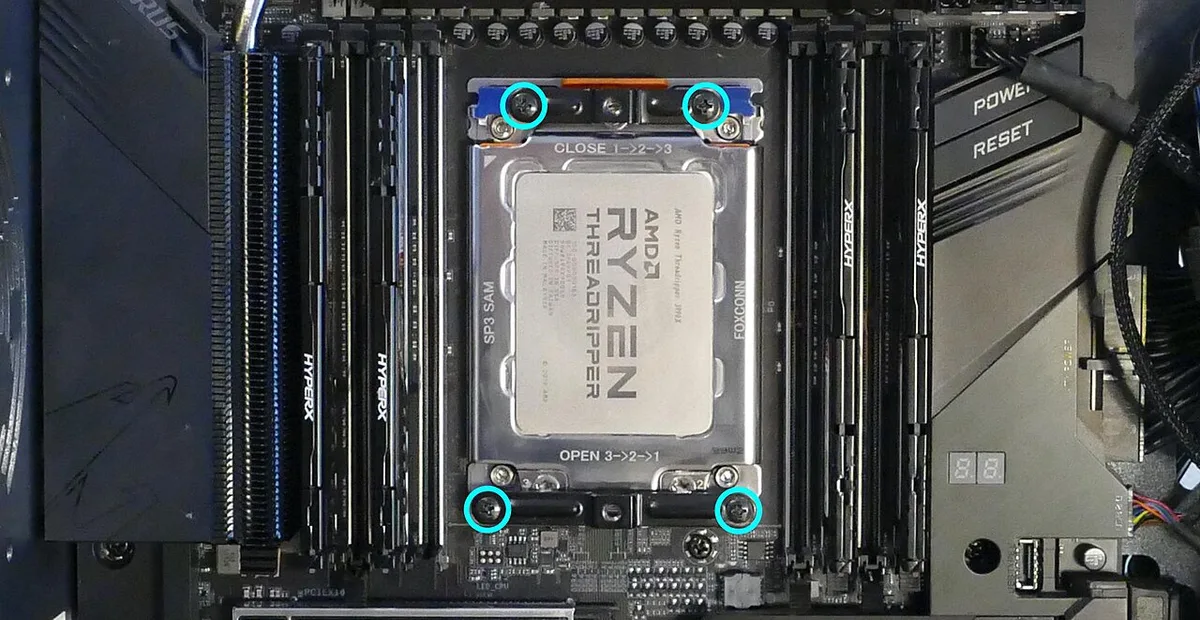
Image source: Wikimedia Commons / System76 (CC BY-SA)
Post-Install Verification and Temperature Monitoring
Boot into BIOS first and check CPU temperature. A stable idle reading is a good sign, but one reading is not enough. Let the system sit at idle for a few minutes and watch for swings.
Large jumps can indicate loose mounting or poor paste contact.
After booting into the operating system, monitor temperatures under light load. Compare them with safe CPU temperature limits. If idle temps are much higher than expected, power down and recheck contact pressure.
Do not run stress tests until the mount looks right.
Listen for new noises too. A ticking sound may mean a cable is touching a fan. A rattling sound may mean a fan screw is loose.
Fix those before closing the case. Good airflow also helps, so check case pressure after the install.
Frequently Asked Questions
Should I use thermal paste if the cooler has pre-applied paste?
Yes. Pre-applied paste is ready to use, so do not add more. Adding extra paste can cause squeeze-out and messy contact.
Only clean and reapply if the pad is damaged or old.
How tight should CPU cooler screws be?
Tighten until the spring compresses and the screw head is flush. Use small diagonal turns and stop before the motherboard flexes. If the board bends, back off and reseat the bracket.
Can a CPU cooler block RAM slots?
Yes. Tall tower coolers can cover memory slots or collide with tall heat spreaders. Check cooler height and RAM clearance before installation.
If needed, install memory first and test fit the cooler.
What temperature should I expect after installing a new cooler?
Idle temperatures often land in the low to mid range for your CPU. Load temperatures depend on the cooler, case airflow, and paste. Compare results with safe gaming temperature guidance and watch for thermal throttling signs.
Do I need to remove the motherboard to install a cooler?
Sometimes. Some boards need a backplate behind the socket. If your case has a CPU cutout, you may install it in place.
If not, remove the board to avoid damage.
How often should thermal paste be replaced?
Replace paste when temperatures rise or during a cooler swap. Old paste can harden and lose contact. Follow thermal paste replacement timing rather than guessing.