How to check psu compatibility with a gaming pc comes down to four things: power draw, form factor, connectors, and headroom. Miss one, and a build may fail to boot or stress key parts. We'll walk through each check in order.
Manufacturer specs and aggregate reviews show most issues come from missing cables or overstated wattage. As of 2026, newer GPUs and ATX 3.1 supplies make connector checks even more important. Let's start with the basics.
how to check psu compatibility with a gaming pc
Check total power draw first. Match the PSU form factor to the case. Verify every required connector.
Add 20 to 30 percent power headroom. Confirm ATX 3.0 or 3.1 support if needed. That is the full check.
What Makes a PSU Compatible With a Gaming PC
A compatible power supply unit (PSU) is not just strong enough. It must fit the case, connect to every component, and deliver clean power under load. A 750-watt unit with the wrong cables is still a bad match.
The same goes for a compact small form factor build using a full-size ATX PSU.
Think of compatibility as four gates. Power, size, connectors, and platform support. You pass all four, or the build is not ready.
If you're also checking CPU and motherboard fit, do it in the same planning pass.
Calculate Your GPU, CPU, and Total System Power
Start with the parts that draw the most power. The graphics card and processor matter most. Storage, fans, and memory add smaller amounts, but they still count.
Use this simple method:
- GPU rated power from the manufacturer
- CPU TDP or rated power
- 10 to 20 watts for each SSD or hard drive
- 3 to 5 watts for each case fan
- 20 to 40 watts for motherboard and memory
Add those numbers, then add headroom. A build with a 250-watt GPU, 125-watt CPU, and 60 watts of extras totals 435 watts. That does not mean a 450-watt PSU is ideal.
It means you need more room for spikes and aging.
Manufacturer recommendations are a good starting point. They are not a full system calculation. A new GPU can also change GPU and motherboard fit if you are upgrading at the same time.
Match PSU Form Factor and Case Clearance
The PSU must physically fit. ATX is the common standard for mid-tower and full-tower cases. SFX and SFX-L are smaller and common in compact builds.
Check the case manual before buying anything.
Watch these details:
- Maximum PSU length
- Mounting orientation
- Fan intake direction
- Cable routing space
- Shroud or cover clearance
A long PSU can block drive cages or press against cables. A short PSU in a large case may need an adapter bracket. Neither is automatically wrong.
It just has to be planned.
Good airflow helps here too. If you need to plan airflow around a tight PSU shroud, do it before cable routing.
Verify Connectors, Modular Cables, and Adapters
This is where many builds fail. Wattage means nothing if the cable is missing. Count connectors before you buy, not after.
Check for:
- 24-pin motherboard power
- 4+4-pin or 8-pin CPU EPS power
- 6+2-pin or 8-pin PCIe GPU power
- 12VHPWR or 12V-2×6 for newer GPUs
- SATA power for drives
- Molex only if legacy parts need it
Modular PSUs use detachable cables. Semi-modular units fix the main cables and detach the rest. Non-modular units have all cables attached.
Modular designs make cable management easier, but only if you use the cables that came with that exact PSU.
Never mix modular cables between brands. A cable can fit but wire differently. That can damage hardware.
Adapter cables also need care. A 12VHPWR adapter should be fully seated and not bent sharply near the plug.
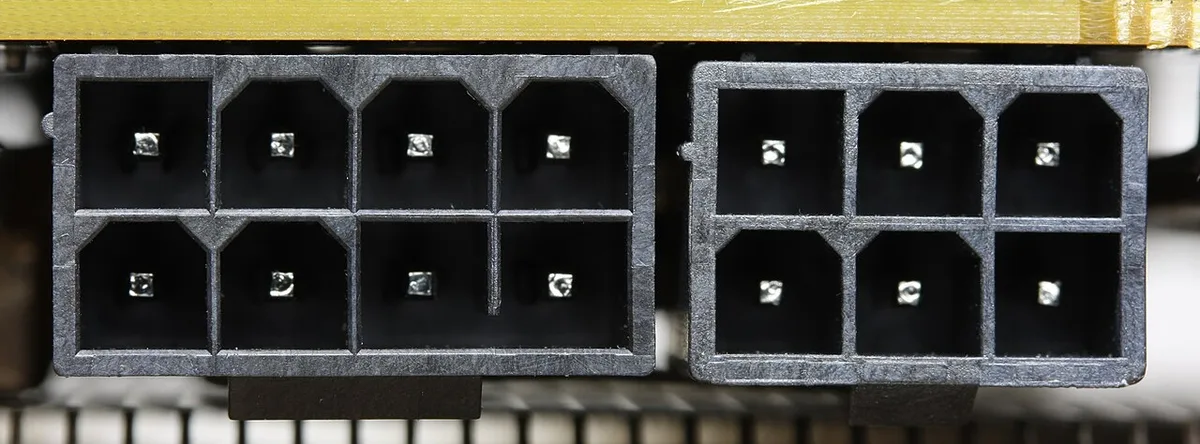
Image source: Wikimedia Commons / D-Kuru (CC BY-SA)
For newer GPUs, native 12VHPWR or 12V-2×6 cables are usually safer than adapters. If your PSU only has adapters, check the GPU maker's guidance. PCI-SIG defines the PCIe power connector standards, so it is worth checking their official guidance when you are unsure.
Native 12VHPWR and 12V-2×6 Cable Checks
Native cables reduce adapter points. Fewer adapters means fewer failure points. Still, seating matters.
Push until the latch clicks and avoid tight bends.
Check these points:
- Cable is native to the PSU model
- Connector clicks into place
- No sharp bend at the plug
- Adapter is rated for the GPU
- Cable length reaches the GPU cleanly
If a cable feels forced, stop. Reseat it and check orientation. Dust can also hide seating issues, so clean cooling parts around the GPU and PSU area before final assembly.
Choose the Right Wattage and Power Headroom
Do not buy the minimum. GPU power can spike above its rated number for short bursts. A PSU running near its limit also runs hotter and louder.
Use this table as a planning guide:
| Total System Draw | Suggested PSU Wattage | Notes |
|---|---|---|
| 300W to 350W | 500W to 550W | Budget or older gaming PCs |
| 400W to 500W | 650W | Common mid-range builds |
| 500W to 650W | 750W | High-end GPU systems |
| 650W to 800W | 850W to 1000W | Enthusiast or creator rigs |
Aim for 20 to 30 percent headroom. That gives room for spikes, upgrades, and normal aging. It also keeps the fan quieter in many cases.
If temps climb after a build, unsafe temps can reveal power or cooling stress.
Understand ATX 3.0, ATX 3.1, and PCIe 5.0 Requirements
Why does the spec version matter? It dictates native support for modern high-draw GPUs. Older ATX 2.x units lack defined transient response standards for new hardware.
They rely on adapters that can introduce instability or heat issues.
ATX 3.0 introduced stricter rules for power excursions. These are sudden spikes in GPU demand lasting milliseconds. A compliant PSU handles these without tripping protections.
ATX 3.1 refined this further with clearer labeling for peak loads.
If you’re building a system with an RTX 40-series or newer card, look for “ATX 3.0 Ready” or “ATX 3.1 Compliant.” This ensures the unit has passed rigorous testing for those specific spike profiles. It’s not just marketing; it’s a safety baseline.
Checking for Compliance Labels
Look at the box or the sticker on the unit itself. Manufacturers often print the spec version near the efficiency rating. If it says “ATX 12V v2.5,” it predates the strict transient requirements of 3.0.
You’ll likely need adapters for modern cards.
PCIe 5.0 compatibility is tied to the connector type. The 12V-2×6 cable replaces the earlier 12VHPWR design. It looks similar but has mechanical improvements for safer seating.
Ensure your PSU supports this if your motherboard or GPU requires it.
Older PSUs won’t break if used with new parts via adapters. But they miss out on built-in stability features. For peace of mind, especially with expensive components, stick to current-spec units.
Our research shows mixed results when pairing old supplies with new-gen silicon under heavy load.
Compare Efficiency, Build Quality, and Protections
Efficiency affects both your electricity bill and internal heat. Higher ratings mean less wasted energy turning into warmth inside the case. This reduces strain on other cooling components.
The 80 Plus certification program sets minimum thresholds. Bronze starts at 85% efficiency at typical loads. Gold hits 90%.
Platinum and Titanium push higher. Don’t chase Titanium unless you have very specific needs. Gold offers the best balance for most gamers.
Build quality goes beyond the label. Look for Japanese capacitors in the primary stage. These handle heat better than cheaper alternatives.
Also, check the fan bearing type. Fluid dynamic bearings last longer than sleeve bearings.
Protections are critical for component survival. A good PSU includes:
- Over-voltage protection (OVP)
- Under-voltage protection (UVP)
- Over-current protection (OCP)
- Short-circuit protection (SCP)
- Over-power protection (OPP)
Without these, a fault could fry your motherboard or drives. Reputable brands list these explicitly. Avoid unbranded or suspiciously cheap units.
They often skip essential circuitry to cut costs.
Consider reducing gaming PC temps by choosing efficient supplies. Less waste heat means cooler overall system operation. This indirectly boosts performance stability during long sessions.
Avoid Common PSU Compatibility Mistakes
What trips up even experienced builders? Assuming wattage equals compatibility. It doesn’t.
Connector count matters more than raw power numbers.
Another frequent error is mixing modular cables. Just because plugs fit doesn’t mean wiring matches. Pinouts vary between manufacturers.
Using wrong cables sends incorrect voltages to sensitive parts. This causes immediate damage or intermittent failures. Always use only the cables included with your specific PSU model.
Ignoring physical clearance leads to frustration later. Measure twice before buying. Some compact cases have limited depth for ATX units.
Others block access to latches if cables are routed poorly. Check reviews for installation tips on your specific case model.
Overlooking transient spikes is risky too. Marketing wattage is continuous average power. GPUs can draw double that briefly.
An undersized supply may shut down unexpectedly during intense scenes. Stick to the recommended headroom guidelines mentioned earlier.
Finally, don’t ignore dust buildup. Clogged filters restrict airflow over the PSU fan. This raises internal temperatures and degrades lifespan.
Regular cleaning helps maintain consistent performance. See our guide on keeping cooling components clean for safe methods.
FAQs
Can I reuse my old PSU for a new gaming build?
Only if it meets current connector and wattage demands. Check for missing 12VHPWR support or insufficient rails. Old units often degrade internally.
Capacitors lose capacitance over time. Risking expensive new components isn’t worth saving $50. Verify age and condition first.
Do I need a modular PSU for better airflow?
Not strictly. Modular designs reduce clutter, improving visibility and air paths. Non-modular units force excess cables into bundles.
These can obstruct fans or shrouds. However, proper routing solves this in non-modular setups. Choose based on ease of assembly preference.
How much headroom should I leave for future upgrades?
Plan for 20 to 30 percent above calculated peak draw. This covers minor GPU swaps or added storage. It also accounts for aging efficiency loss.
Too little headroom stresses the unit. Too much wastes money. Find the sweet spot for your budget.
Are SFX PSUs less reliable than ATX ones?
No, provided they’re from reputable brands. SFX units face tighter thermal constraints due to size. High-quality models manage heat well.
Cheaper variants may struggle under sustained load. Stick to known manufacturers with good warranties. Size doesn’t dictate reliability alone.
What happens if I connect a 12VHPWR adapter incorrectly?
Poor seating increases resistance at contact points. This generates localized heat. Extreme cases lead to melted connectors or fire hazards.
Always ensure the latch clicks fully. Avoid sharp bends near the plug. Inspect visually after installation.
Final PSU Compatibility Decision Guide
Start by listing your core components. Note their power draws and connector types. Calculate total expected consumption.
Add 20 to 30 percent buffer. Select a PSU meeting that wattage tier.
Next, verify form factor fits your case. Check length limits and mounting brackets. Confirm connector availability matches your needs.
Prioritize native 12VHPWR/12V-2×6 support for modern GPUs. If unavailable, assess adapter risks carefully.
Review efficiency ratings and protections. Aim for 80 Plus Gold minimum. Ensure full suite of electrical safeguards.
Read recent user feedback for hidden flaws. Avoid no-name brands entirely.
Double-check cable modularity preferences. Decide if detachable wires aid your build style. Remember never to mix brands’ cables.
Finally, consider warranty terms. Longer coverage indicates confidence in durability.
This systematic approach minimizes guesswork. It prevents costly errors during assembly. By following these steps, you secure stable power delivery.
Your gaming rig runs smoother and lasts longer. Trust the process, not just the price tag.
2 thoughts on “How to Check PSU Compatibility With a Gaming PC”
Comments are closed.