What is the correct order for assembling a gaming pc? Most builders prepare the motherboard outside the case first, then mount it, then add power, storage, and the graphics card. That order keeps small parts visible and reduces bent pins or loose cables.
It also makes the first boot easier to troubleshoot.
Manufacturer specs indicate that ATX motherboards use a standard I/O shield and standoff layout, so check the manual before tightening anything. A typical mid-tower build takes 1 to 3 hours. Now let's walk through the visual cues that make each step clearer.
Why Visual Cues Beat Text Instructions in PC Assembly
Text can tell you to seat RAM fully. A photo shows the latch position and the click sound. That gap causes many first-build mistakes.
Use diagrams for orientation and text for order.
- CPU: the triangle marker aligns with the socket marker.
- RAM: the notch position and latch direction matter.
- M.2: the standoff hole and label direction matter.
- Motherboard: the standoff map and I/O shield lip matter.
| Step | What to look for | Common visual mistake |
|---|---|---|
| CPU | Triangle and socket arrow | Forcing wrong orientation |
| RAM | Notch and latch | One side not clicked |
| M.2 | Standoff and notch | Drive tilted or wrong hole |
| Board | Standoff map | Extra or missing standoff |
The Pre-Flight Check: Compatibility and Workspace Setup
Before opening boxes, verify parts fit. Check CPU and motherboard compatibility and PSU compatibility. Also confirm RAM support before you buy memory.
Per NIST ESD guidance, ground yourself before handling parts.
| Tool | Why it matters |
|---|---|
| Phillips screwdriver | Most case and board screws |
| Zip ties | Clean cable routing |
| Thermal paste | Only if cooler lacks pre-applied paste |
| Flashlight | Standoffs and small headers |
Work on a large table. Remove rings and bracelets. Keep screws sorted by size.
Stage 1: Motherboard Prep Outside the Case (CPU, RAM, M.2)
Install the CPU first, then RAM, then the M.2 drive. This keeps pressure off the board and gives your hands room. Use the QVL memory list to confirm memory kits.
Check NVMe support before installing a fast SSD.
- CPU: lift the retention arm, align the triangle, lower the arm gently.
- RAM: open both latches, align the notch, press until both clicks.
- M.2: insert at an angle, lower onto the standoff, secure the screw.
- Cooler: mount after paste if the cooler needs manual application.
Do not overtighten the CPU cooler. Tighten in a cross pattern and stop when snug.
Stage 2: Case Preparation and Standoff Verification
Prepare the case before the motherboard goes in. Remove both side panels. Install case fans with airflow pointing the right way.
Verify standoffs match the board holes exactly.
| Check | Pass sign |
|---|---|
| Standoffs | One per board hole, none extra |
| Fan direction | Arrows match intake or exhaust |
| Cable holes | Reach PSU and front headers |
| Sharp edges | No loose metal near board |
An extra standoff under the board can short it. A missing standoff can flex the board. Both are easy to catch with a flashlight.
Stage 3: Mounting the Motherboard and I/O Shield
Install the I/O shield first. Press each corner until it snaps. Then lower the board onto the standoffs and align the ports with the shield.
Start screws by hand, then tighten in a cross pattern.
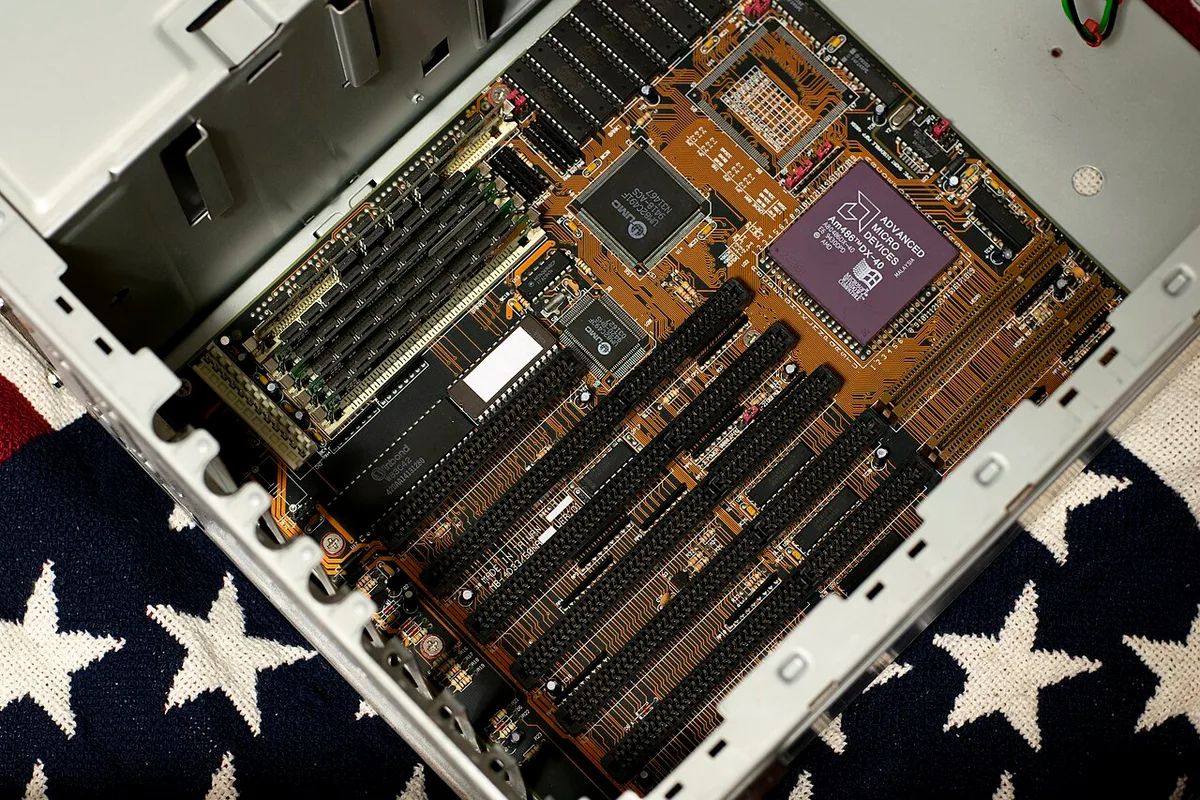
Image source: Wikimedia Commons / Nicolasfoster
Check BIOS version effects before first boot. Confirm GPU and motherboard compatibility before installing the card. Do not force the board into place.
If a screw resists, back it out and realign.
Stage 4: Installing the GPU and Power Supply Unit
Install the PSU before the GPU if cables are tight. Place it fan-down or fan-up based on the case bottom vent. Route the main cables through the rear before mounting.
Then install the GPU last among the big parts.
- PSU: align screw holes, tighten four screws, and set the switch off.
- Modular cables: connect 24-pin, CPU EPS, PCIe, and SATA before closing.
- GPU: remove slot covers, insert into the top PCIe x16 slot, and press until the latch clicks.
- Support: use a bracket or stand if the card sags.
| Component | Visual cue | Risk if wrong |
|---|---|---|
| PSU | Fan faces vent | Heat buildup |
| GPU | Latch clicks | Loose contact |
| PCIe cable | 6 or 8 pin fully seated | Boot failure |
| Slot covers | Removed before install | Blocked ports |
Modular units let you use only needed cables. Non-modular units need extra routing space. Check the PSU label for wattage and efficiency rating.
Match the CPU power connector, often 8-pin EPS. Some boards need two. If the GPU uses two 8-pin connectors, use separate cables when possible.
Daisy-chained cables can work, but separate cables reduce load on one wire.
Check PCIe compatibility issues before choosing a slot. Confirm GPU and motherboard compatibility for length and power. Do not force the card.
If resistance is high, check the latch and slot covers.
Stage 5: Cable Routing and Front Panel Connections
Route cables after major parts are in. Start with the 24-pin motherboard power. Then CPU EPS, GPU power, and storage cables.
Keep cables behind the motherboard tray when possible.
- 24-pin: click fully on both ends.
- CPU EPS: route through the top cutout.
- GPU power: avoid sharp bends near the connector.
- SATA: connect data and power after drive mounting.
- Front panel: use the manual pinout diagram.
Front panel headers are small and easy to reverse. Power switch and reset are usually unpolarized. LED pins are polarized.
If an LED does not light, flip that connector only.
| Cable | Typical location | Check |
|---|---|---|
| 24-pin | Right motherboard edge | Full click |
| CPU EPS | Top left | No strain |
| PCIe | GPU top | Latch engaged |
| Front panel | Bottom right | Manual pinout |
Use neutral air pressure to plan fan direction. Clean routing helps reduce temperatures without extra fans. Tie cables where they cannot touch blades.
Critical Visual Mistakes That Kill Your First Boot
Most no-boot problems are visible. Check the CPU cooler backplate, RAM latch, GPU latch, and power cables. A half-seated RAM stick is a common cause.
A missing CPU power cable is another.
- Bent CPU pins from wrong orientation.
- RAM not fully clicked into both latches.
- GPU sitting above the slot, not in it.
- 24-pin or CPU EPS not fully seated.
- Front panel power switch on wrong pins.
- M.2 screw missing or drive tilted.
- Extra standoff under motherboard.
| Symptom | Likely visual cause |
|---|---|
| No lights | PSU switch or wall power |
| Fans spin, no display | GPU power or seating |
| Beeps or code | RAM seating |
| Instant shutdown | Short or wrong standoff |
Check safe CPU temperature if it shuts down quickly. Review thermal throttling causes if it boots but runs hot. Do not keep retrying a shorted board.
Post-Assembly Validation: BIOS, Drivers, and Stress Testing
Power on after checking cables. Enter BIOS and confirm CPU, RAM, and storage appear. Load XMP or EXPO if supported and stable.
Then install the OS and chipset, GPU, and network drivers.
- First boot: watch for POST screen.
- BIOS: check temperatures and fan speeds.
- Storage: confirm boot drive is detected.
- Memory: enable profile only after stable boot.
- Drivers: install motherboard chipset first.
- Stress test: run CPU and GPU loads separately first.
| Check | Target |
|---|---|
| CPU temp idle | Below 50 C |
| GPU temp idle | Below 50 C |
| Fan speed | Stable, no rattling |
| Boot drive | Correct size and model |
Monitor safe GPU temperature during load. Keep dust cleaning routine in mind for long-term temps. Stop testing if temperatures spike or fans fail.
Frequently Asked Questions About Gaming PC Build Order
What is the correct order for assembling a gaming pc?
Build the motherboard outside the case first with CPU, RAM, and M.2. Then prepare the case and install the board. Add PSU, GPU, storage, and cables last.
This order keeps parts visible and makes troubleshooting easier.
Should I install the CPU cooler before or after mounting the motherboard?
Install it outside the case when possible. It gives better access and reduces pressure on the board. Large air coolers may need motherboard support.
Check CPU cooler and case clearance first.
When should I install the graphics card?
Install it after the motherboard and PSU are mounted. This prevents bending the slot during other work. Connect power cables before closing the case.
Check PCIe compatibility issues if the card is not detected.
Do I need thermal paste for every build?
No, many coolers include pre-applied paste. Add paste only if the cooler base is bare. Use a small pea-sized amount.
Too much paste can spill and cause mess. See thermal paste explained.
What should I check before first boot?
Check CPU power, 24-pin power, RAM seating, GPU seating, and front panel pins. Verify no extra standoffs touch the board. Confirm monitor cable is in GPU, not motherboard.
Keep the case open for the first power-on.
How long does a first gaming PC build take?
Most first builds take 1 to 3 hours. Cable routing and BIOS checks add time. Rushing increases mistakes.
Plan extra time for driver updates and stress testing.